Userfields
From Business Process Management, BPM and Workflow Automation Wiki | BizAgi BPMS
<keywords content="keywords"> userfield, user fields, using user fields, customize fields, customization, forms custom, form customize, personalization of fields, personal attributes </keywords>
|
Alert: User fields are deprecated and this concept applies only for 9.1.x projects. Including customized controls with JQuery, CSS 3 and HTML 5 technology is offered through Bizagi Widgets in Bizagi GO. |
Contents |
User Fields
Overview
Creating user fields is a possibility provided by Bizagi that allows the inclusion of custom HTML controls for processes forms.
These fields are often used for technical and sophisticated renders which are not by default in Bizagi's comprehensive set of fields.
Creating User Fields
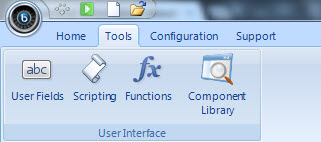
1. In the standard Bizagi Studio menu, click on the Tools Options tab and click on the User Fields option.
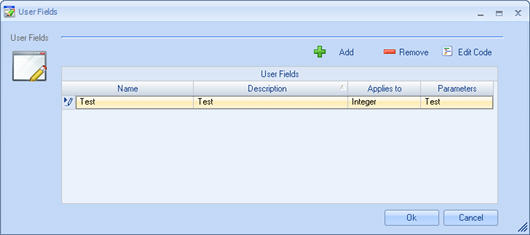
2. The window User Field is displayed; here, the properties such as the description, the related data types, and the code can be defined.
|
Name: User field name. Description: Explanation about what the user field does. Applies to: Correspond to types of data for which you want to apply a User Field render type, so it can be shown in the renders with this type of attribute. Example: If it is selected that applies to Integer Numbers, when editing or creating forms where there are renders with attributes of integer type, the User Field may be selected. That is, depending on the type of data selected in this window the User Field could be seen in the forms. Parameters: The parameters for the new user field can be configured in this window; the values for these attributes in the form edition window can be defined whenever the user field is used in a different form. Several parameters can be configured for each user field. Edit code: The Edit button allows the definition of the user field code. A discussion and samples about the code written in the edition button of the user fields is presented later. |
Applies to
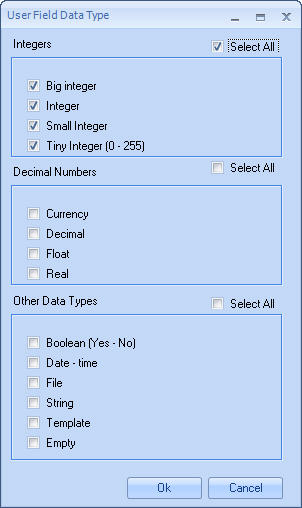
In this window, the available data types for the user field should be selected. The data types have been divided in categories. All the data types are activated or deactivated when all the data types that belong to a group are selected. If it is not necessary that the user field corresponds to an attribute within the form (would not have a Data Binding) clear all options in this window.
|
Example: If the user field applies to the type of field "Integer", when editing or creating forms, the user field will be displayed in the type of render column for this type of attributes. |
Parameters
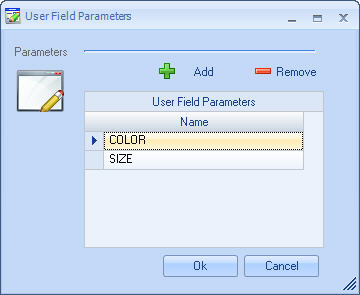
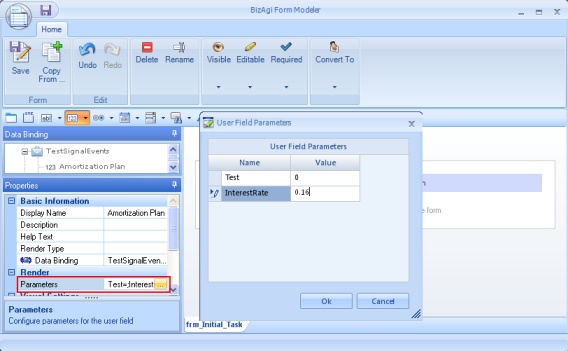
Parameters can be defined for each user field. These parameters will be used within the code of the user field, and will be filled by renders that uses them. When clicking the Parameters cell of user field the following window is displayed:
In this window parameters can be added, erased and modified. For this version of Bizagi, a parameter is composed by a single name. In the example two parameters were created: the first is the color of the text and the second, the size of the same one.
User Field's Code
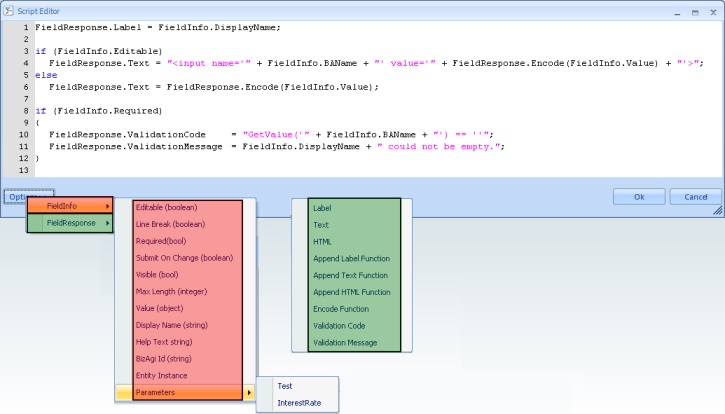
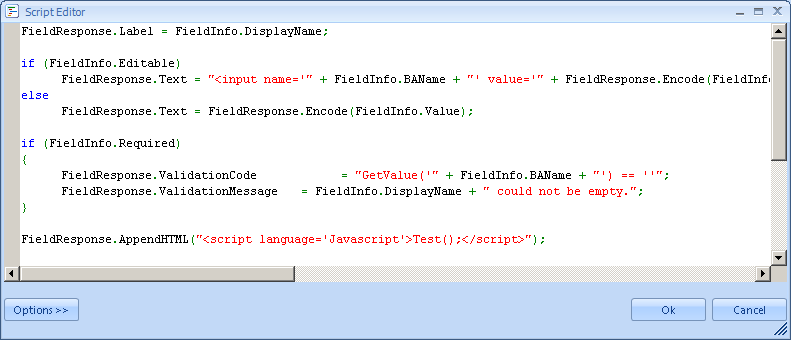
When creating a new user field, a default basic code is created automatically in order to illustrate how this works.
FieldResponse.Label = FieldInfo.DisplayName;

if (FieldInfo.Editable)
	FieldResponse.Text = "<input name='" + FieldInfo.BAName + "' value='" + FieldResponse.Encode(FieldInfo.Value) + "'>";
else
	FieldResponse.Text = FieldResponse.Encode(FieldInfo.Value);

if (FieldInfo.Required)
{
	FieldResponse.ValidationCode 		= "GetValue('" + FieldInfo.BAName + "') == ''";
	FieldResponse.ValidationMessage 	= FieldInfo.DisplayName + " could not be empty.";
}
In this code, two variables are used:
<span id="scripteditor" />
FieldInfo: it contains the information about the render properties. For instance, if the render is editable, visible or required. Other properties available in Bizagi Studio can be included.
FieldResponse: it contains the code information in order to display (draw) the field.
The properties for both variables are available in the button "Options" in the left inferior part of the window.
FieldInfo
As mentioned before, the property FieldInfo contains the information that will be used to draw the control. A user field can be created through two ways:
1. The FieldResponse.Label and FieldResponse.Text properties can be configured if the user field contains a description and a control, which is common in the majority of controls of Bizagi.
FieldResponse.Label = "Description";

FieldResponse.Text = "<Input name='value' value='5'>
Label is a text will be printed as a text. Text must contain a HTML code that to draw the control.
2. If no label is required, the properties Label and Text should not be configured. The property FieldResponse.HTML, which contains all the HTML code to draw the control, should be configured instead.
FieldResponse.HTML = "<input name='value' value='500'><input name='value2' value='500'>"
FieldResponse
Field response contains also helping methods that make the programming of user fields easier:
![]() Encode Function: Returns a string codified for HTML.
Encode Function: Returns a string codified for HTML.
![]() AppendLabel Function: Instead of defining all the label at the same time, this function can be used to add text to the variable label continuously.
AppendLabel Function: Instead of defining all the label at the same time, this function can be used to add text to the variable label continuously.
![]() AppendText Function: Instead of defining all the text at the same time this function can be used to add text to the variable text continuously.
AppendText Function: Instead of defining all the text at the same time this function can be used to add text to the variable text continuously.
![]() AppendHTML Function: The same for the variable HTML. These functions are useful when used inside iterations, instead of additions to variables string that are very slow.
AppendHTML Function: The same for the variable HTML. These functions are useful when used inside iterations, instead of additions to variables string that are very slow.
Validations
The user fields offer a basic way to do validations. Two variables are used for that:
FieldResponse.ValidationCode, which contains the JavaScript of the validation. This function has to return True or False. If the code of the validation returns True it means that the user field does not meet the correspondent validation and the message specified in the variable FieldResponse.ValidationMessage will appear.
The function Me.Context.getXPath can be used when a user field requires information on other fields.
|
Example: Me.Context.getXPath("Name") and Me.Context.getXPath("LastName") can be used if the user field is found within a form in the Client entity. |
Including User Fields in forms
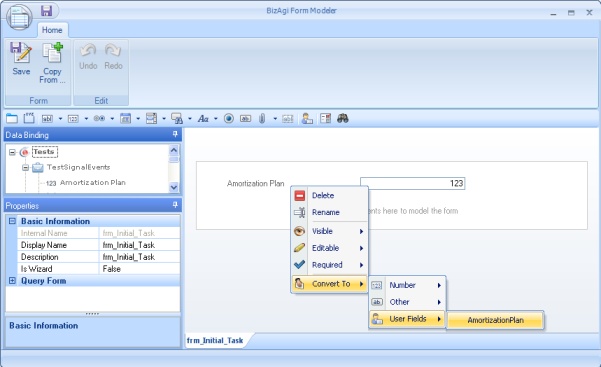
A user field can be used on the form after its creation on the screen indicated. If the render would be associated with an attribute in the data model, first include this attribute in the form, then right click on the render and from the selection menu go to Convert To - User Fields - [name_of_the_created_user_field]. The user field will only be displayed for the related data types, specifically, those configured for the user field on the previous screen (Applies to). User fields can also be used on query forms.
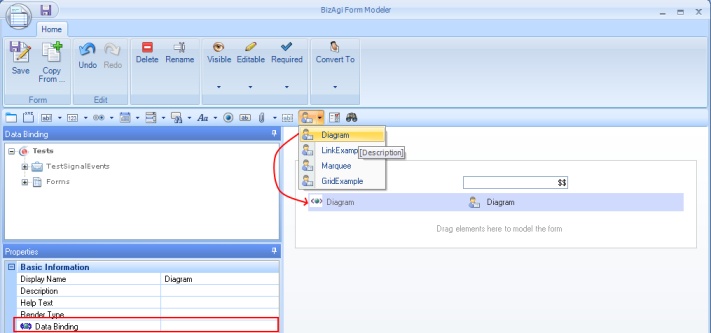
Another option is to drag the render from the Render Menu to the form and then select the corresponding Data Binding for it. The Data Binding is not required if nothing was selected in the Applies To window.
Use of Parameters in Forms
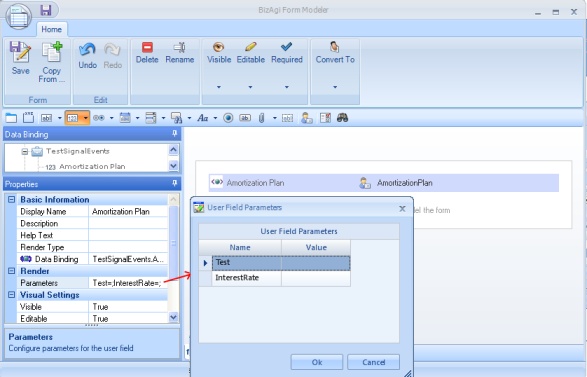
When you select a user field for a render in a form, and parameters have been configured for it within the Properties of the form where the user fields is, under the group Render there is the Parameters property to enter the values for each parameter that has been configured. Click on the property so the User Field Parameters window opens up and the parameters values may be set.
Default path
A user field default path is:
C:\BizAgi\[Bizagi_edition]\Projects\[your_project]\WebApplication\App\ListaDetalle\
This means that if you use and reference a physical file on your user field (for example for an image), you may need to consider this starting path for your source (especially when using a relative path).
Consider too that physical files referenced in a user field should be in a path that is network-accessible (such as a shared folder, or the web application's folder).
Execution in the work portal
When the web application displays a render with type user field, it will invoke its code and it will use the attributes of the variable FieldResponse to draw it.
User Field Examples
The following are some examples for the creation of user fields. The Bizagi application used is a simple application to create an amortization plan whose main attributes are: Amount, Payment and Rate. These attributes will be used to display the different types of user fields.
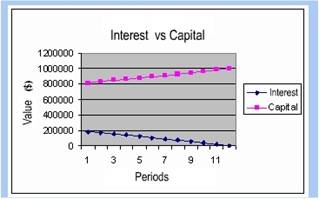
Displaying an Image
The following example shows the code to make a user field that displays an image. When you click on the image, a javascript function is called on.
FieldResponse.AppendHTML("<img onclick = 'Test();' alt='Interest Vs Capital' ");
FieldResponse.AppendHTML("src = '"+FieldInfo.Parameters["Source"]+"' />");
Creation of a Link
The following user field displays a Link. It is important to point out that no variables are used to hold the HTML in memory, it is returned directly.
FieldResponse.Text = "<a href='http://www.Bizagi.com'>" + FieldInfo.DisplayName + "</a>";
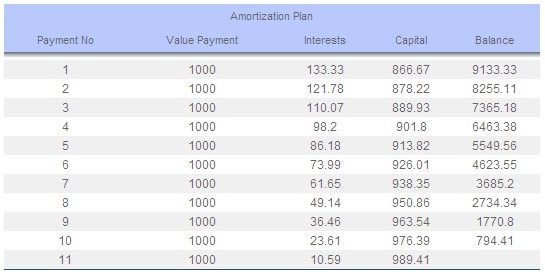
Amortization Plan
The following example shows a user field that displays a simple amortization plan based on the Amount, Payment and Rate. No validations are made. Instead, a table is displayed with the information that is calculated. Rate is a parameter of the user field; Amount and Payment are attributes in the Process Entity.
FieldResponse.AppendHTML("<table border='0' cellspacing='0' cellpadding='0' align='center' width='60%'>");
FieldResponse.AppendHTML("<tr><td colspan='5' class='ListHeaderLinks'>");
FieldResponse.AppendHTML(FieldInfo.DisplayName + "</td></tr>");
FieldResponse.AppendHTML("<tr class='ListHeaderLinks'>");
FieldResponse.AppendHTML("<td>Payment No</td>");
FieldResponse.AppendHTML("<td>Value Payment</td>");
FieldResponse.AppendHTML("<td>Interests</td>");
FieldResponse.AppendHTML("<td>Capital</td>");
FieldResponse.AppendHTML("<td>Balance</td>");
FieldResponse.AppendHTML("</tr>");
FieldResponse.AppendHTML("<tr style='height:8px;'><td colspan='5' class='gridline1 TDShadow' style='background-image: url(../../img/WorkPortal/CellShadow.gif);'></td></tr>");

if(FieldInfo.Parameters["Rate"] != DBNull.Value)
{
	var iMonthlyRate = (FieldInfo.Parameters["Rate"]/100) /12;
	var iPayment = 1;
	var iBalance = <Amount>;
	var temp = iPayment;

	while(iBalance <= 0 || iPayment < 40)
	{
		if(temp == 1)
		{
			FieldResponse.AppendHTML("<tr class='gridline2'>");
			temp = 0;
		}
		else
		{
			FieldResponse.AppendHTML("<tr class='gridline1'>");
			temp = 1;
		}
		FieldResponse.AppendHTML("<td>" + iPayment + "</td>");
		FieldResponse.AppendHTML("<td>" + <Payment> + "</td>");
		var iInterest = iBalance * iMonthlyRate;
		FieldResponse.AppendHTML("<td>" + iInterest.ToString("##.##") + "</td>");
		var iCapital = <Payment> - iInterest;
		FieldResponse.AppendHTML("<td>" + iCapital.ToString("##.##") + "</td>");
		iBalance = iBalance - iCapital;

		if(iBalance < 0)
		{
			FieldResponse.AppendHTML("<td> </td>");
			FieldResponse.AppendHTML("</tr>");
			break;
		}
		FieldResponse.AppendHTML("<td>" + iBalance.ToString("##.##") + "</td>");
		FieldResponse.AppendHTML("</tr>");
		iPayment++;
	}
	FieldResponse.AppendHTML("<tr><td colspan='5' class='gridline1 TDSumary'><table class='SummaryTable' cellpadding='0' cellspacing='0'><tr></tr></table></td></tr>");
}

FieldResponse.AppendHTML("</table>");
|
Alert: The example above uses the .ToString() method which is native for .Net environmets. This means that this will work for Bizagi processes using IIS. For Bizagi processes using a JEE Application Server (worked in Bizagi Enterprise JEE edition), you will need to use "toString()" and others methods for formatting such as "substring()" and "indexOf()". |
Password
The following example shows the code to make a user field that displays a password. The properties of visibility and required field are considered in the definition of this user field.
//Starts Code
FieldResponse.Label = FieldInfo.DisplayName;
if (FieldInfo.Editable)
 FieldResponse.Text = "<input type='password' name='" + FieldInfo.BAName + "' value='" + FieldResponse.Encode(FieldInfo.Value) + "'>";
else
 FieldResponse.Text = "<input type='password' readonly='readonly' name='" + FieldInfo.BAName + "' value='" + FieldResponse.Encode(FieldInfo.Value) + "'>";
if (FieldInfo.Required)
{
 FieldResponse.ValidationCode   = "GetValue('" + FieldInfo.BAName + "') == ''";
 FieldResponse.ValidationMessage  = FieldInfo.DisplayName + " could not be empty.";
}
//Ends Code
In the user portal, the password render will look as follows.
Marquee
As an example, the following user field presents the economic indicators in a marquee.
var marqueewidth = 135; // height
var marqueeheight = 47; // speed
var speed = 1; // content

var marqueecontents = "<font color = 'red'>TRM=$2,329.79 EURO=$3,121.28 UVR=$145.8009 DTF=7.73%</font>";

var sControl = "<table width = 135><tr><td><marquee direction=\"up\" scrollAmount=" + speed + " style=\"center:" + marqueewidth + ";height:" + marqueeheight + "\">";

sControl += marqueecontents + "</marquee></td></tr></table>";

FieldResponse.Label = FieldInfo.DisplayName;
FieldResponse.Text = sControl;
Invocation of a custom function
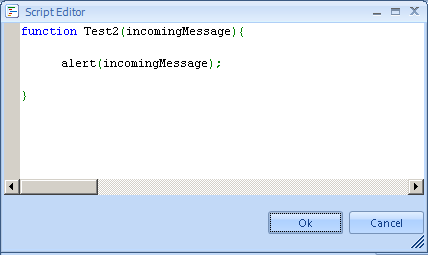
The user field of this example invokes a custom function added in the project with the Scripting feature.
Using an HTML' <script> element, you may include the invocation to any custom function in the Scripting library as an invocation in the HTML document at the body's (<BODY>) element.
This means that the function will be invoked at the activity's form loading (on load --the "PageLoad" event--).
Its code is:
FieldResponse.AppendHTML("<script language='Javascript'>Test();</script>");
If you wish to pass the information in the user field's attribute to your custom function, you may do so by using "FieldInfo.Value" as coded below:
FieldResponse.AppendHTML("<script language='Javascript'>Test2('" + FieldInfo.Value + "');</script>");
Bear in mind that in this example, we are invoking the scripting function at page load; therefore it is expected that the attribute has been previously set with a value (in a previous point of the process).
Invocation of the same function at a different moment (for example, triggered from a button) is also possible.
User Fields within Grids
The following sample shows a case where the context concept is used. A user field in the grid display form will be created. The user field code relates two values of the entity, that is to say, of the grid's record.
var valueAttrib = Me.Context.getXPath("Value");
var obsAttrib = Me.Context.getXPath("Observations");

FieldResponse.Text = "<b>" + FieldResponse.Encode(valueAttrib + ": " + obsAttrib) + "</b>";
The Me.Context.getXPath function obtains directly the values of the displayed record in the previous code, specifically, Value and Observations.
In execution, each row of the table relates the values of the corresponding record.
No further steps to use the user fields within the grids are required as long as the context is used correctly.
User fields in Production
To guarantee the correct performance of all environments and once a project has been deployed, it will not be possible to delete user fields used by a process version already working in the Production environment.
Therefore, in the Development environment Bizagi Studio will restrict some of their edition possibilities in order to ensure the stability of the Production environment in future deployments.
Specifically and for a user field which is already in Production, it will be possible to edit its code.
Editing its other properties (e.g, its parameters, supported data types, or context entity) will not be possible.
Related Articles
<comments />
