Multiple subprocesses
From Business Process Management, BPM and Workflow Automation Wiki | BizAgi BPMS
<keywords content="keywords"> multiple, subprocess, subprocesses, sub process, sub-process, multiple instances, many process, many processes </keywords>
Multiple sub-processes
Bizagi offers an easy to use Wizard to configure Multiple sub-processes. that allow the creation of several occurrences or instances of the same process.
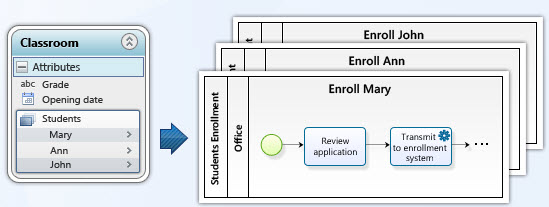
In order to illustrate this functionality think about a Classroom for the next example. In it, several students have to be enrolled in order to assist to class. Then there are two processes: The Classroom process where students will file their applications, and the Student Enrollment process, where each one will be enrolled.
Before you get started
In order to configure a Multiple Subprocess it is necessary to follow these steps:
- Define and diagram the Parent Process: this is the Main process that will create the Multiple Subprocess. In the above example the Parent process is the Classroom process.
- Define and diagram the Sub-process: This is the process that will perform all the activities for each of the instances created. In the example the sub-process will be Enrollment.
- Create the Collection: using the Process Wizard, go to the Second Step and Edit the Data Model to create the Collection Xpath. The Collection is the relationship that determines that there will be multiple entries of something. In this case the relationship will be Classroom.Enrollment, thus Enrollment is the name of the Collection.
It is important to clarify some concepts that need to be remembered:
- The number of instances created can be determined by a constant integer or by the number of items of a Collection (a 1-N relationship). Multiple Sub-Processes apply only for non-embedded processes.
- Context: The context of a process is defined by where the Data is stored and accessed. Thus, the context is the main process entity where the data of the process is built.
In the above example, the context of the Classroom process is the entity Classroom. The context of the Enrollment process of each student is the Enrollment entity. If the Multiple Subprocess was not the Enrollment of each student but the Verification of each student, then the context would be the entity Student.
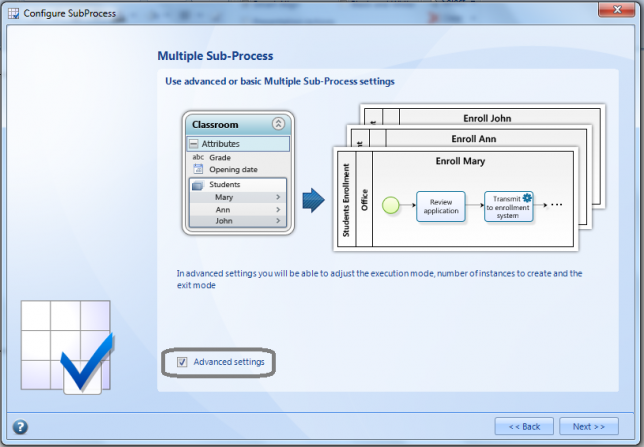
- The Basic settings will create the Multiple sub-process will default settings. The Advanced settings will allow the user to configure different business cases.
- Process can be created in two ways: Parallel or Sequential. The shape of the sub-process will be displayed according to the mode selected.
Parallel
Sequential
Configure a basic Multiple Sub-Process
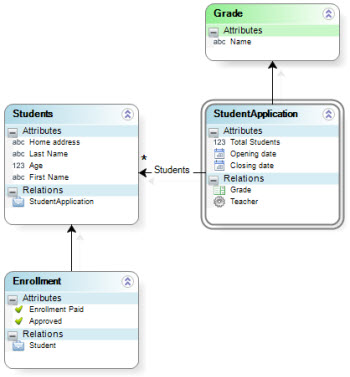
We will continue to use the Classroom process. In the example the parent process is called Classroom and the sub-process is called Student Enrollment. Both processes have been diagrammed in the Process Modeler and the Data Model has been defined with the Collection: there is a collection between the entity Classroom and the entity Students. When a relationship between two entities is created, an attribute (StudentApplication and Classroom) is automatically created in the Entity related to the One Entity. This attribute is key to access to the parent process attributes starting from the subprocess context.
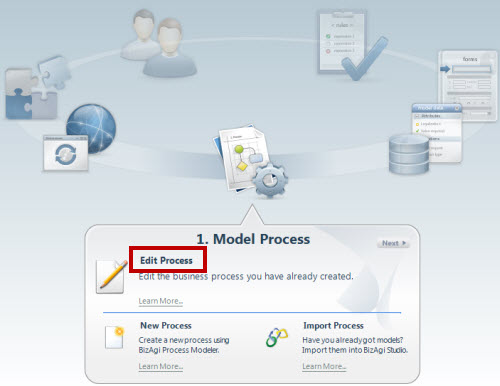
1. Go to the First step of the Wizard and select Edit the Process for the Parent Process.
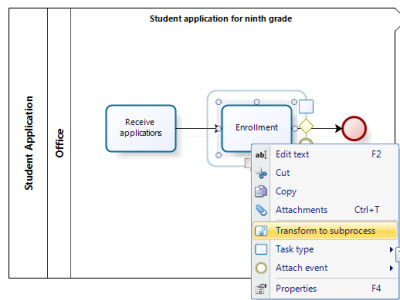
2. Right click on the Shape where the Multiple subprocess must be configured. If the shape is not a subprocess, select Transform to Subprocess. If the shape is a subprocess but is not yet a Multiple sub-process select Configure Subprocess. The Sub-Process Wizard will be displayed.
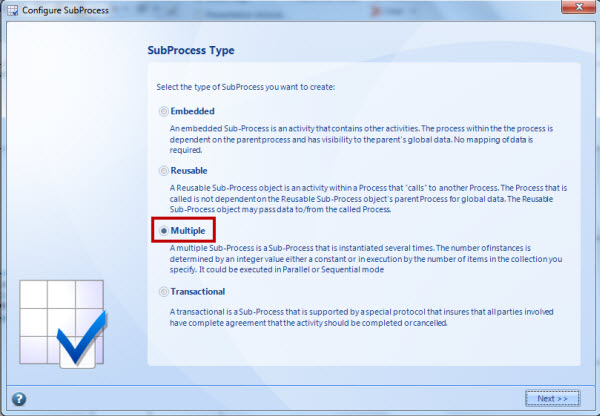
3. Select Multiple Sub-process and click Next
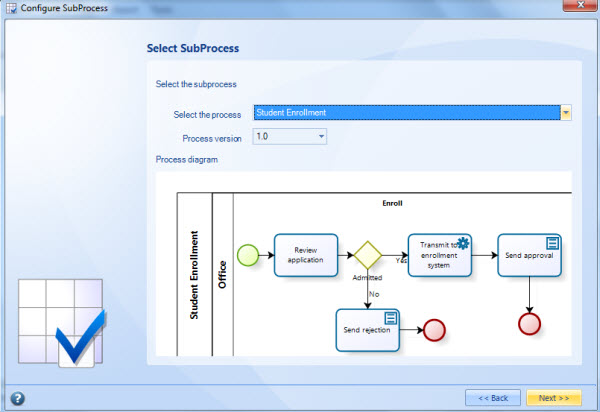
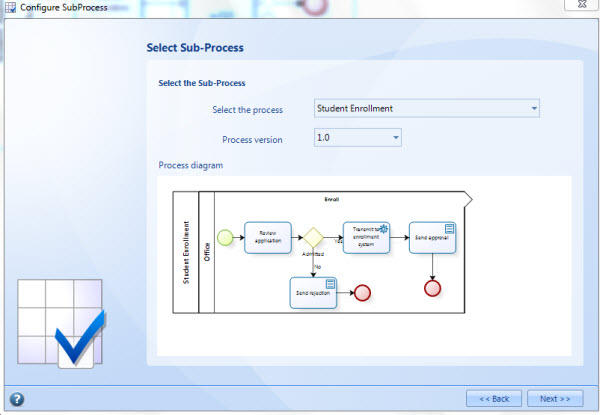
4. Select the Sub-process and click Next
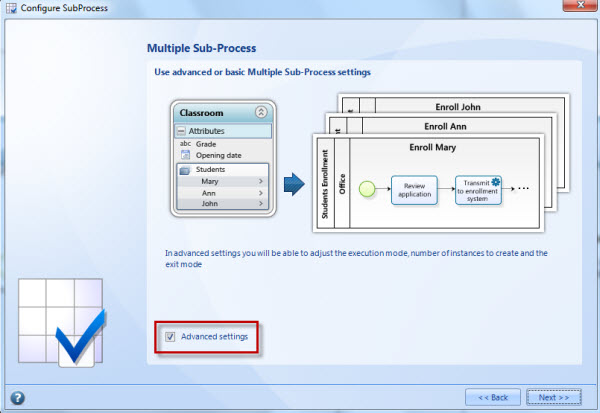
5. To use the Basic settings for Multiple Sub-process click on Next again. For Advanced settings click on the Advanced Settings check-box on the bottom of the screen. In this case, the basic settings will be used.
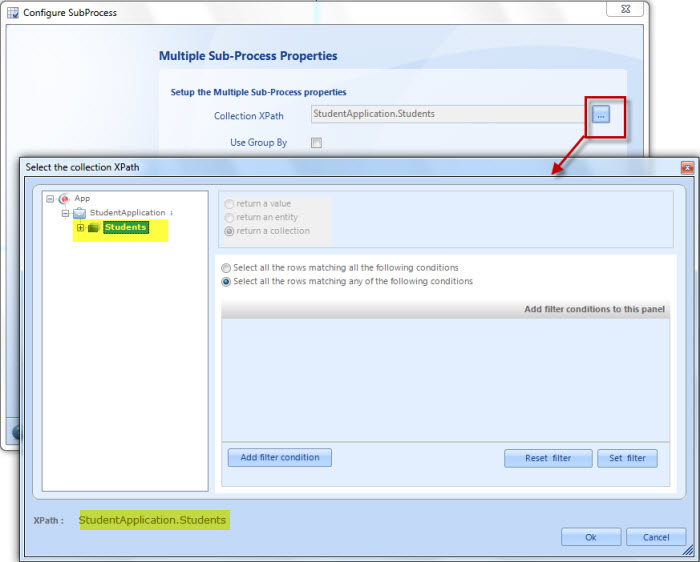
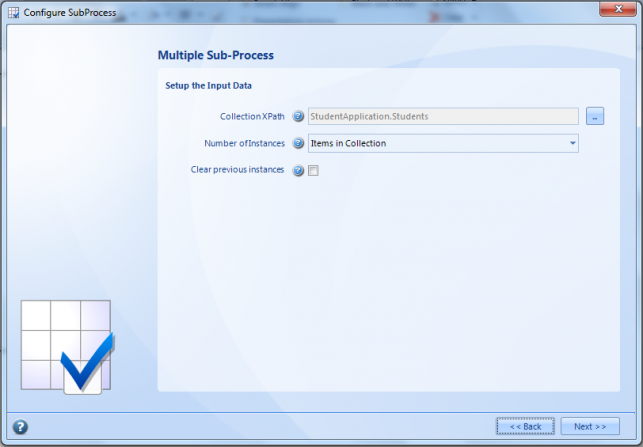
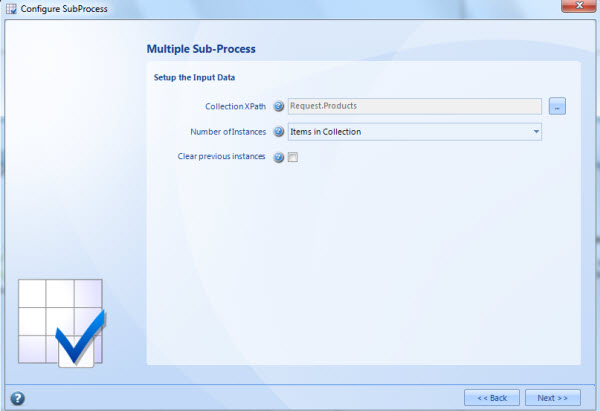
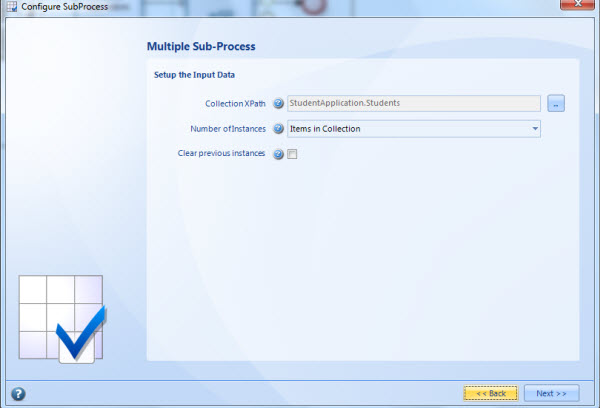
6. Select the Collection Xpath. This is the XPath that relates the Parent entity with the Collection entity from which the instances of the Multiple Subprocess will be created. In this case, it will be: StudentApplication.Students. This is the collection of Students in the Classroom process.
7. Click on Finish
Access to the Parent Process Information from the Subprocess Context
As mentioned previously on this article, it is possible to navigate from the Application Entity of the Multiple Subprocess to the Parent Process; throught the attributes automatically generated when creating the one to many relationships between two Entities.
Going back to the example of the students trying to enroll into a classroom; when associating the collection shown on the step 6 in the previous section to the multiple subprocess, a one to many relationship is created automatically between the Application Entity (Student Enrollment) and the Entity Student (which was defined in the Collection Xpath).
Navigate from the subprocess to obtain information from the parent process can be useful when creating expressions or forms that require to access to information included in the parent process
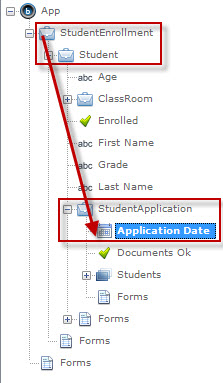
In the example mentioned in this section, it is required to have access to two attributes located in the parent process (Application Date y Documents Ok) when defining the forms with the Subprocess Application Form Context, in order to show them as non editable in one of the forms of the subprocess.
When designing the form, it is easy to navigate through the attributes automatically created when creating a relationship between entities. In this case, we need to navigate from the Subprocess Application Entity which is StudentEnrollment (that corresponds to the context from where the Activity Forms for the Activities of the subprocess are created), and continue through the attributes generated when creating the 1 to many relationships in the process data model. We navigate through Student, StudentApplication (that corresponds to the Parent Entity), and from there, we can access to the desired attributes.
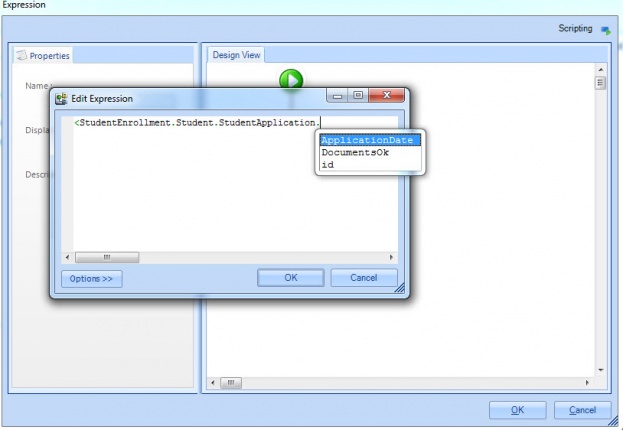
When creating and associating an expression to an activity inside a multiple subprocess, it is easy to navigate from the Application Entity of the subprocess to the Parent Process and be able to access to the Attributes of this Entity. On the following image, it can be seen how to navigate through the attributes (it is similar to the navigation when creating forms).
Advanced Configuration of Multiple Sub-Process
The advanced options in the Multiple Subprocess Wizard have some special properties for advanced users or for special business scenarios.
- Users will be able to configure the number of instances to create not only using a collection but a fixed number or an integer stored in an attribute.
- It is also possible to select how the sub-process is executed, creating all instances at the same time, or one by one.
- Users can configure how the Parent process behaves as the instances created are finished: If it waits for all of them to be finished in order to contiue, if it waits for one, if it continues with each one, and so on.
The following are the explanations of all the features.
Collection XPath
XPath that relates the Parent entity with the Collection entity from which the instances of the Multiple Subprocess will be created.
Number of Instances
Number of occurrences the Multiple sub-process will create depending on the amount of objects found in the collection or the defined number in an Integer-type attribute.
Items in Collection: Depends on how many items are in the collection selected
Integer Constant: A fixed number
Items Attribute: An integer-type attribute that is part of the Data model
Clear Previous Instances
When selected, all instances of the Collection will be re-created in case the process re-enters the Multiple Sub-process.
That is, if for some reason a case in a process enters more than once the same multiple sub-process, by default Bizagi ignores the instances of the collection that were already used to create a case of the multiple sub-process, they are not used again. Bizagi will create cases only for those records of the collection that haven't opened a case already. The Clear Previous Instances functionality when selected, ignores the default behavior, and when the case re-enters the multiple sub-process creates ALL instances again, regardless if they have already opened a case.
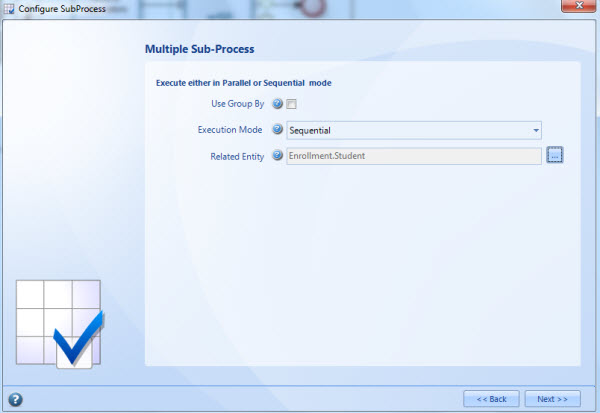
Execution Mode
Determines if the process instances will be created all at once, Parallel or will be created one at a time, Sequential.
IMPORTANT:
- If the Sequential Mode is selected, there will be no Exit Mode. Only Parallel Mode will enable the Exit Mode.
- If the Group by option is selected, only Parallel Execution Mode will be available.
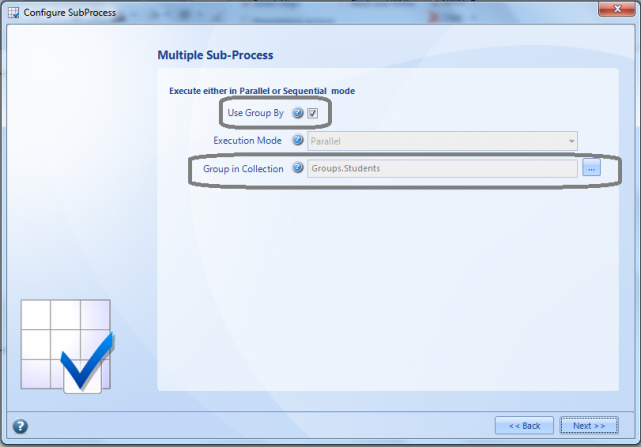
Use Group by
There are some cases in which multiple sub process must be created grouping chosen attributes from the collection. The number of sub processes launched will depend on the different values of those attributes.
In our Classroom example, if the multiple sub process needs to be grouped by girls and boys, two sub process instances will be created: one for girls and other for boys.
The next image shows how the sub processes related to a collection of three students are grouped in two cases, one for men and other for women.
For grouping sub process instances have into account that the collection to which the grouping will be applied must be associated to the entity of the sub process that will be thrown by each group. Additionally, it is required that the parent process and the sub process have different context entities, so the sub process entity cannot be the same entity to be grouped.
For grouping instances of a sub process follow the next steps:
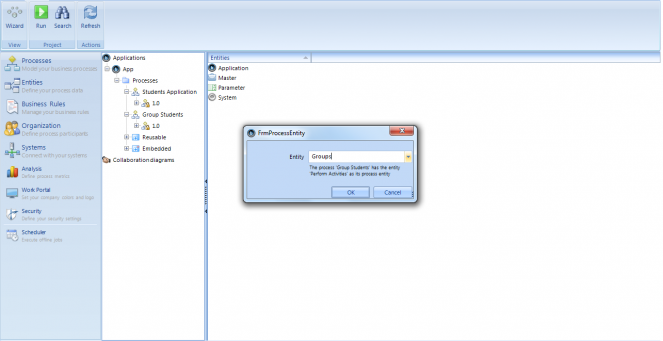
1. Define the sub process entity. Remember that for being able to group sub process, the sub process entity cannot be the same entity to be grouped. IN this case we define an entity called “Groups” for the “Group Students” sub process.
2. Configure the sub process as multiple sub process in the sub process configuration options.
3. Once the associated diagram to the sub process has been selected, choose the option “Advanced Properties”
4. Select the collection that you wish to group. In this case we group by the “Students” collection.
5. In the last window of the wizard, select the option “Group by”. The wizard will ask you to define the collection to be grouped, in this case the collection “Students”. Once it hass been defined, the wizard will advise you that a relationship must be defined between such entity and the sub process entity. Click on “Accept” button to establish that relationship automatically. Then click on “Next”
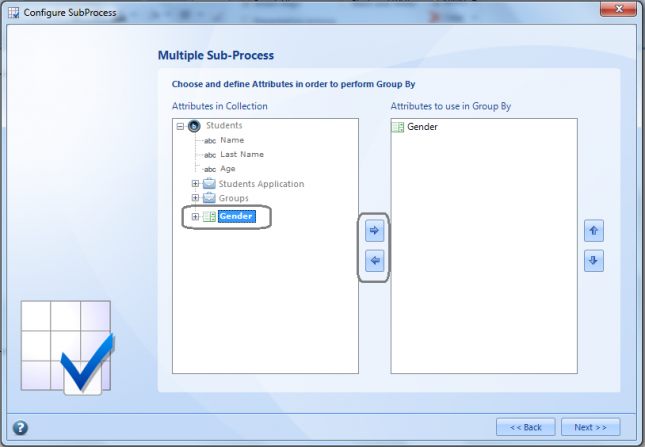
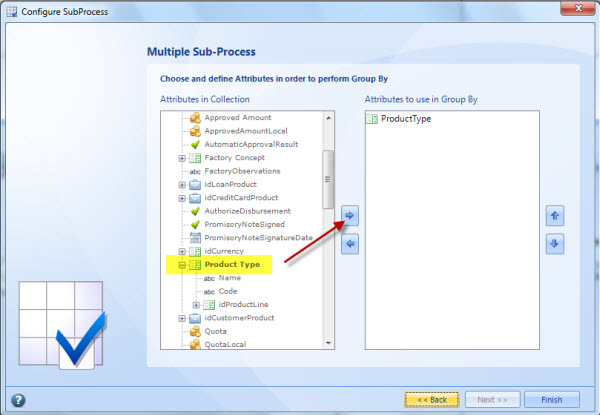
6. Select the attributes by which you wish to group. You must select it from the box on the left and then click on the arrows to add or remove it to the right side. We will group by gender. Then click on “Finish”
When you execute the process you will realize that it is not possible to Access to the parent process information due an automatic mapping is not done, it means, there is not a relationship between the sub process entity and the parent process entity but only a relationship between the parent process and the grouped entity, Then it is necessary to define the missing relationship.
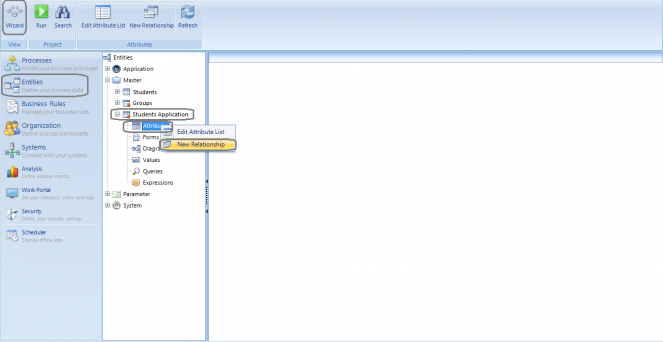
For defining the missing relationship go to the Wizard view, click on properties, master entities and the on the parent process entity. Once the sub-options of such entity are shown, right click on the “Attributes” options and then in “New Relationship”.
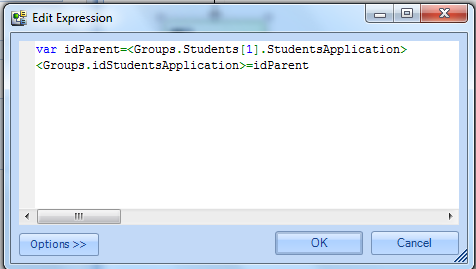
Additionally it is necessary to take the relationship between the parent process and the groped entity and use it to establish the missing relationship. For this, we define an on enter expression of the first activity of the sub process that gets the ID of the parent process entity and sets it in the sub process entity.
The expression would be:
var idParent=<Groups.Students[1].StudentsApplication>
<Groups.idStudentsApplication>=idParent
Once it has been done, you will be able to Access to the data of the parent process context normally.
Related Entity or Group in Collection
When the Sub-process business entity differs from the Collection entity, the Wizard will display one of these fields. Related Entity or Group in Collection are relationships between the Collection entity and the Sub-process business entity. These relationships are necessary to allow the user to navigate through the data from the process to the collection.
The Related Entity will be shown if the Collection is not grouped (using the Group by option). If the Collection is grouped, the Group in Collection will be shown, because a one-to-many relationship is needed to group the Collection records in different sub-collections.
Usually, the Collection entity and the Business Entity of the Multiple Sub-process are the same entity. But sometimes they are not. For example, think of a process where before Enrolling Students, they have to be approved. The Approval Students process will have Students as is Business Entity. However, in the Enroll Students process, the Collection entity is Students but the Business Entity of the Sub-process is Enrollment. In this case, the Sub-process Entity is different from the Collection entity.
Exit Mode
This Mode determines the behavior on exit of the Sub-process regarding the Parent process.
StandAlone: The parent process continues with the next activity of its process as soon as the Subprocess is created, without waiting for it to be completed. The sequence pattern does not apply and the sub-process will not depend on the parent process; that is, if the parent process ends, the sub-process can remain in effect.
IMPORTANT: This option will not be displayed if the Sequential Execution Mode has been selected. Only Parallel Execution Mode applies.
Integrated: The execution of the Subprocess is required before the parent process continues with the next activity of its process. This behavior can be compared to the sequence pattern, where Activity B cannot be run until Activity A has ended. The Integrated mode has four options according to the business case needs.
- All Tokens: All the tokens are synchronized and only after ALL the sub-processes that are opened have ended will the flow of the parent process continue.
- Each Token: At the end of each sub-process created, the flow of the parent process continues. If the output mode is each token, the activity that follows the multiple sub-process in the parent process will take place as many times as there are sub-processes. It is important to have a clear understanding of this and synchronize the process at some point as needed with an Exclusive Gateway used as convergence.
- One Token: The parent process will continue to the next activity after the FIRST sub-process has finished.
- Expression defined: the parent process will continue according to an expression.
Multiple Sub-Processes Example with Basic settings
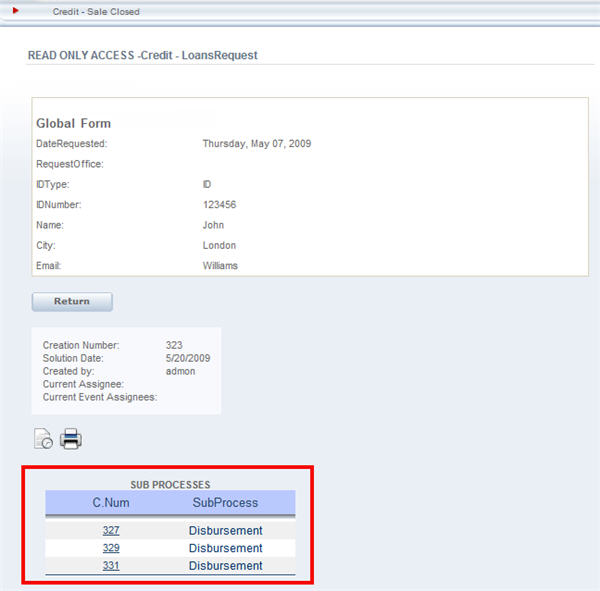
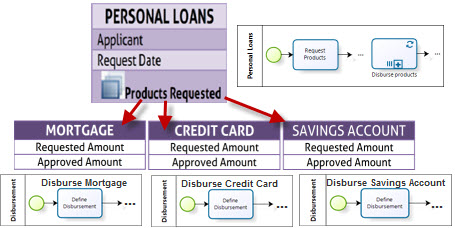
A client can request several products in one Loan Request Process. However, each of them must be disbursed separately. The multiple sub-processes will instance a Disbursement process for each product requested. Once all the disbursements have been completed, the Loan Request process will continue.
<videoflash>_feK8Ca8MUU|640|505|</videoflash>
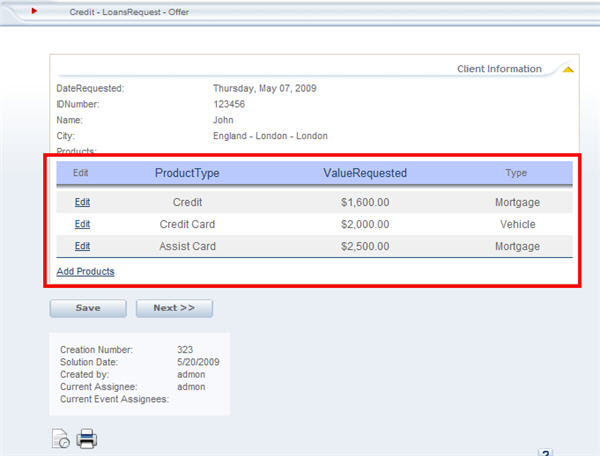
The following images show a Loan Request process with three products. Each one of them creates one Disbursement SubProcess.
Multiple SubProcesses Example with Advanced settings
A client can request several products in one Loan Request Process. The products must be Disbursed separately according to the credit type: Credit Cards, Loans, etc.
- The multiple sub-processes will instance a Disbursement process for each type of product requested. Thus, the Group by option will be used, by Product Type.
- Once all the Disburse processes have been completed, the Loan Request process will continue. Thus, the Integrated – All tokens Exit mode will be used.
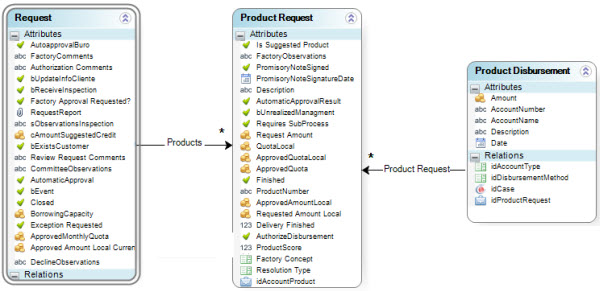
Notice that the model has three entities: The Parent process entity: Request The collection entity: Products (Product Request) The sub-process entity: Product Disbursement In order to use the Group by option, the Collection entity and the Sub-process entity must be different, and this is the case. The relationship between Product Request and Product Disbursement will be created automatically.
1. Select the Advanced Settings in the Wizard and click on Next. Then, Select the Disburse process.
2. Select the Collection
3. To create a Disburse process for each product type, regardless of the number of products, a Group by Attribute must be defined. Then, check the Group by option. The Execution Mode will be selected by default. Also, click on the Group in Collection Option to create the relationship between the Process entity (Disbursement) and the Collection (Products). Then, click on Next.
4. Select the Attributes to Group by. Product Type in this case. Finally, click on Finish.
Multiple Sub-Processes Example with Sequential creation
A Second Grade classroom always enrolls students according to their Last Name. Then, the Sequential option must be used in order to make sure each case is opened alphabetically.
The following is the data model
1. Select the Enrollment process.
2. Select the Advanced Settings in the Wizard and click on Next.
3. Select the Collection, in this case Students. Also choose the number of instances: Items in a Collection. In this case, the collection will already be created in the process. Click on next.
4. Select the Sequential Execution Mode. Then click on the Related Entity to automatically create the relationship between Enrollment and Students.
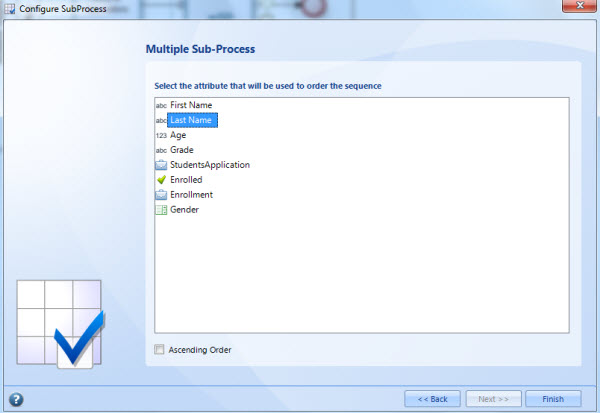
5. Select the attribute to order the instances. In this case, Last name will be chosen. This way an instance will be created at a time. When each one finishes, the next one will be created. This will happen alphabetically. Click on Finish
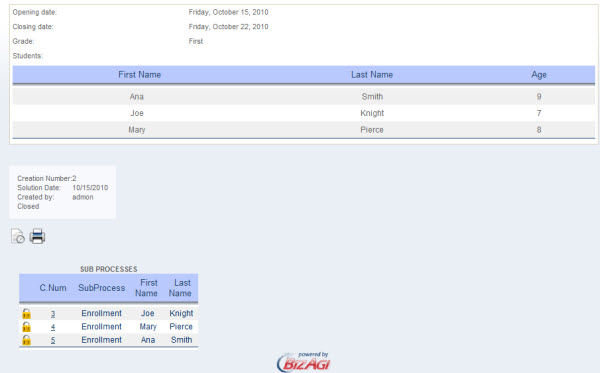
When the cases are created, they will be created onw by one, like shown in the following image
<comments />


