How to embed an application in Bizagi
From Business Process Management, BPM and Workflow Automation Wiki | BizAgi BPMS
<keywords content="keywords"> activex, directx, userfields, components, user controls, active control, HTML object, active controls, active x, peripherals, peripheral, device, devices integration, devices, webcam, web cam, scanner, printer, signpad, digital camera, camera, fingerprint, reader, COM, com objects, com object, finger print, digital </keywords>
Contents
|
How to embed an application in Bizagi
Overview
This article describes how to embed an application in Bizagi processes (graphically accessible).
Through this approach, end users will be able to use that application from their browser in any activity of a process.
As shown in the image below, the user interface (form) of an activity, embeds a custom application:
This example shows a "Do Something" button of a custom user control component.
Notice that in Bizagi, you may also include applications to do some automated processing in business rules. For example, an application to create PDF or binary files, to read excel files' content, etc.
Including applications for processing from business rules is treated by the Component library feature. If you wish to learn about this possibility of including an application in Bizagi for invocation directly from a business rule, refer to the Component library feature.
What you need to do in Bizagi
In order to embed an application in your process activities, first you need to have your application built as an embeddable object (for example, a class library assembly, a swf flash application, an applet, etc). This application should include the methods for any logic behind it will run. For instance, it can include methods to make use of APIs that control peripheral devices (that is, if you wish to integrate any peripheral device in Bizagi such as a webcam, a scanner, a signpad, a fingerprint reader, etc), or to handle digital signatures.
Once you have your application, you need to create a userfield in Bizagi to embed it and instance the application through its GUID (unique identifier). A userfiled is a type of render in Bizagi which can contain any HTML code, as customized.
Through the userfield, you may embed the application as an HTML Object and expose its user interface elements for end users to make use of the application's methods (mainly through buttons).
Once the HTML object is embedded in your process form, in runtime, buttons in the userfield will invoke the application's methods through scripting functions (java script).
It is important to mention that the invocation of the application is done through scripting functions, so that these methods are executed on the client side of the solution. The result or information handled internally by the application (for example, a captured image), can be then sent back to an input element in Bizagi within the script function.
Summarizing the previously explained, in Bizagi the following steps are needed and will be described:
1. Embedding the application as an HTML object.
2. Creating the HTML controls to handle the application's methods.
3. Creating the script functions to handle the application's methods.
4. Including the userfield in your forms.
If you wish to view a simplier example about extending forms in Bizagi, about how to embed another web page in the forms, you may refer to the How to embed a google map in Bizagi example.
Example
In the following example, we will describe how to embed an application into a "Driver License request" process in Bizagi.
In our process, we will embedded in the "Register basic information" activity's form a sample application:
In this sample application, we will capture of information from a peripheral device, and then set it to an attribute in Bizagi.
Before you begin
The first step is have your application available and know its GUID, methods, and properties.
Remember that this application can include any APIs necessary to handle a specific peripheral device.
For this example, application used is an Active X which exposes a user control. The main concept behind these types of applications is that an interface class is defined to publish its methods and attributes (public), so that their actual invocation is done at the client side of the solution (using HTML and Script code).
|
Note: Keep in mind that APIs to control a peripheral device and its options (methods to scan, read, capture, reset, etc), are often supplied by the manufacturer of the specific peripheral. |
To view detailed information and guides for developing Active X applications in .Net, you may view these external links: www.dreamincode.net/forums/topic/38890-activex-with-c%23, www.c-sharpcorner.com/UploadFile/dsandor/ActiveXInNet11102005040748AM/ActiveXInNet.aspx.
Including the assembly in the web path
In this example we will embed a class library assembly, which is built as a dll file.
To do this, we copy the assembly into a path in the Web application folder (in a Bizagi project, you may place it in "C:\BizAgi\[bizagi_edition]\Projects\[your_project]\WebApplication\").
Keep in mind that the output dll is a custom assembly which is included manually in a Bizagi project, and hence Bizagi will not deploy it automatically for your other environments.
This does not happen when an assembly is included via the Component Library (which is for a differente application integration approach from the one presented in this article).
|
Note: Notice that Active X registration usually have some additional configuration for the generated assembly (may involve the GAC, COM configurations, etc). |
In our example, our output assembly is MyClassLibrary1.dll. Our application's namespace is MyClassLibrary1, and the user control class is myControl.cs.
Embedding the application as an HTML object
Once we have our ActiveX assembly, we can create the userfield in Bizagi that embeds it through the HTML <Object> element.
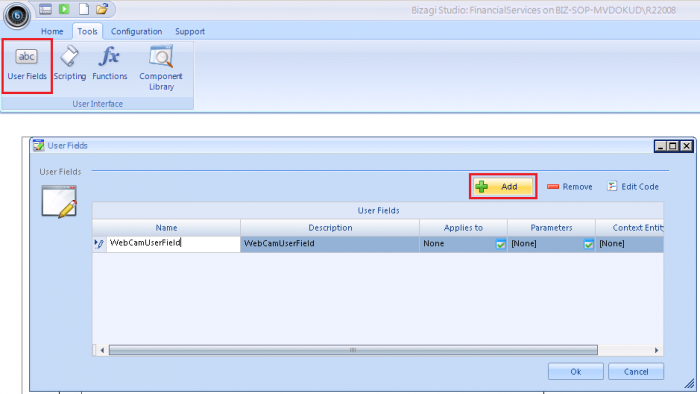
To do this, we click on the Userfield option at the Tools menu and add a new userfield:
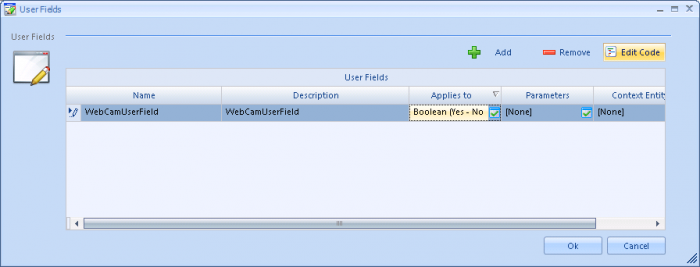
We make sure we check the possible attribute types which can use this userfield. In our case, we want it to be the attribute which will store the result of the captured information. We proceed to edit its code:
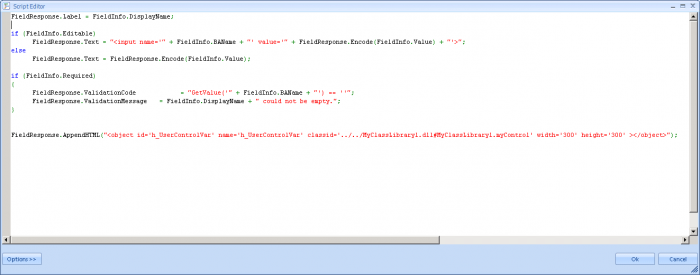
Notice we embed the application as an HTML object by including a reference to the ActiveX assembly (as a web path, according to our previous section):
The code for this is:
FieldResponse.AppendHTML("<object id='h_UserControlVar' name='h_UserControlVar' classid='../../MyClassLibrary1.dll#MyClassLibrary1.myControl' width='300' height='300' ></object>");
Take into account that we used a relative path for our assembly's physical location. Since Bizagi's userfields default path is located as "C:\BizAgi\[bizagi_edition]\Projects\[your_project]\WebApplication\App\ListaDetalle\", we include the prefix "../../" to get to the path "C:\BizAgi\[bizagi_edition]\Projects\[your_project]\WebApplication\" (where our dll is located).
|
Note: Although this example includes a reference to the assembly in the HTML object as classid="[my_Relative_path][my_Assembly file]#[my_Namespace].[my_ControlClass]", you may also choose to use the clsid property and your assembly's GUID (as classid="clsid:[my_GUID]"). |
In addition to this, we identify our object as "h_UserControlVar" so that it can be instanced by its id in a scripting function (it is required that this name starts with "h_" so that it is treated as a hidden element).
Creating the HTML controls to handle the application's methods
Now we need to define buttons to handle the methods in our application.
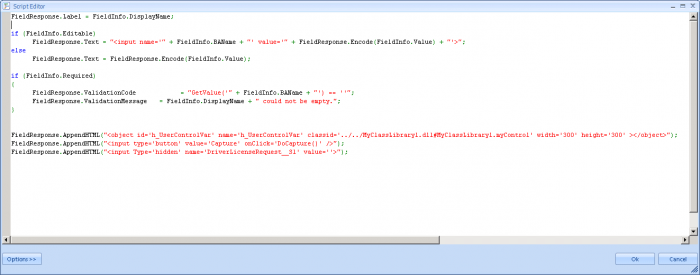
To do this, in this same userfield we include HTML buttons for each of our methods:
We include an additional hidden render (named as "[myProcessEntity]__[myAttribute]") to store the captured input back in Bizagi.
The added code is now:
FieldResponse.AppendHTML("<object id='h_UserControlVar' name='h_UserControlVar' classid='../../MyClassLibrary1.dll#MyClassLibrary1.myControl' width='300' height='300' ></object>");
FieldResponse.AppendHTML("<input type='button' value='Capture' onClick='DoCapture()' />");
FieldResponse.AppendHTML("<input type='button' value='Reset' onClick='DoReset()' />");
FieldResponse.AppendHTML("<input Type='hidden' name='DriverLicenseRequest__S1' value=''>");
The two buttons will execute the DoCapture() and DoReset() functions respectively.
Creating the script functions to handle the application's methods
According to our previous step, we proceed to define our DoCapture() and DoReset() functions.
To do this, in this same userfield we include the functions definition as java script:
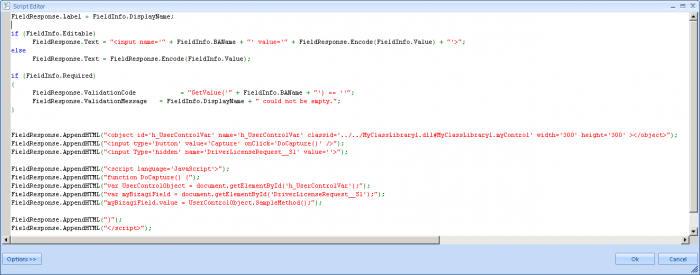
The added code is now (example for 'DoCapture()'):
FieldResponse.AppendHTML("<object id='h_UserControlVar' name='h_UserControlVar' classid='../../MyClassLibrary1.dll#MyClassLibrary1.myControl' width='300' height='300' ></object>");
FieldResponse.AppendHTML("<input type='button' value='Capture' onClick='DoCapture()' />");
FieldResponse.AppendHTML("<input Type='hidden' name='DriverLicenseRequest__S1' value=''>");

FieldResponse.AppendHTML("<script language='JavaScript'>");
FieldResponse.AppendHTML("function DoCapture() {");
FieldResponse.AppendHTML("var UserControlObject = document.getElementById('h_UserControlVar');");
FieldResponse.AppendHTML("var myBizagiField = document.getElementById('DriverLicenseRequest__S1');");
FieldResponse.AppendHTML("myBizagiField.value = UserControlObject.SampleMethod();");

FieldResponse.AppendHTML("}");
FieldResponse.AppendHTML("</script>");
We save these changes. Now we have finished creating our userfield.
Including the userfield in your forms
Finally, we include the userfield into our Registration activity's form.
To do this, we select the third step of the Process wizard (define forms) and click on the "Register basic information" activity.
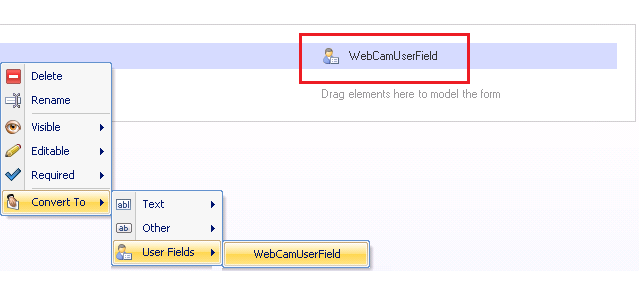
In the form designer, we include in this form the given field to store the information, and render it as a userfield (choosing the one we created):
We save the form and proceed to execute our process in Bizagi's work portal.
Result
We now execute the process by using the Process Wizard's step 7 (run process) or the quick access icon:
We create a new "Driver license request" case and enter to the "Register basic information" activity.
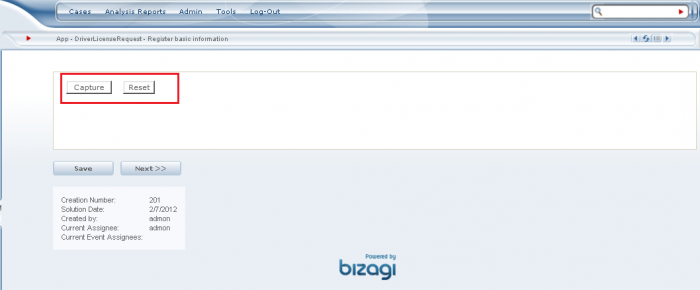
Our Active X methods will be invoked when clicking on their corresponding buttons:
At this point we are set embedding an application in an activity of our Bizagi process!
Related Articles
<comments/>


