How to integrate Bizagi with smartphones
From Business Process Management, BPM and Workflow Automation Wiki | BizAgi BPMS
<keywords content="keywords"> smartphones,mobile,smartphone,blackberry,iphone,approve,reject </keywords>
|
Alert: The integration presented in this article is deprecated and applies only for 9.1.x projects. The feature of presenting the Work Portal in mobile devices is an out-of-the-box feature included in Bizagi GO. |
Contents |
How to integrate Bizagi with smartphones
Oftentimes processes need concrete actions, like approvals, from certain people with high positions whose tasks can become bottlenecks because they are not in front of their computer at all times.
Bizagi supports smartphones. Users can participate in processes and approve requests in an efficient way while on the road, right from their phones and e-mail, and without having to log into web applications.
This article describes how to create in a Bizagi process an option to approve or reject cases from a smartphone. The integration mentioned here relies in the use of SMTP e-mail notifications and in Bizagi's SOA layer.
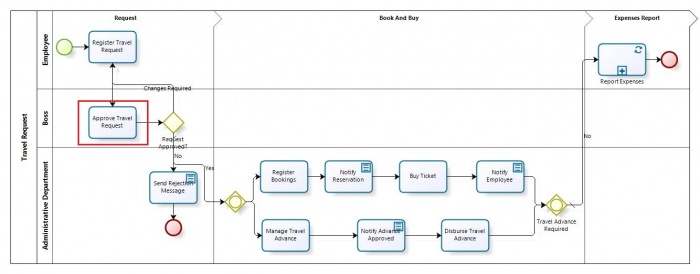
For this specific how-to and guidelines, the Travel Request process (from the process central templates) is adjusted so that the Approve Travel Request activity is performed by the boss user from a smartphone.
The following architecture diagram represents the solution's workings.
Through Bizagi's process (1), an e-mail notification is sent via SMTP to the boss user (2).
The boss opens his message from the smartphone (3) and clicks on the link to either approve or reject the request.
The link launches a web application (4) that invokes the web services to perform the activity in Bizagi's process.
To carry out this integration, follow the 5 steps explained and fit for the Travel Request process model.
Working with the travel request process.
Import the Travel Request template from the process central, directly from your Bizagi Studio.
Further information about importing this process is available here.
Remember that this how-to may be worked out along with any other process.
Adapting the data model
Adapt the data model for this process by editing the TravelRequest entity, so that new attributes are included to handle the link request.
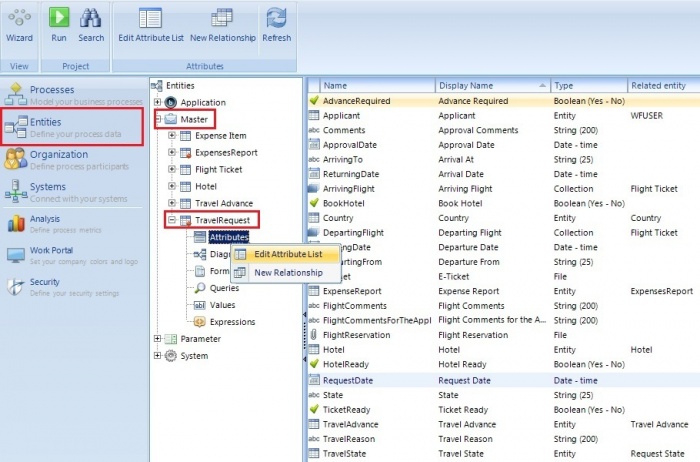
In order to do this, go to the modules view and select the Entities module. Locate the TravelRequest entity in the Master type entities and expand its items.
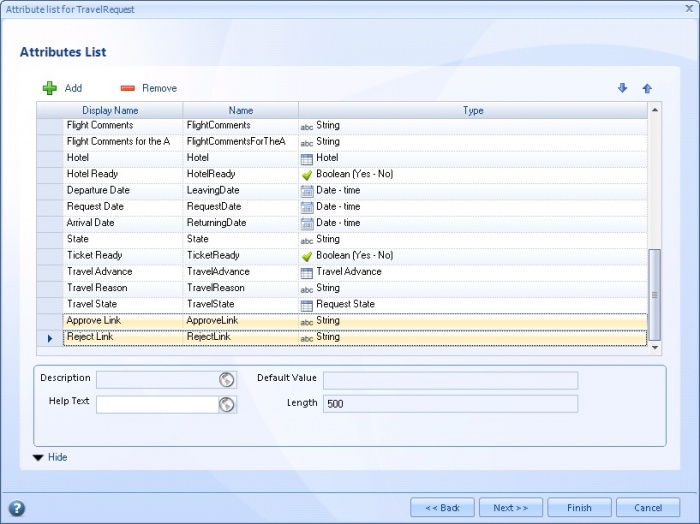
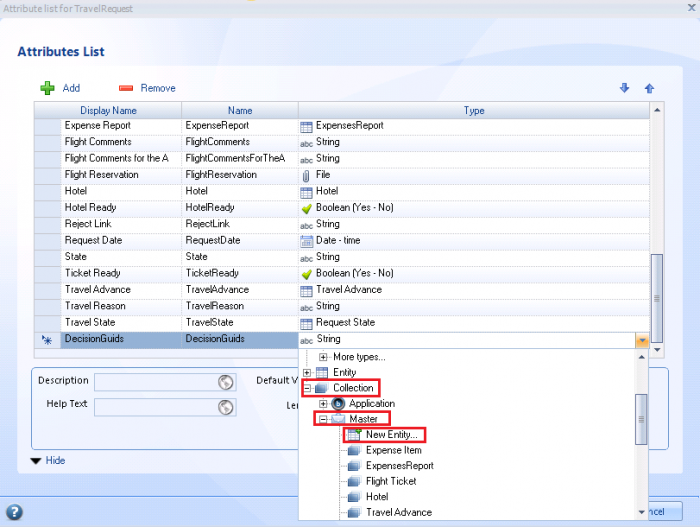
Right-click in TravelRequest's attributes item. Select Edit Attribute List and include the 3 new attributes:
- ApproveLink and RejectLink as string type attributes. Each one will serve the purpose to contain a different link to the corresponding travel request approval choice. Ensure these strings are long enough to support the URL link.
- DecisionGuids which is a master collection type attribute. This will create an entity designed to store the information related to each case and specifically for each decision taken (one for approval and one for rejection).
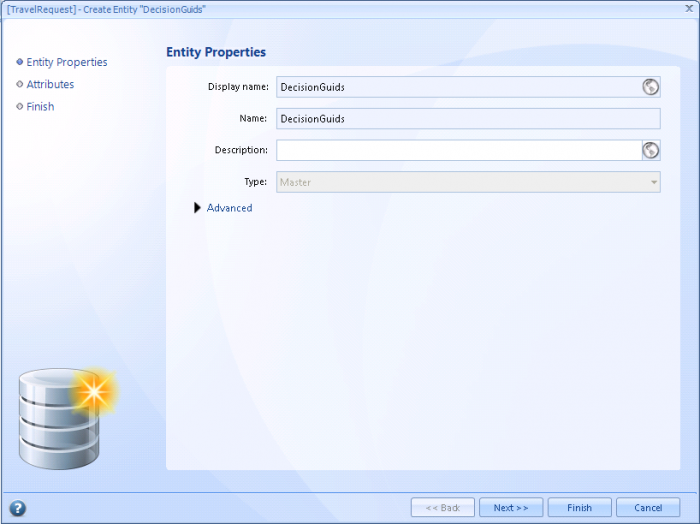
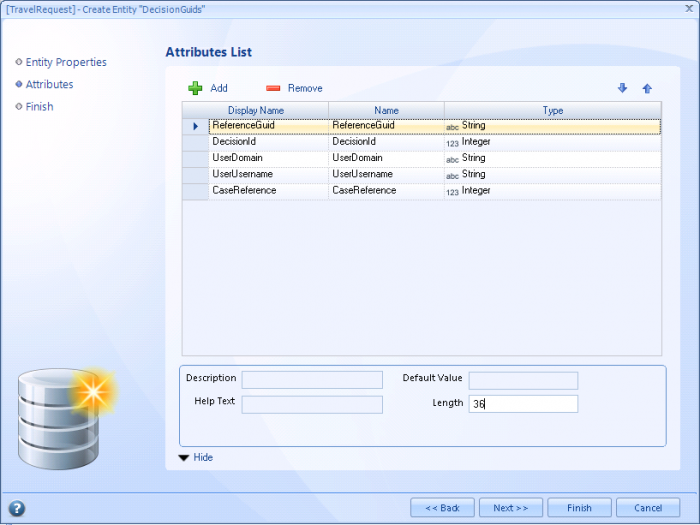
The new master entity called DecisionGuids should have the following attributes, as shown below:
Ensure that the ReferenceGuid attribute is a string type attribute with length equal to 36 characters. UserUsername and UserDomain are set with 20 characters length for this example. Click on Finish for both entity's properties.
Creating an expression to set the links information
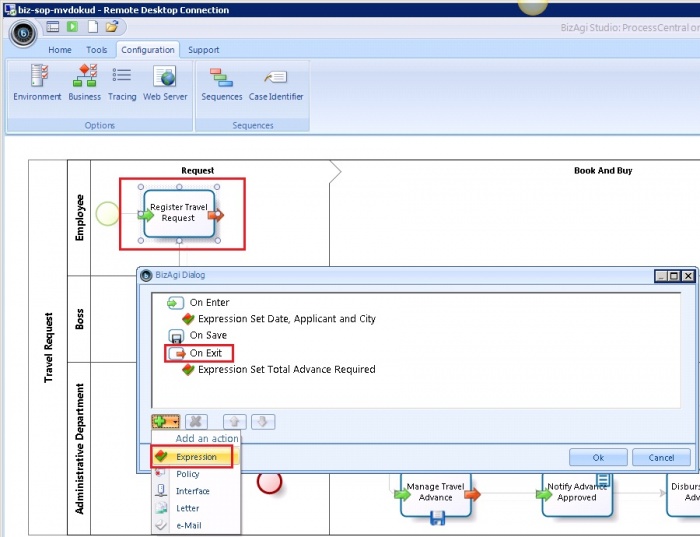
Create an activity action to set the 2 link attributes (ApproveLink and RejectLink) information, by choosing the fourth step of the wizard (business rules).
To accomplish this, create an expression to be executed onExit of the register travel request activity.
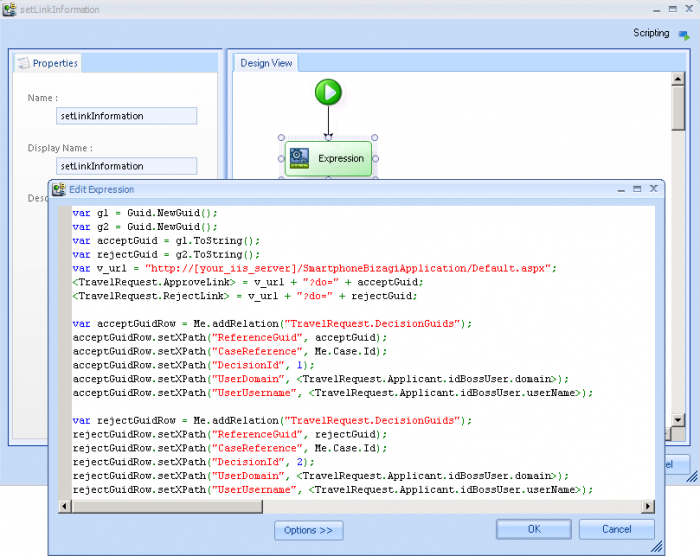
The expression's code will be responsible to build the link with the required parameters to invoke the performActivity web service. For this example the code would have:
Notice that the variable v_url should have assigned the webpage as it will be mounted and available in your IIS server.
This can be properly set and reviewed as in step 5.
Building the links should include the required parameter as a Guid for security measures.
Here is the code of the expression:
var g1 = Guid.NewGuid();
var g2 = Guid.NewGuid();
var acceptGuid = g1.ToString();
var rejectGuid = g2.ToString();
var v_url = "http://[your_iis_server]/SmartphoneBizagiApplication/Default.aspx";
<TravelRequest.ApproveLink> = v_url + "?do=" + acceptGuid;
<TravelRequest.RejectLink> = v_url + "?do=" + rejectGuid;
var acceptGuidRow = Me.addRelation("TravelRequest.DecisionGuids");
acceptGuidRow.setXPath("ReferenceGuid", acceptGuid);
acceptGuidRow.setXPath("CaseReference", v_caseId);
acceptGuidRow.setXPath("DecisionId", 1);
acceptGuidRow.setXPath("UserDomain", <TravelRequest.Applicant.idBossUser.domain>);
acceptGuidRow.setXPath("UserUsername", <TravelRequest.Applicant.idBossUser.userName>);
var rejectGuidRow = Me.addRelation("TravelRequest.DecisionGuids");
rejectGuidRow.setXPath("ReferenceGuid", rejectGuid);
rejectGuidRow.setXPath("CaseReference", v_caseId);
rejectGuidRow.setXPath("DecisionId", 2);
rejectGuidRow.setXPath("UserDomain", <TravelRequest.Applicant.idBossUser.domain>);
rejectGuidRow.setXPath("UserUsername", <TravelRequest.Applicant.idBossUser.userName>);
Creating an e-mail notification that include the links
Create an activity action to create the e-mail that includes the 2 link attributes information. Again, use the fourth step of the wizard and create an e-mail notification for the approve travel request activity.
This notification should be sent at the onEnter of the activity.
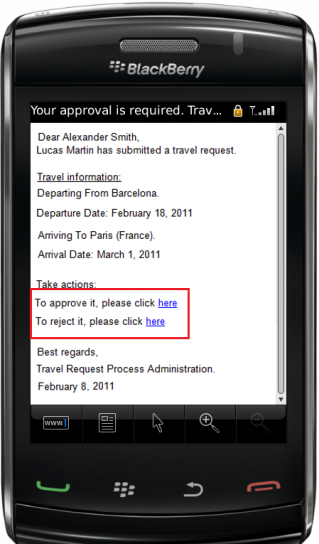
The e-mail's recipient is the boss, and the e-mail body should include the Link attributes as shown:
To approve the request,
please click <a href=<TravelRequest.ApproveLink> target="_blank">here</a>
To reject the request,
please click <a href=<TravelRequest.RejectLink> target="_blank">here</a>
Creating the performActivity web application
Create a web application that will be in charge of receiving the valid token to invoke the performActivity web service in the travel request process.
Since this how-to was worked with Microsoft Visual Studio 2008, the created web application solution will be addressed from now on as the "SmartphoneBizagiApplication".
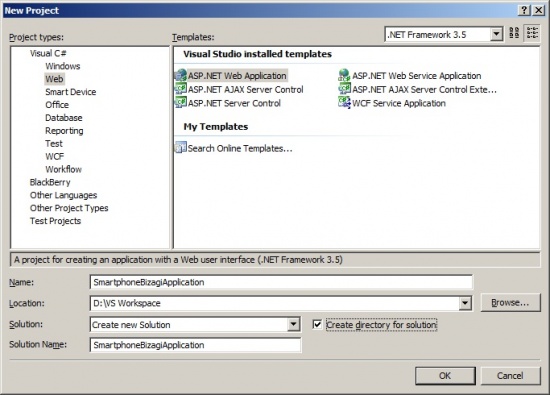
Create a new project in Visual Studio and for its type, select "ASP. Net Web Application".
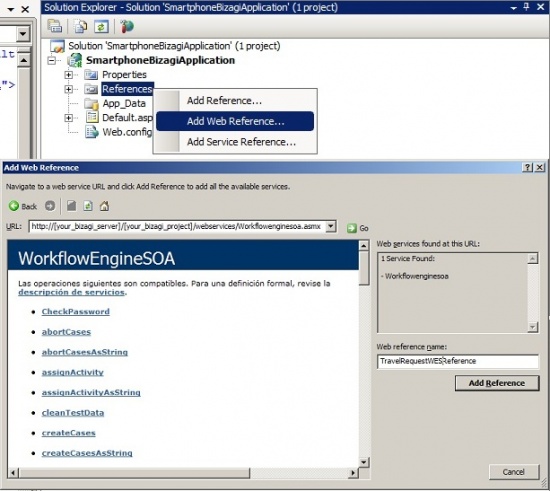
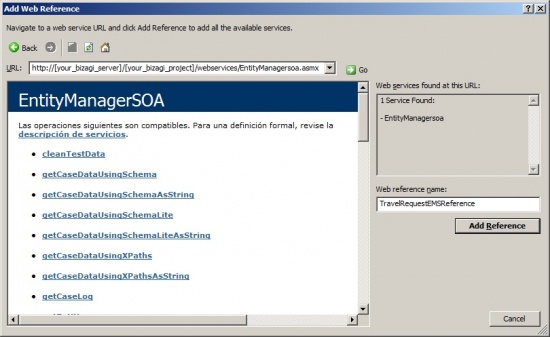
For the SmartphoneBizagiApplication, two web references in the visual studio project were added as:
http://[your_Bizagi_server]/[your_Bizagi_project]/webservices/workflowenginesoa.asmx
http://[your_Bizagi_server]/[your_Bizagi_project]/webservices/entitymanagersoa.asmx
Therefore, create the two corresponding web references to your Bizagi project's published web services.
|
Alert: Notice this is an example and that according to secure and best practices, the access to these web services should be restricted and controlled in the IIS configuration, according to your own-defined security policies. For instance, we recommend that access to these web services should be allowed only for certain IP addresses. |
Given that a link will be created in Bizagi's process, the valid token parameter will be passed within the URL (as HTML's get method).
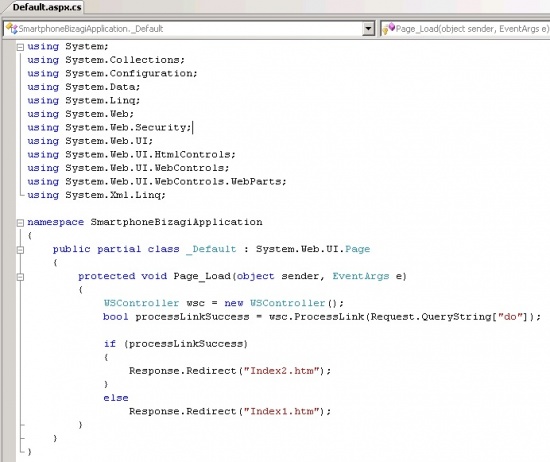
Hence, ensure that in the SmartphoneWebApplication's Default.aspx.cs the retrieval of this parameter is included in its Page_Load method.
Default.aspx.cs:
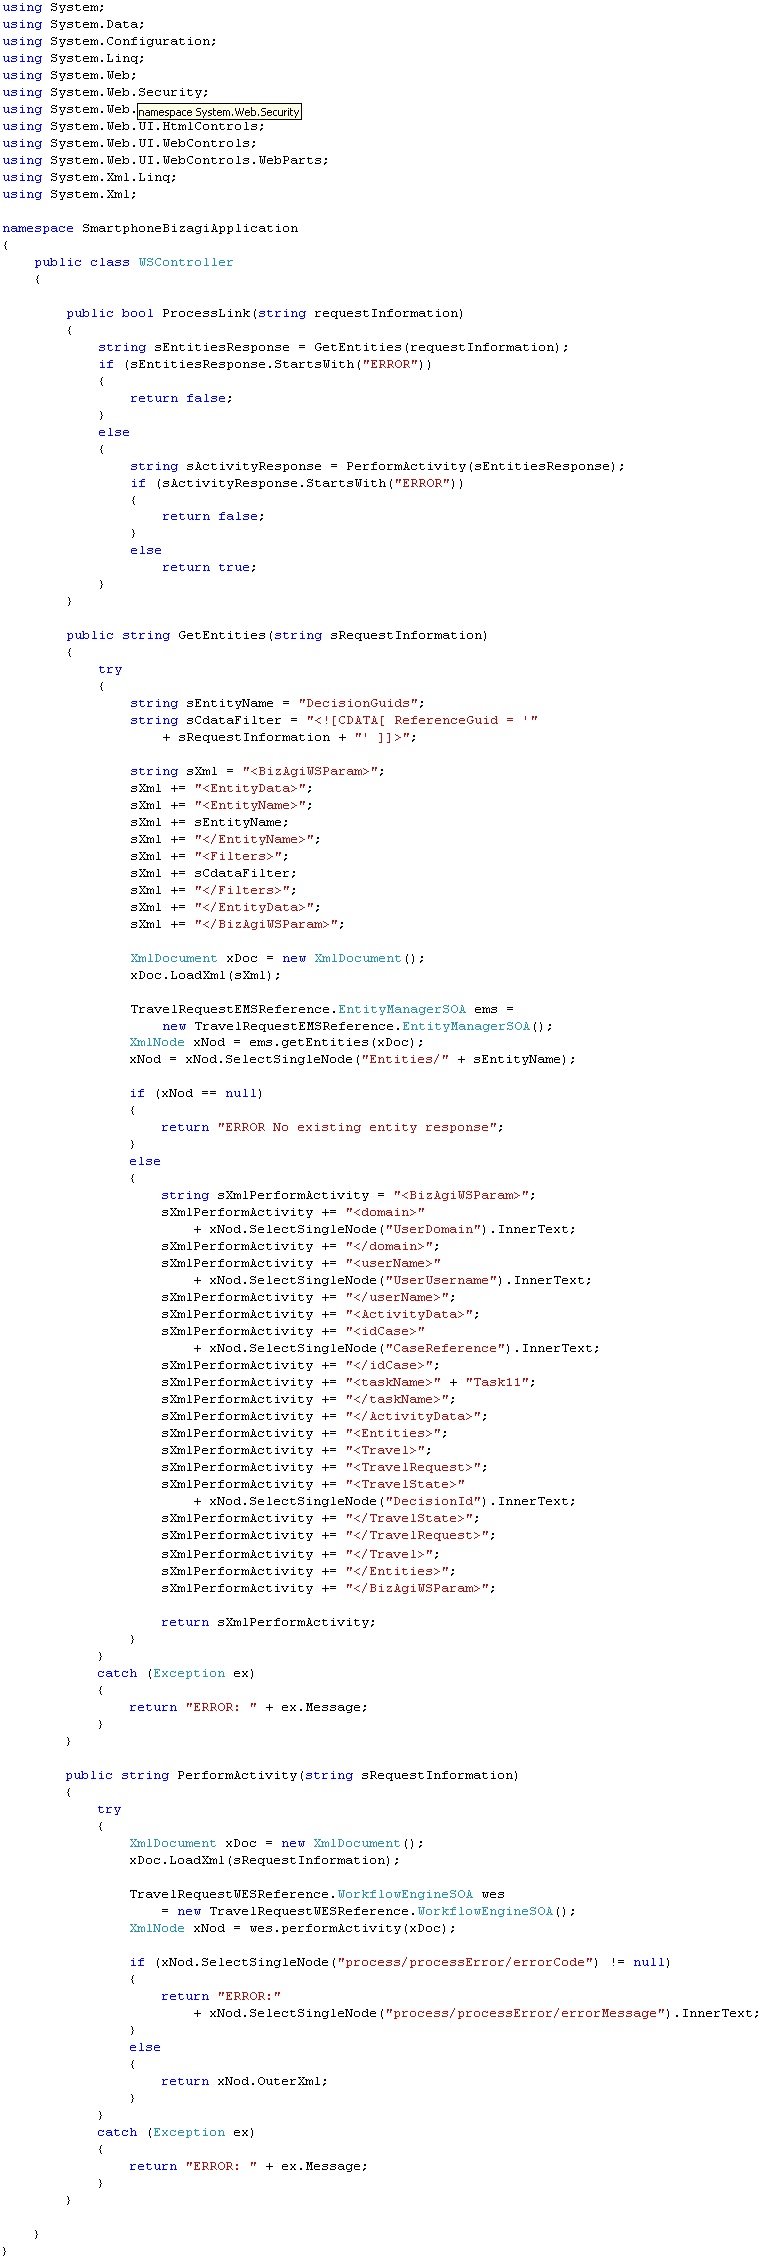
The invocation of the web services are carried out in a different class, called WSController.cs.
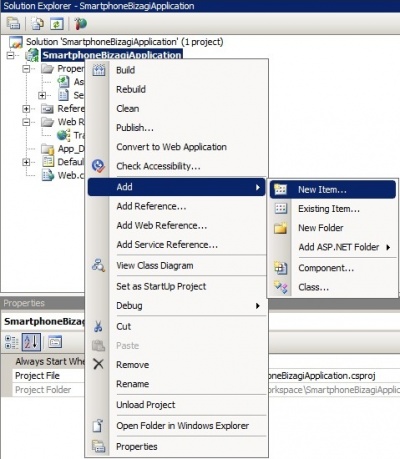
To create the WSController class, add a new item to your project as shown:
The resulting WSController.cs uses the getEntities to gather the case's information from the Guid token and then uses the performActivity web service to set the approval or rejection.
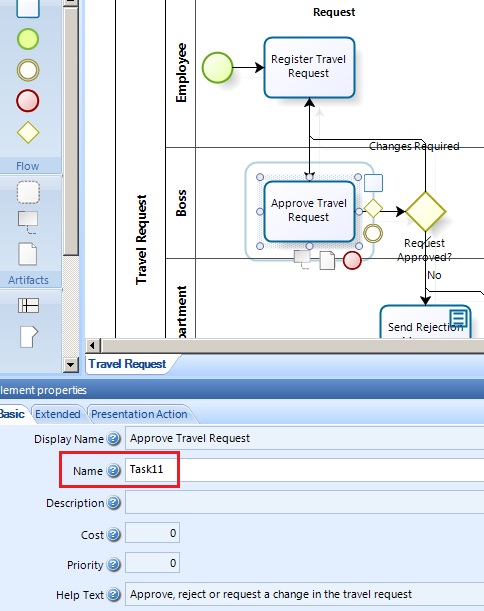
Notice that the taskName's value is fixed, since this example id done for the Approve travel request activity, which is "Task11".
Download the complete Visual Studio example project here.
Index1.htm and Index2.htm are just the final html pages that will be loaded to show to the user that the request has been processed. For this example, Index1 was launched if an error occurred while processing the task, and Index2 showed a success message.
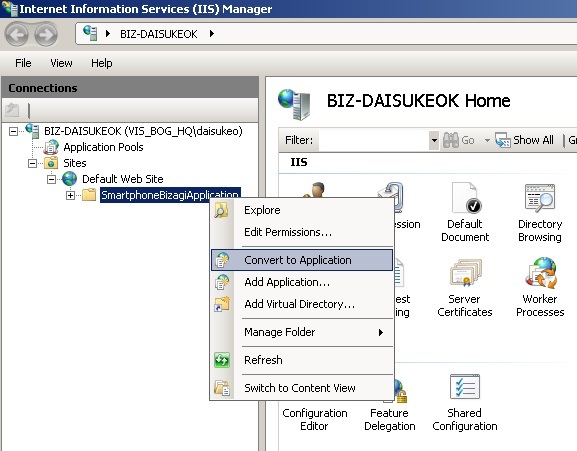
Finally, mount these files in the server's IIS as an application so that access from the link is possible (as http://[your_Bizagi_server]/[your_iis_application]/Default.aspx).
To do so, first copy the solution folder into the server's C:\inetpub\wwwroot\path.
Open the IIS manager. You may do so from the run command as shown:
Right-click on the copied folder and select the convert to application option.
At this point, the travel request process is set to send e-mail notifications to the boss allowing him/her to approve or reject the case from the smartphone!
<comments/>
