How to include documents anytime in Bizagi
From Business Process Management, BPM and Workflow Automation Wiki | BizAgi BPMS
<keywords content="keywords"> case documents, case document management, new documents, edit, new, edit documents, documents repository, documents, case document. </keywords>
Contents |
How to include documents anytime in Bizagi
Overview
For many processes, documents make up a major part of the information necessary to work in a case.
In some business scenarios, we cannot foresee how many documents will be attached to the process, or even when will they be ready.
In this article, we will illustrate how to include a design pattern in Bizagi to present an option to include uploads anytime during the process.
Within the design and approach presented in this article, authorized end users will be able to:
1. Have the possibility to upload documents anytime during the process. This is covered in the process model by including an BPMN intermediate event, which is always available for the end users.
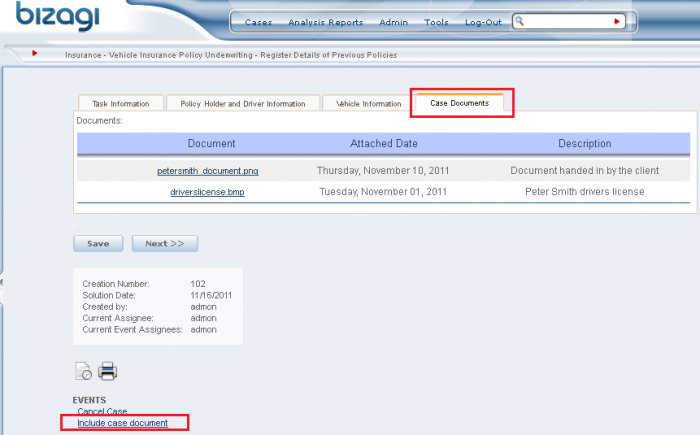
2. View all the documents uploaded to the activities of the process. This is shown as predefined for each activity (in the user interface, in a common tab).
This design is included by doing 3 easy steps (no advanced topics are involved in the steps described below).
All of these steps completion are assisted by Bizagi's wizards, and without the need for programming!
Notice that this design is similar to the options presented by an out-of-the-box-feature in Bizagi called case notes.
View more information about Case Notes.
If you wish to manage documents in the process in a different way, please review this guide to manage documents in Bizagi.
How to do this?
To include the document management in Bizagi so that they can be uploaded anytime, the following steps are needed:
1. Including a BPMN intermediate event.
2. Creating an entity for the documents repository.
3. Defining the user interface for the event and activities.
Example
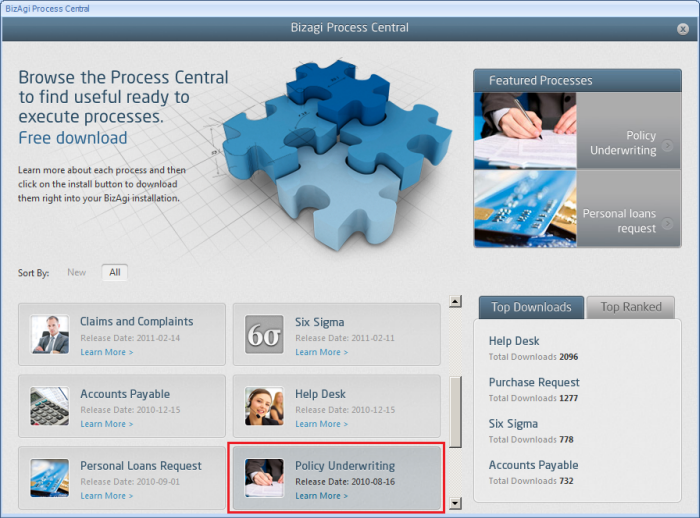
To illustrate the design presented in this article, we will use as an example the "Vehicle Insurance Policy Underwriting" process (available from the "Policy Underwriting" Process Central template).
For the vehicle insurance policy underwritting process, we proceed with the previously mentioned 3 steps.
Including a BPMN intermediate event
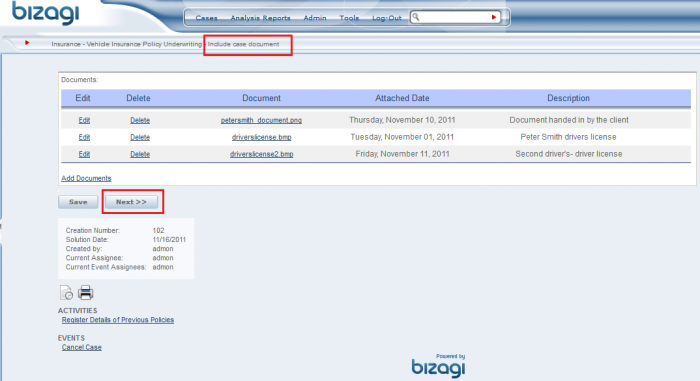
In this step we will edit the process model so that we can include an "always available" BPMN intermediate event. This event will be called "Include case document", and it will be available for any end user to upload a new document.
To edit the process model, we go to the Process Wizard Step 1 "Model Process" and edit the process.
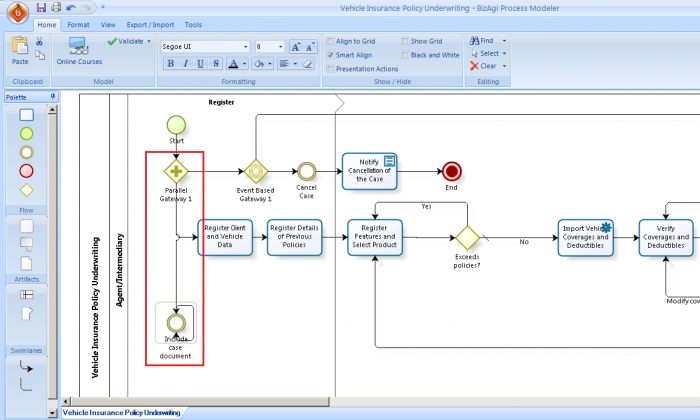
We include a new intermediate event parting from the parallel gateway "Parallel Gateway 1".
Notice that the transition following this "Include case document" event is the same event itself.
This is done so that this event becomes available once again, each time the end user working on it clicks on "Next".
Creating an entity for the documents repository
In this step we create an entity in Bizagi's data model to serve as the documents "repository".
To create our documents entity, we go to the Process Wizard Step 2 "Model Data" and load the data model diagram.
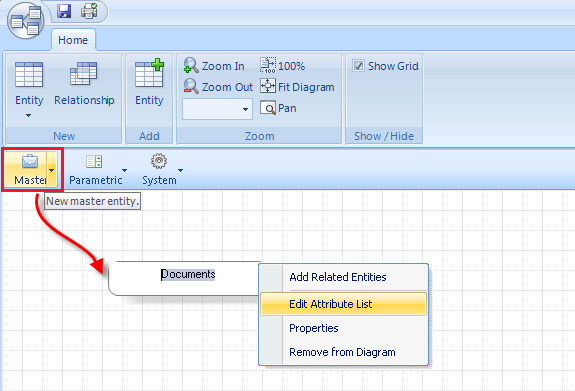
We include a new master entity by dragging the "master" icon located at the top left corner into our diagram workspace.
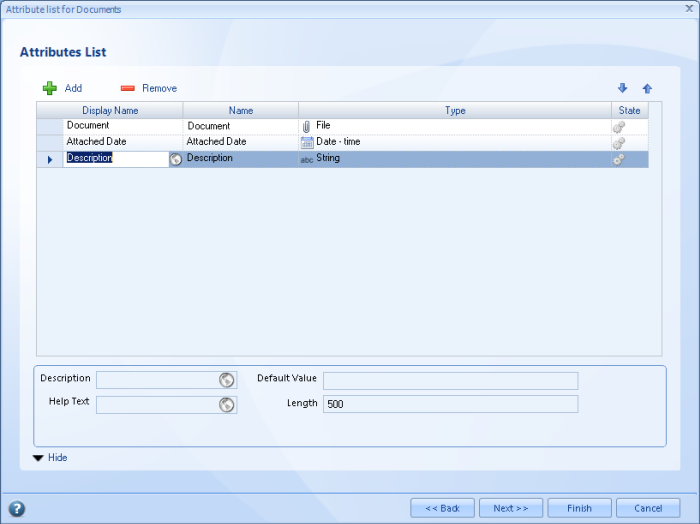
We name the entity (in our example is called "Documents") and define (edit) its attribute list:
Notice that we created 3 attributes:
+ A File-type attribute called "Document" to store the uploaded file. Take into account that a file-type attribute in Bizagi can store more than 1 file.
+ A String-type attribute called "Description" to provide a textbox for observations or clarifications concerning the uploaded file.
+ A Datetime-type attribute called "Attached Date" to automatically record the date in which the file is uploaded.
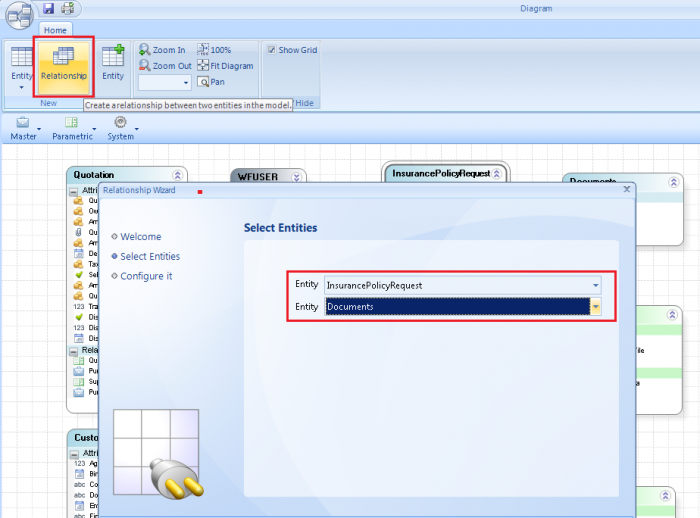
Now, we must define that in our process we can have a collection (1 or more) documents. To do this, in our data model we create a relationship between our Process entity (called "InsurancePolicyRequest" in the "Vehicle Insurance Policy Underwriting" process), and our recently created "Documents" entity.
We select the "Relationship" option at the top left corner:
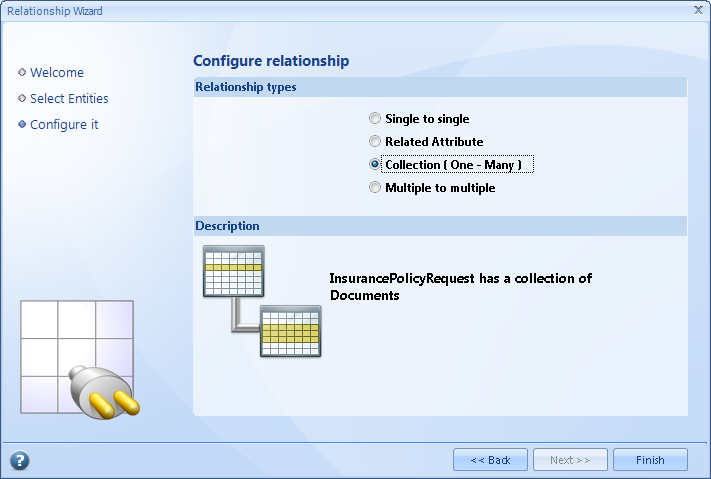
We specify that this relationship is a collection type (one-to-many):
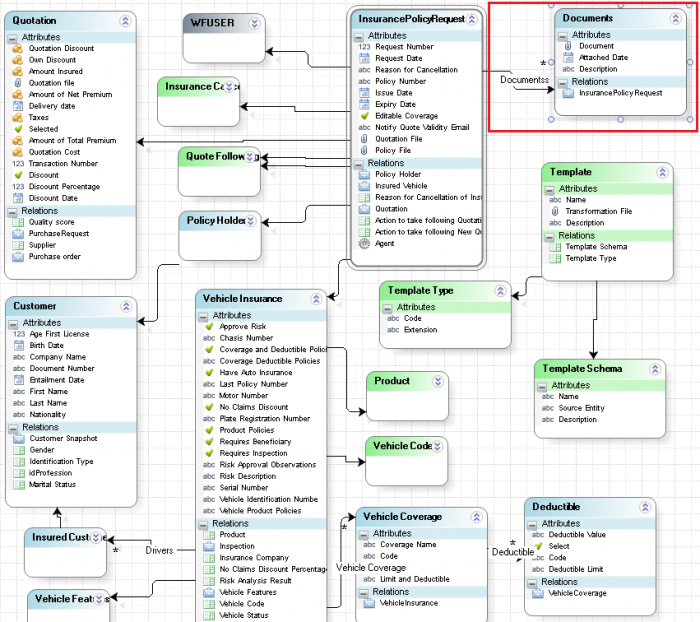
Finally, our data model diagram will have our process entity contain a collection of Documents, and it will look something like this:
Defining the user interface for the event and activities
In this step we will design the user interfaces (forms) for both our event (called "Include case document") and the rest of the activities to which we want to display the uploaded documents.
We will proceed to define the forms that allow adding, editing, deleting and viewing the documents.
In our example, the addition, edition or deletion of documents is done in the event's form; and in the rest of the activities the set of uploaded documents will be seen as read-only.
To define the forms for our documents management, we will need to first pre-define one form for the addition/edition of documents, and one form to view (as read-only) these documents.
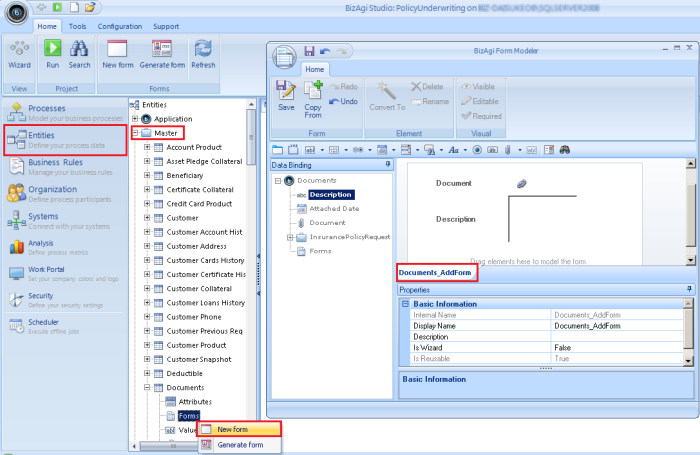
First, we go to the "Modules View" and locate in the "Entities" item our created "Documents" entity. We create our first form for this entity, as shown below. This form will be used to allow adding or editing documents:
Remember that modelling our forms just requires dragging and dropping of our attributes in the left panel into the form's design area.
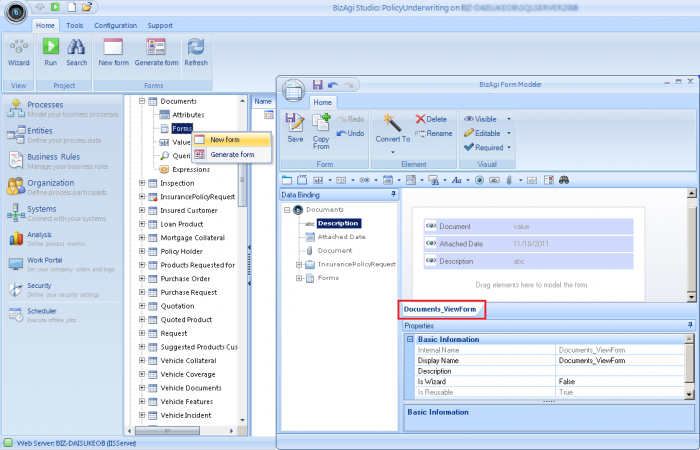
We repeat the previous step to create the second form, which will be used to display the case notes as read-only in the rest of the activities of the process:
Once we have created these 2 forms, we go back to the "Wizard View" and into the Process Wizard Step 3 "Define Forms".
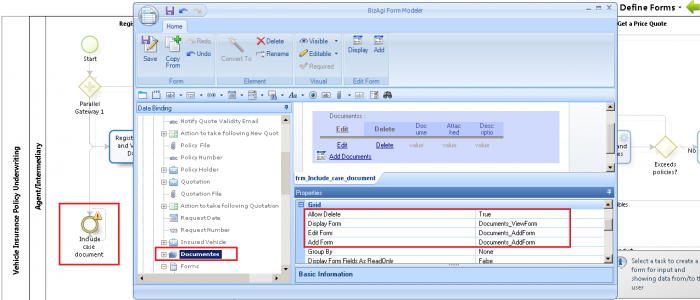
We click on the "Include case notes" event to define the form for this event:
Notice that we are allowing deletion of documents, and that: our display form is "Documents_ViewForm" (the second one created previously for the Documents entity), our edit form and add form is "Documents_AddForm" (the first one created previously for the Documents entity).
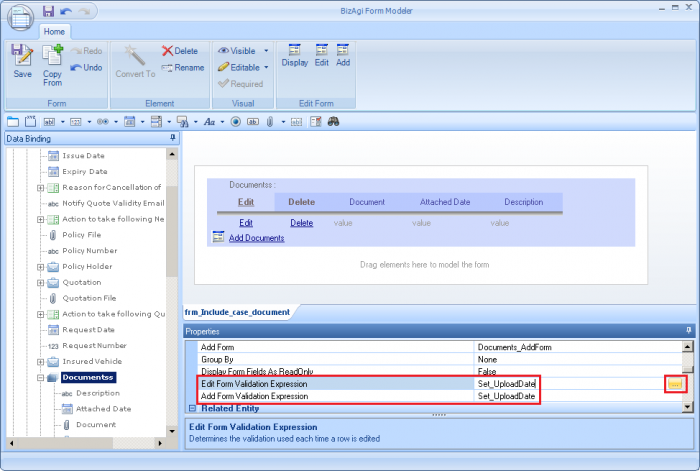
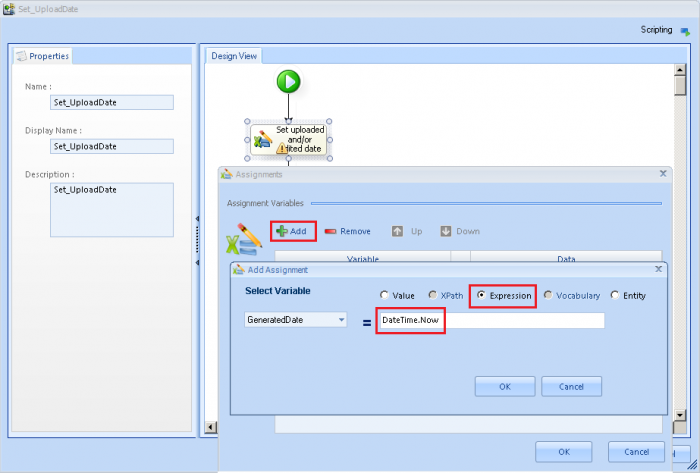
In this same form, and in those grid's properties, we include an expression to set the "Attached Date" attribute with the current date.
To do this, we create one expression to set it for the "Edit form Validation expression" and "Add form Validation expression":
Our expression is called "Set_UploadDate" and contains one assignment module as shown:
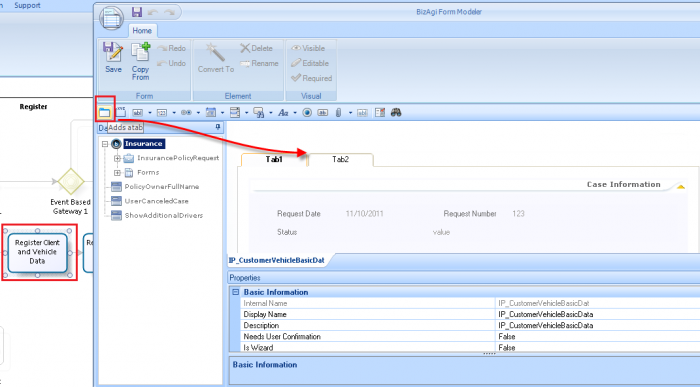
Now we have defined the forms for our documents' entry point. We proceed to include in the rest of the activities' forms, a tab to show as read-only our documents.
To do this, click on the activities in this same Wizard's Step 3, to edit their current form.
The first activity in this process is called "Register Client and Vehicle Data". We including tab design by dragging and dropping tabs into the form:
The last tab will be displayed as "Case documents" and it will contain the documents information.
In order to reuse the design in this tab, we create an independent form at this level:
This reusable form will be called "Documents_TabForm" and will only have as a display Form the "Documents_ViewForm". No deletion, addition or edition of documents will be possible for these activities.
Make sure the grid is set as non-editable:
Finally, all we have to do is drag and drop the "Documents_TabForm" in our "Case documents" tab to include the read-only documents view in any of the rest of the activities of the process.
At this point we are set for our documents management in the "Vehicle Insurance Policy Underwriting" process!
Remember that end users will add, edit or delete new uploads from the "Include case documents" intermediate event. Once they click on "Next", the documents will be visible in the rest of the activities, and the event will be available once again for any user to manage the documents.
Related Articles
- View how to enhance this design to support dynamic management of templates to generate documents..
<comments/>
