ECM Integration
From Business Process Management, BPM and Workflow Automation Wiki | BizAgi BPMS
<keywords content="keywords"> ECM, Enterprise Content Management, CMIS, Content Management Interoperability Services, document management, upload document, Alfresco, SharePoint, Share Point, Documentum, alfresco, sharepoint, share point, documentum </keywords>
Contents |
ECM Integration
Bizagi offers out-of-the-box support for integration with ECM systems. In this way, files attached (uploaded) to a process activity will be stored automatically in the central document repository (ECM), and not in Bizagi. Additionally several operations are available on a document: check-out, update, update file metadata, undo check-out and delete.
This integration requires that the ECM complies with the CMIS 1.0 (Content Management Interoperability Services) standard. This new standard consists of a generic set of web services which expose the capabilities of the ECM. Most major players in the ECM industry support (or will shortly) the CMIS standard. In this way Bizagi can be easily integrated with leading products like: SharePoint, Alfresco, Documentum, etc.
In this document we present examples with Alfresco 3.4a, SharePoint 2010 and Documentum 6.6.
Before Getting Started
Before our examples can be followed is necessary to have installed and configured the ECM. Configure the structure of the repository where documents are going to be stored. This configuration also includes creating the custom content types with the desire metadata for the particular document.
Alfresco
- For Alfresco the ECM administrator must create a Space to be used only for one Bizagi project and create all the necessary content types.
SharePoint
- To work with SharePoint, follow these steps:
|
Note: For more detail instructions read the "Installing and configuring the CMIS connector" section here. |
1. Download and install the SharePoint Administration Toolkit which contains the CMIS connector.
2. Activate and deploy the connector by first running the following command in the SharePoint 2010 Management Shell (find it in Start – All Programs - Microsoft SharePoint 2010 Products):
Add-SPSolution –LiteralPath 'C:\Program Files\Microsoft\SharePoint 2010 Administration Tookit\Content Management Interoperability Services (CMIS) Connectors\spcmis.wsp'
3. Then in the SharePoint Central Administrator, from the System Settings menu select Manage Farm Solutions. Select spscmis.wsp and click on Deploy Solutions.
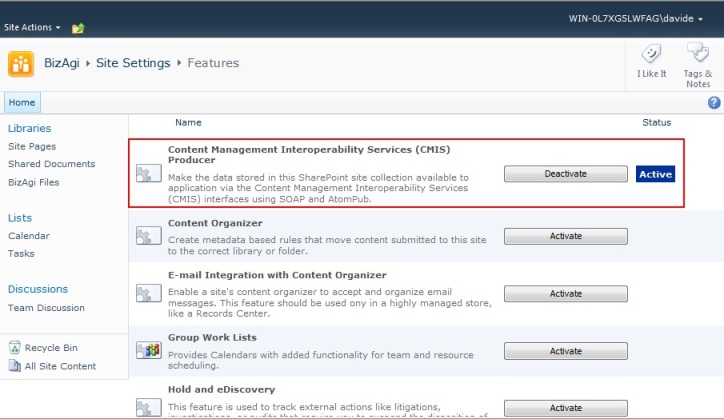
4. Now the rest of the configuration is on the Site designated as the producer. Go to Site Settings and from Site Actions select Manage Site Features. Here, activate the CMIS Producer.
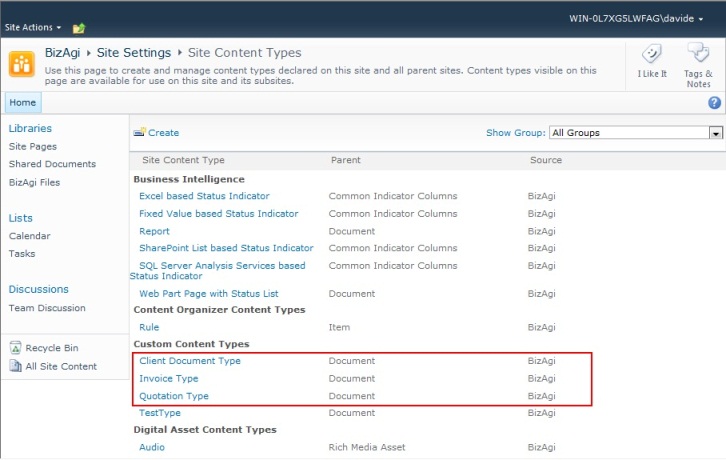
5. Create the content types in Site Settings – Galleries – Site Content Types.
6. Go to Library Settings.
In its General Settings go to Advanced Settings. Here it is required to allow management of content types (specifying "Yes" for the question: "Allow management of content types?").
In the end, the settings should be as shown in the picture:
|
Note: Additionally to work with Bizagi Enterprise JEE Edition, is necessary to enable the Basic Authentication for SharePoint on the IIS. For the .NET Edition do not enable the Basic Authentication. |
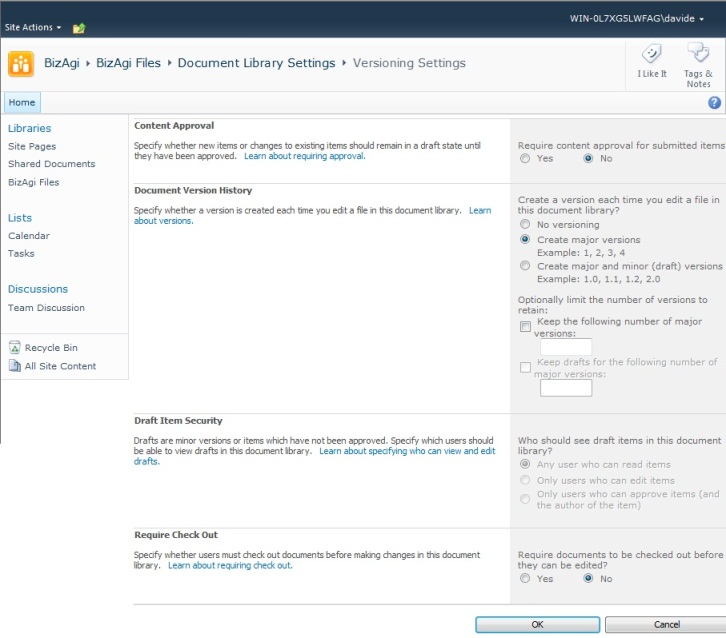
7. In the same Library Settings, in the General Settings section select Versioning Settings and configure it as shown in the picture:
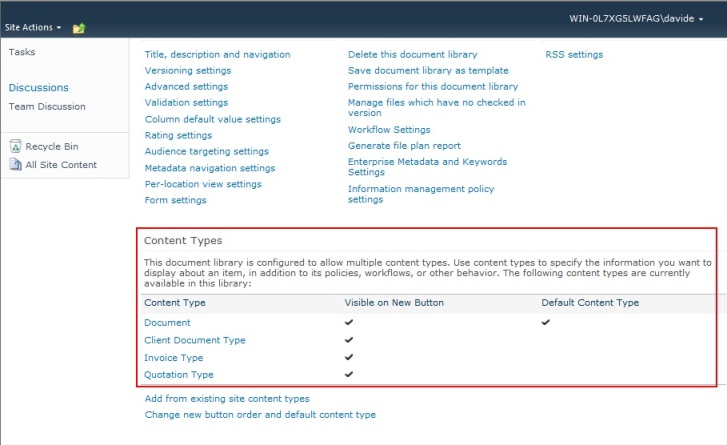
8. Finally, create a document repository (here is used one called Bizagi Files) or use an existing one like Shared Documents. To do this, enter into the repository and select the tab Library. Back in the Library Settings on the Content Types section, add the ones wanted to be used in the repository by clicking on Add from existing site content type.
Documentum
- Installation of CMIS in ECM Documentum:
Actually, Documentum 6.7 that will shortly be released is the product version that officially will support CMIS 1.0, but for now the current Documentum 6.6 is already compliant with CMIS. For this version, EMC provides CMIS early access releases (the latest is number 4), click on this link (registration required) to downloaded it and follow the instructions on the Deployment Guide.
1. Define ECM
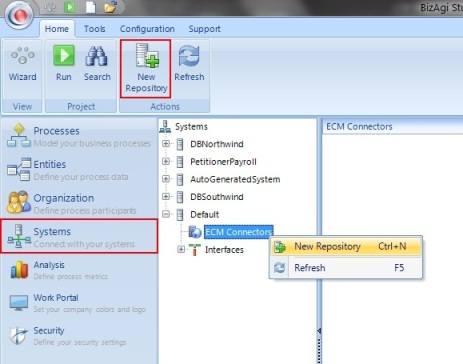
The first step is to define the ECM to be used, in the Modules View. Select Systems, where is possible to use an existing System or create a new one. Expand the System and select ECM Connectors. Right click on it (or click on the action button that appears) and select New Repository.
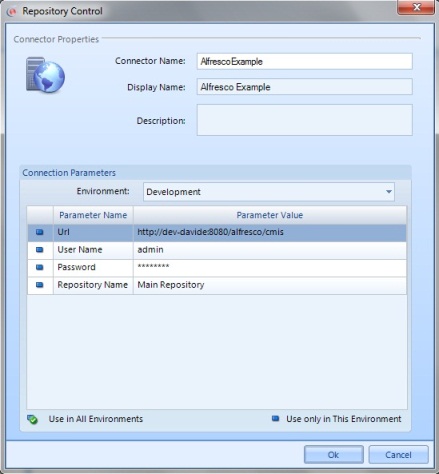
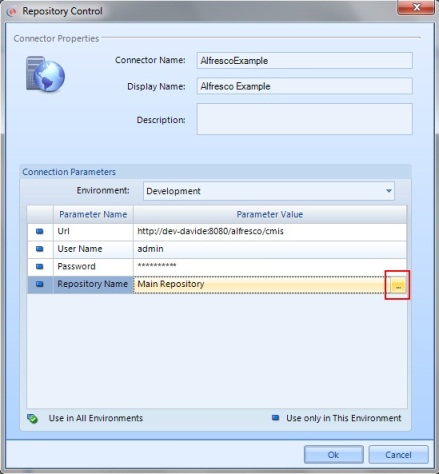
This opens a new window. In this Repository Control window, type the Connector Name (without spaces or special characters), the Display Name and Description. This is a logical name for the ECM used by Bizagi.
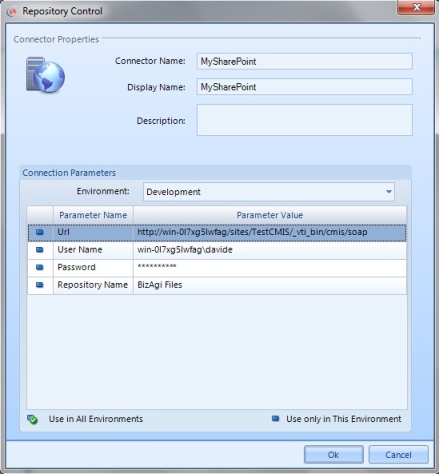
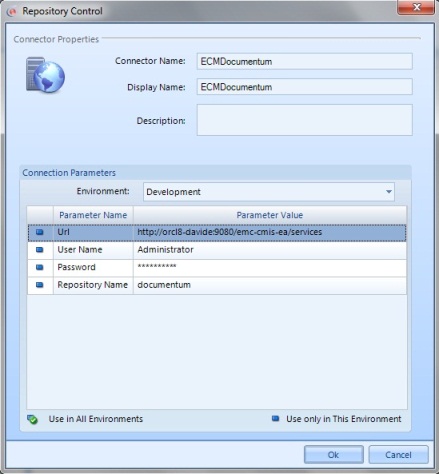
In the Connection Parameters section, include the URL to the interoperability services of the ECM server, the User Name used to upload documents (all operations done to the documents will be registered as done by this user), the user’s Password, and finally the Repository Name.
- For Alfresco, the URL will be the same as for the application but adding "/cmis", for example:
- For SharePoint it is important to remember that the User Name must be in the form domain\user; and for the URL parameter add to the site’s URL "/_vti_bin/cmis/soap", like shown in the following picture:
- When configuring Documentum use the URL "http://<host>:<port>/emc-cmis-ea/services", here is an example:
Is necessary to enter the values of the first three parameters before entering the Repository Name; this is because for this last parameter Bizagi connects for the first time to the ECM and retrieves a list of repositories. Select the Parameter Value column for the Repository Name and then click on the button that appears on the right side.
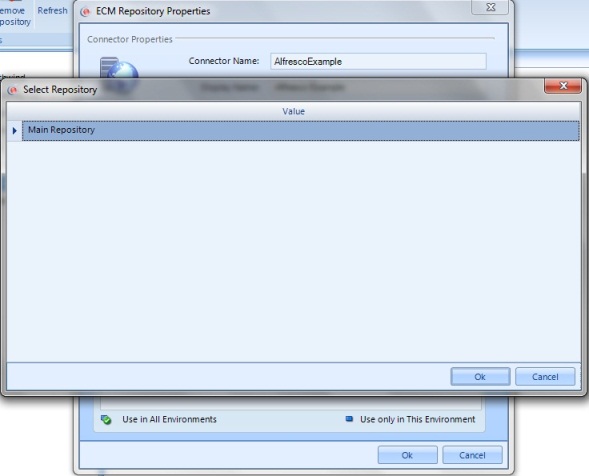
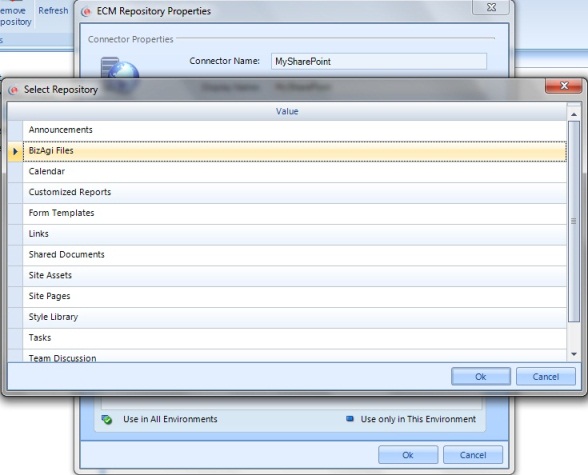
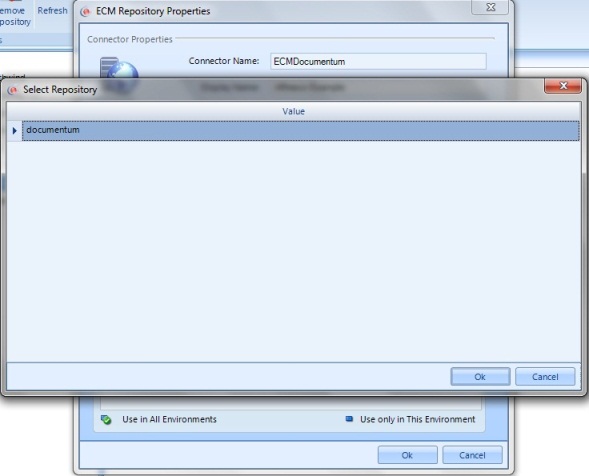
This opens a new window where all available repositories existing in the ECM are shown; choose the repository that is going to be used.
- For Alfresco there is only the Main Repository.
- On SharePoint is possible to select one already created like Shared Documents or one created especially for this purpose (in this example Bizagi Files).
- Select any existing repository in the Documentum server.
2. Define Folders
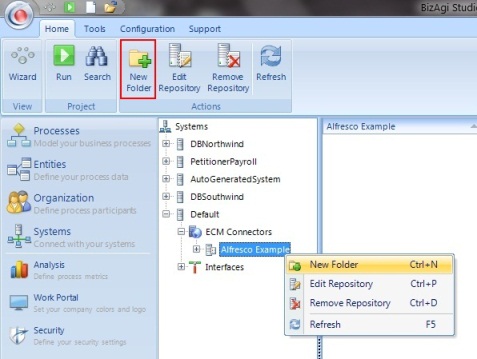
Once the connection to the ECM has been configured, it is necessary to define which ECM folders will be used to store documents. This will be used by Bizagi to upload the documents to the folder structure (hierarchy) that has been defined by the ECM administrator. It is required to define at least one folder. Select the New Folder option for the recently created repository.
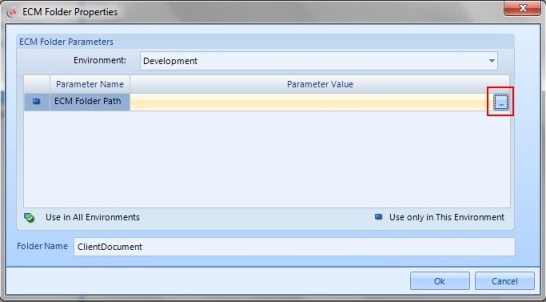
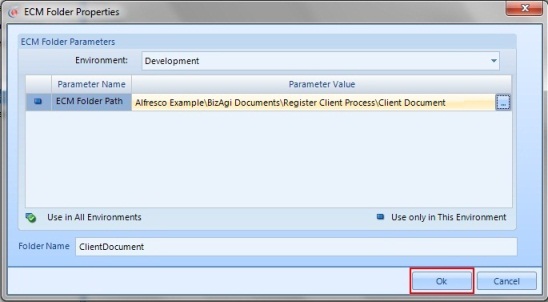
In the ECM Folder Properties window, first type a name for the folder and then click on the Parameter Value for the ECM Folder Path.
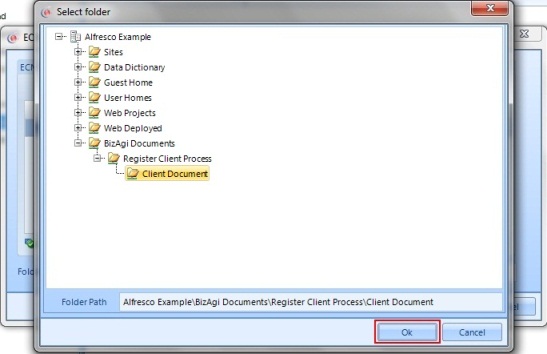
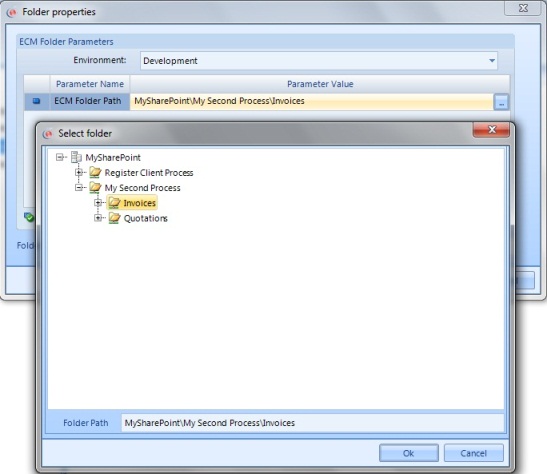
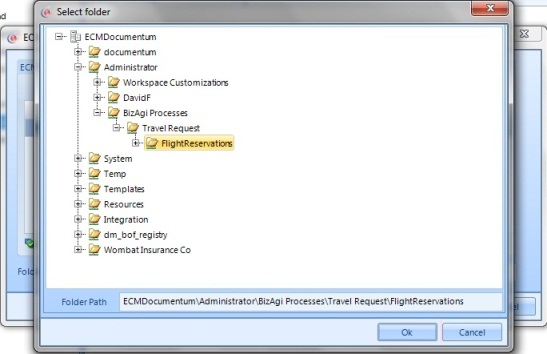
In another window, Bizagi connects to the ECM and is able to show the file system for the configured repository. Select the matching folder in the content management system, for this one created in Bizagi. Click on Ok to close that window.
- Alfresco:
- SharePoint:
- Documentum:
Then click on Ok on the other window to save the value.
3. Define Forms where Documents can be Uploaded
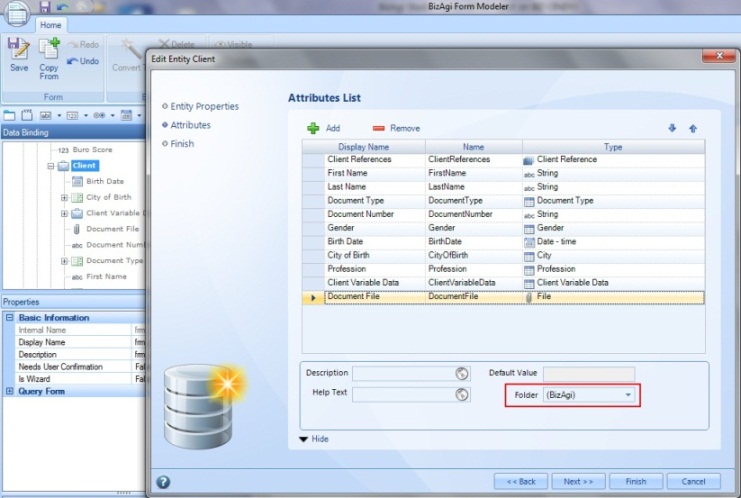
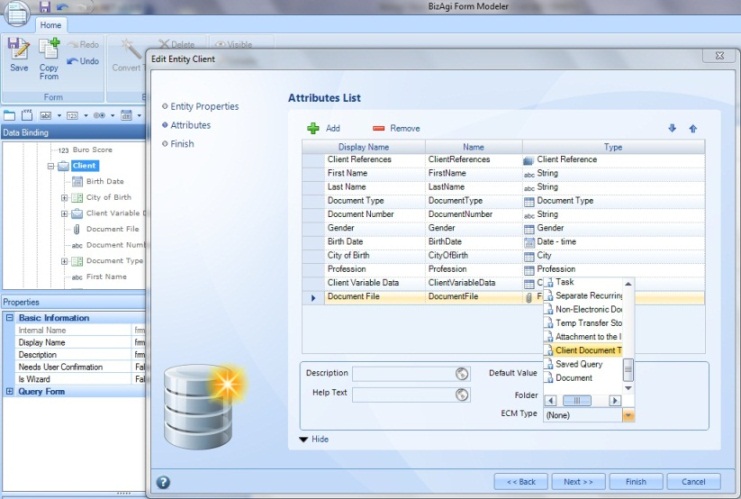
In each form where an upload is possible an attribute of type File must be used, and it has to be associated with the place in the ECM where it will be stored. Go to the third step of the Process Wizard (Define Forms) and select the activity where the attribute will be added. On the Data Binding window find the attribute that is going to be associated with the ECM and edit the entity where it is found. In this example the attribute Document File in the Client entity is going to be used. This attribute will contain an image (.jpg) of the client’s identification document. Notice that when this attribute of File type is selected, one additional property is shown, Folder.
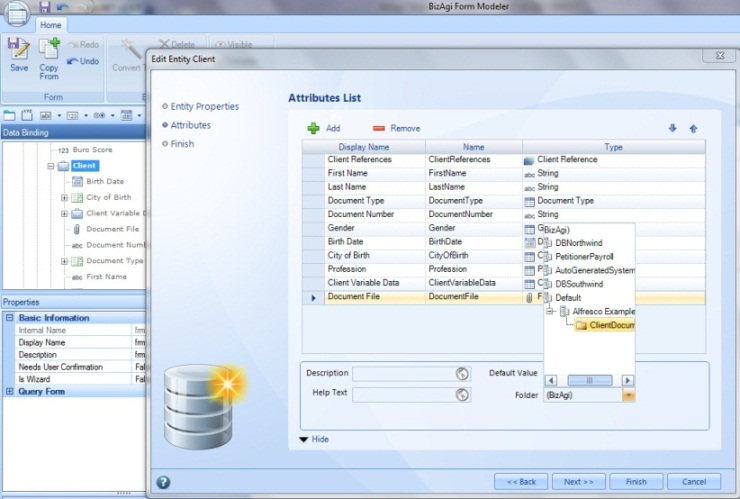
In Folder, is possible to select one of the folders created for the repository configured in Systems, double click on the desired folder to select it. If (Bizagi) is selected, this means the uploaded files are going to be managed by Bizagi, not by an ECM.
After a folder different from Bizagi is selected, the property ECM Type appears. To populate this drop down list Bizagi connects to the ECM and shows a list of all existing Content Types in the repository.
|
Note: When working with Alfresco, even those types which are not valid for documents are shown. To avoid errors in the user interface just select one of the Custom Content Types created in the Alfresco server. For this example the Client Document Type was created and is going to be used. For SharePoint only content types registered in the repository are shown. In Documentum early implementation of CMIS, exists an issue when retrieving the object types. First when custom object types are created in Documentum, these are not immediately included in the list Bizagi gets; and second this list does not include the objects’ display name. For this reason in Bizagi it may be a little confusing trying to select the Content Type. Identify the desire Content Type by viewing the metadata. |
Select the Content Type; double click on it to select it. Click on Finish to save changes made to the attribute.
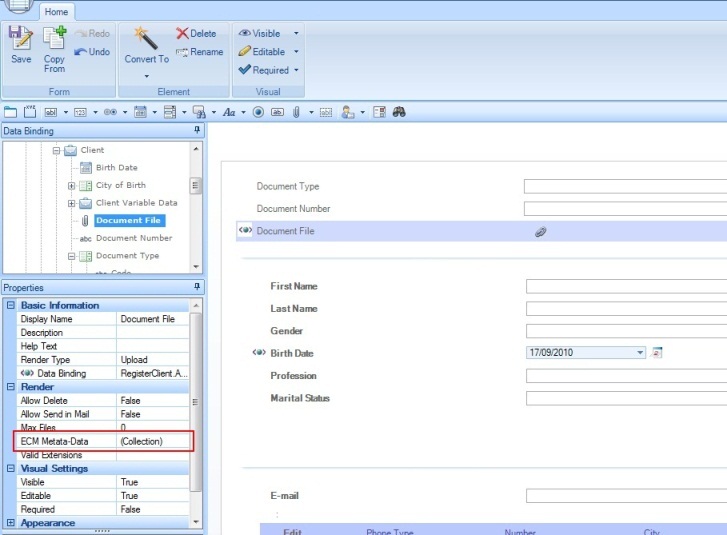
The next step is to include this attribute in a form of the process. Drag and drop the attribute into the form and notice the ECM Meta-Data property.
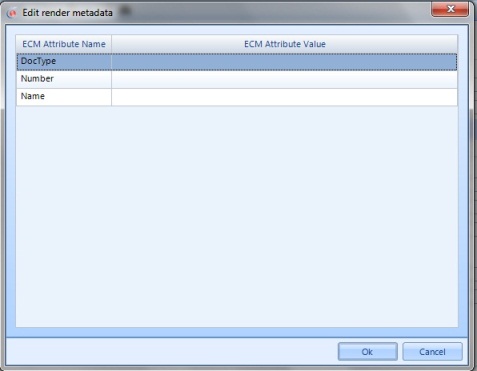
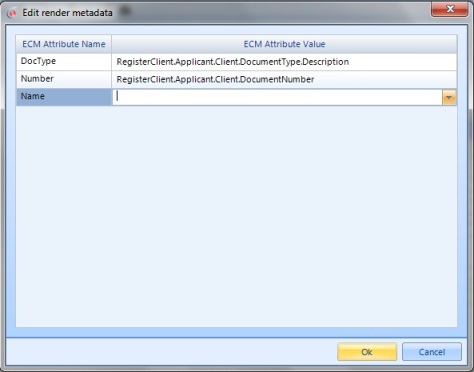
When the value cell of this property is clicked, a new window opens showing the metadata for the particular Custom Content Type selected for this attribute (this information is brought from the repository). For this example there are three ECM Attributes: DocType, Number and Name. It is only possible to have ECM Attributes of type "string", "integer", "decimal", "date" and "boolean".
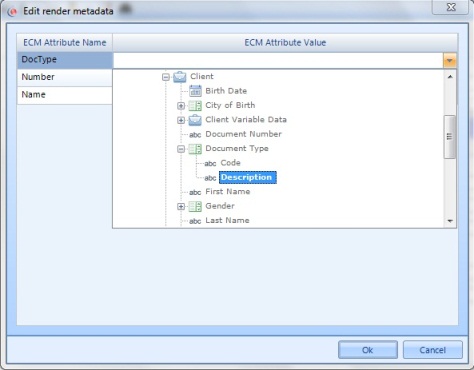
For each ECM Attribute is possible to select an XPath so its value can be set automatically in the Work Portal. If an XPath is not selected, the value for the ECM Attribute may be entered manually when the file is uploaded. To select the XPath just click on the ECM Attribute Value cell and navigate the data model until the desired Bizagi attribute is found (double click to select).
For this example, one of the ECM Attributes (Name) will not have an XPath. Click on Ok to save changes.
4. Upload/Attach a Document to the Process
Now let’s see how all this is used in the running process.
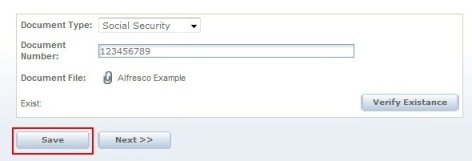
In the form where the file will be uploaded, are also included the attributes selected as XPaths for the ECM Attributes. So, in the user interface, first enter the values for Document Type and Document Number and then click on the Save button of the form.
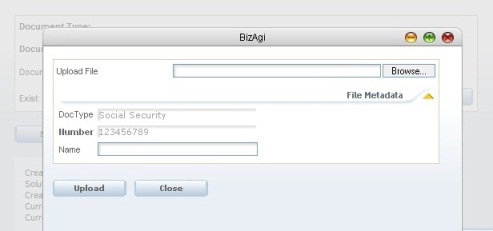
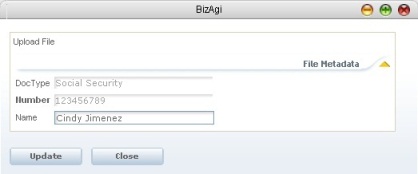
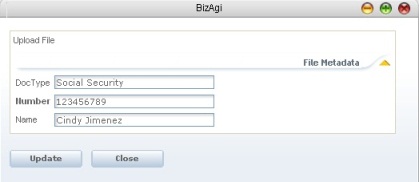
By doing this, when the clip icon is clicked to upload the document, it is possible to see the File Metadata that has XPaths, with the corresponding values. The ECM Attribute that was left without an XPath is shown with a textbox so it can be entered manually. Notice that in the File Metadata, the Number attribute is in bold, this means that it is required, and if it is not filled when the file is uploaded, an error will occur.
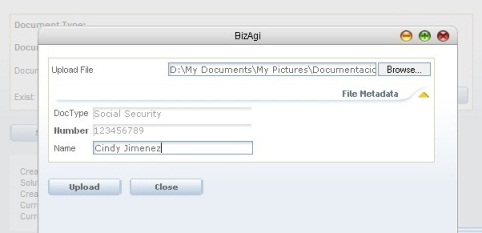
To select the document just click on Browse and select the file, like in any other file control.
Enter the Name (optional, not required field).
When done click on Upload.
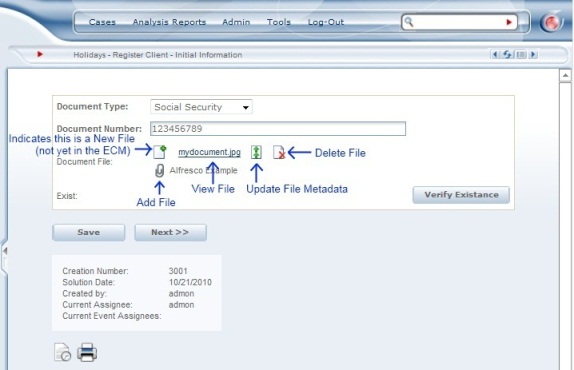
At this point, the file has not yet been stored in the ECM. Once you click on the Next button Bizagi commits the transaction and the file is stored in the ECM. For this same reason at this point the only actions on this document are: View File, Update File Metadata and Delete File.
![]() View File: Click on the file name to open the file just to view it or to save a local copy. If a document is modified, changes can only be saved locally, not in the ECM.
View File: Click on the file name to open the file just to view it or to save a local copy. If a document is modified, changes can only be saved locally, not in the ECM.
![]() Update File Metadata: Opens a new window to edit the file metadata, here is only possible to change properties with no XPath configured.
Update File Metadata: Opens a new window to edit the file metadata, here is only possible to change properties with no XPath configured.
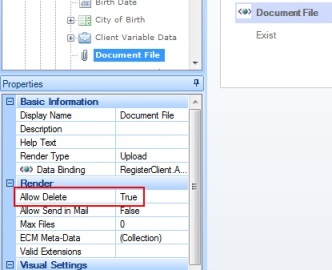
![]() Delete File: This option is shown only if in the render properties was selected to permit the deletion of files.
Delete File: This option is shown only if in the render properties was selected to permit the deletion of files.
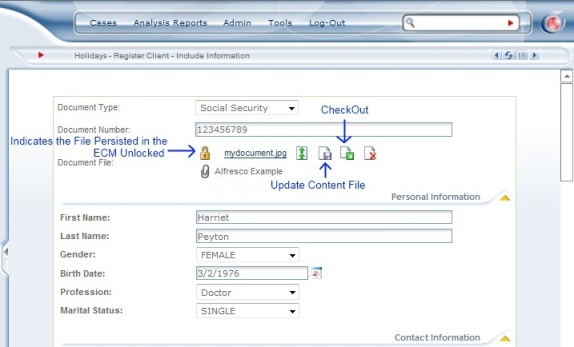
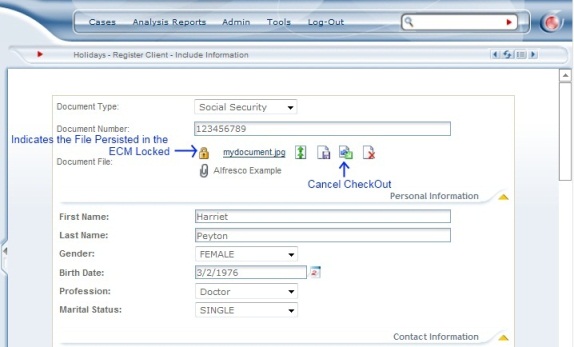
After the Next button has been clicked and the case moves to the following activity, if the render is Editable then the available actions on this file are: View File, Update File Metadata, Update Content File, CheckOut and Delete File. If the render is non-editable, the only valid operation on the file is to view it.
![]() View File: Click on the file name to open the file just to view it or to save a local copy. If a document is modified, changes can only be saved locally, not in the ECM.
View File: Click on the file name to open the file just to view it or to save a local copy. If a document is modified, changes can only be saved locally, not in the ECM.
![]() Update File Metadata: Opens a new window to edit the file metadata, once the file has persisted in the ECM is possible to modify all properties.
Update File Metadata: Opens a new window to edit the file metadata, once the file has persisted in the ECM is possible to modify all properties.
![]() Update Content File: With this option is possible to replace all the file content. The name initially given to the file is not change, even if the new file has another name. Performing this operation executes an automatic CheckOut.
Update Content File: With this option is possible to replace all the file content. The name initially given to the file is not change, even if the new file has another name. Performing this operation executes an automatic CheckOut.
![]() CheckOut: Locks the file so it cannot be modified by any other user in other activity or in the repository.
CheckOut: Locks the file so it cannot be modified by any other user in other activity or in the repository.
![]() Cancel CheckOut: This icon appears either when the CheckOut or Update Content File options are selected. When clicked, unlocks the file and restores the file previous to the Update Content File.
Cancel CheckOut: This icon appears either when the CheckOut or Update Content File options are selected. When clicked, unlocks the file and restores the file previous to the Update Content File.
Delete File: This option is shown only if in the render properties was selected to permit the deletion of files.
There is not a CheckIn option because changes made to a file (Upload Content File) are checked-in (or persisted) when the Next button is clicked and the case gets to the following activity.
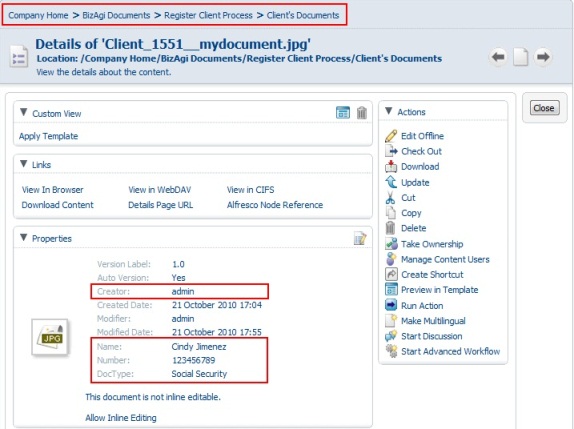
The following picture shows an Alfresco snapshot after a file was uploaded from Bizagi. Notice that it was saved in the selected folder, the creator is the user configured in Bizagi, and the metadata was set correctly.
Important Notes
- Folders creation is not supported with Alfresco 4.0.a. Full functionality is supported until version 4.0.0 (4003).
- Some repositories, like Alfresco, support different content types, for example D:BPM:Task, which are proprietary of the ECM. These content types are proprietary and should not be used in Bizagi even though they are shown when configuring the attribute in the Attribute List on an Entity. Use only custom content types (created by the administrator).
- Since Bizagi uses one common user to create, modify and update files in the ECM, it is not possible to know exactly which Bizagi users made modifications to a file.
- Properties of a file metadata can only be of type string, integer, decimal, date and boolean. If there are other types of properties these are shown but cannot be edited, and will not cause an error unless they are mandatory.
- A restriction of the CMIS 1.0 standard is that is not possible to assign "null" value to properties of a file metadata. This means that after a property is set to a value, the only allow change (using Update File Metadata) is to another value, not to erase the existing one.
- This integration only supports uploading files using the upload functionality of Bizagi. If letters or other types of documents are created in the process, in order to store them in the ECM, the user must first save them locally and upload them using the upload button.
- File attributes associated to an ECM must be part of a Master entity. They cannot be in Parameter entities or other type of entities.
- Files uploaded through Bizagi should not be erased directly from the repository, neither it is advisable to make Check In/Check Out operations while the document is related to an open case in Bizagi.
- In Bizagi the maximum size allowed for an uploaded document can be configured. This size limit also applies to documents being uploaded to the ECM.
- Since it is very likely that documents with the same name may be stored in the same folder, Bizagi automatically includes a unique identifier as a prefix.
- Some browsers have a security option which blocks popup windows. The view option usually opens in a new window, so use the combination Ctrl + Click to open the popup window.
ECMs in Production
To guarantee the correct performance of all environments and once a project has been deployed, it will not be possible to delete ECMs integrated to a process version already working in the Production environment.
Management of these ECMs' configuration values in the Test or Production environment will be done directly with the Management Console in each project's environment separately.
Related Articles
<comments />
