How to configure access control
From Business Process Management, BPM and Workflow Automation Wiki | BizAgi BPMS
<keywords content="keywords"> access rights, permission, permissions </keywords>
Contents |
How to Define Access Rights to Users on the WEB (Work Portal)
In Bizagi, all users have access to all pages in the web application by default. In order to control access to those pages it is very important to set each one in the Authorization menu. Access rights to Parameter Entities, Administration pages, New cases and Policies can be controlled for a User Role or User Group.
The control to these pages is allowed or denied in the Security Menu.
Please click to learn more about How to manage Access Rights to the Work Portal in different environments (Development, testing, production)
|
Note: In the JEE Edition when the authorization is configured, restart the Application Server to view the changes on the Work Portal. |
How to Allow Access Rights to Parameter Entities
In this example, the Vacation Request process has a Parameter Entity called Rejected Reason. Three roles have been defined: Analysis, Management and Director, and the following rights are to be set for each of them:
- The Director role is able to view and modify the entity. I.e. the role has Full Access Rights.
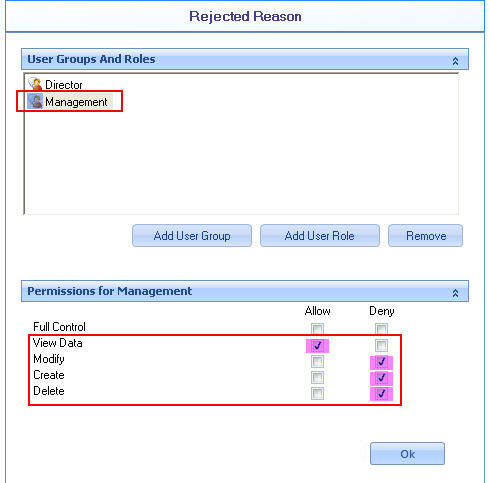
- The Management role is able to view the entity´s data but is not able to edit it.
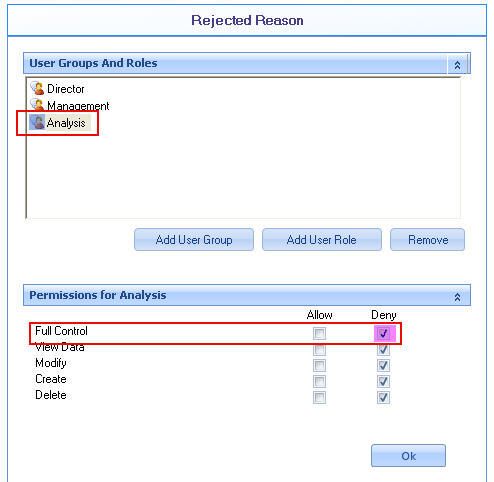
- The Analysis role is not able to view the entity´s data at all.
How to Grant Full Access Rights
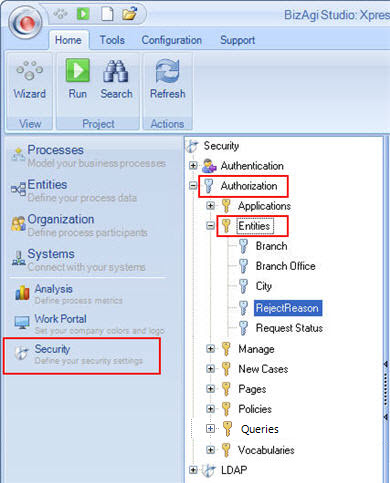
1. In order to allow the Director to view and modify the entity, first go to the Bizagi menu, identify Security and then select the Entities submenu under Authorization.
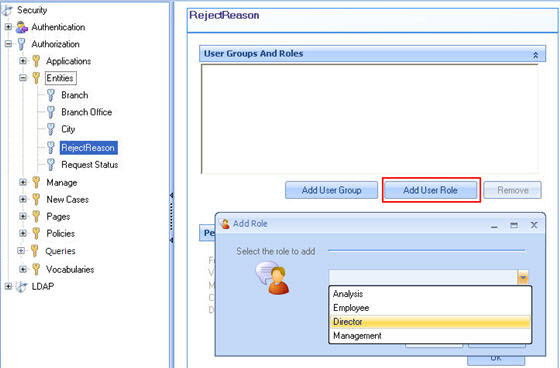
2. Click on the Rejected Reason entity. A table is displayed on the right. Bear in mind that permissions can be selected for Roles and User Groups. In this case, select Add User Role to display the Add Role window which shows all the roles created in the application. Select the Director Role from the list.
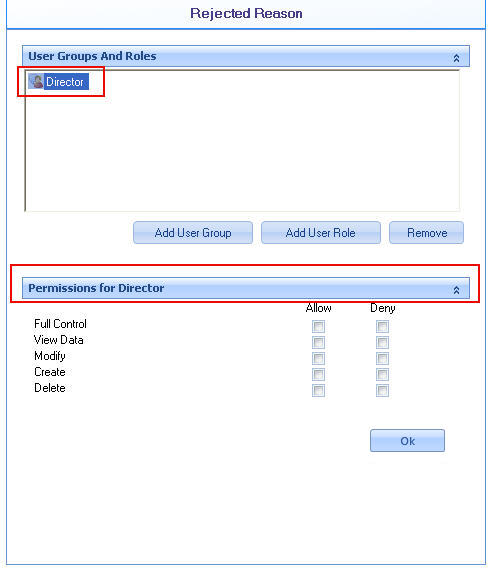
3. When the role is displayed in the User Groups And Roles area, click on the Director Role that was just added. The Permissions and Restrictions box is activated below where Permissions for Director are displayed.
4. The following permissions can be established:
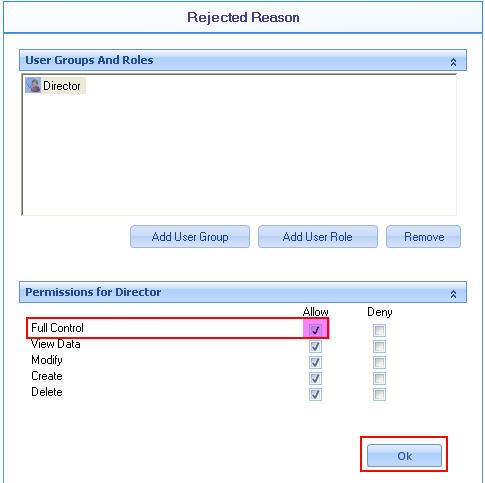
In this case, the Director will have Full Control. Check the box in the Allow column for Full Control. All of the other permissions are automatically selected. Click Ok.
The same configuration applies if User Groups are selected. Instead of click on Add User Role, click on Add user Group.
Related Topics:
- For further information about User Groups, go to User Groups.
- For further information about Roles, go to Roles.
How to Restrict Access Rights
1. To allow the Management role to View data, but not be able to modify it, follow the same steps that have just been described, choosing the Management role.
Click on the Management role, when displayed in the User Groups and Roles area, and check the box in the Allow Column for View Data.
Then check the boxes in the Deny Column for Modify, Create and Delete. Click on Apply.
2. Finally, to restrict the Analysis role from viewing any data, follow the same steps that have just been described, choosing the Analysis role.
Click on the Analysis role, when displayed in the User Groups and Roles area, and check the box in the Deny column for Full Control.
All other boxes in the Deny column are automatically selected.
For the change to be effective in Bizagi click on Apply <span id="authorization_new_cases" />
How to Authorize Creation for New Cases
In this example, the organization has only one role that can create new cases for the Vacation Request process.
Permission will be given to the Employee role to be the only one allowed to create new cases.
Users can be allowed or denied creating new cases.
How to Allow Creation for New Cases
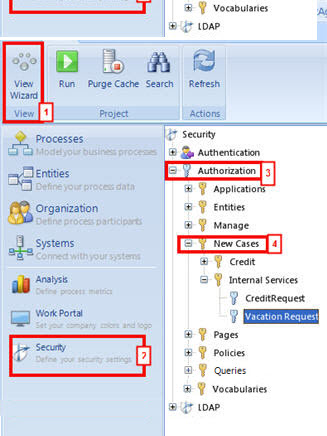
1. In the Bizagi menu, identify Security and then select the New Cases submenu under Authorization.
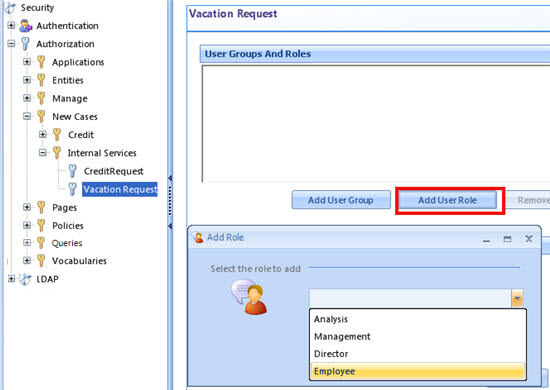
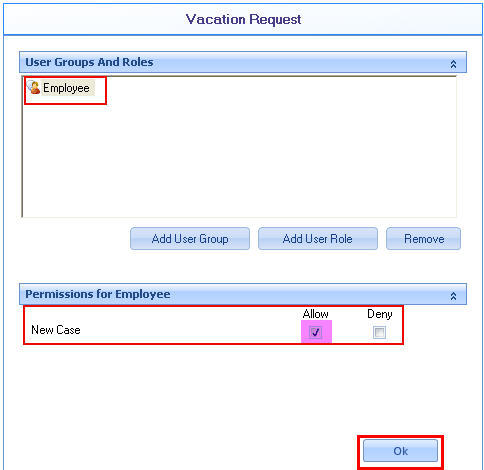
2. Click on the Vacation Request process. A table is displayed on the right. Bear in mind that permissions can be selected for Roles and User Groups. Click on the Add User Role button to display all the roles created in the application. Choose the Employee Role.
3. Click on the Employee role, when displayed in the User Groups and Roles area, to activate the Permissions and Restrictions box where Permissions for Employee are shown.
Check the box in the Allow column for New Cases.
For the change to be effective in Bizagi click on Ok.
How to Deny Creation for New Cases
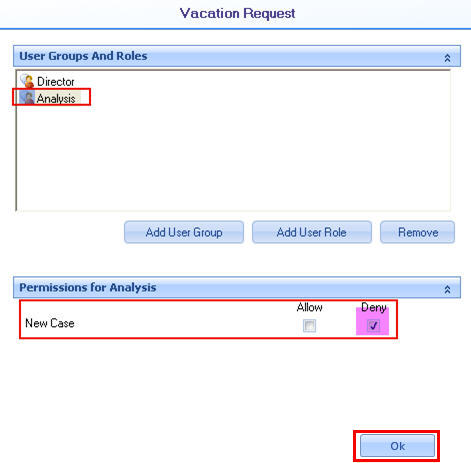
To restrict, for example, the Analysis role from creating cases, follow the same steps that have just been described above. Choose the Analysis role, and check the box in the Deny column for New Cases. Then, click Ok.
How to Grant Access Rights to Administration Pages
In this example, there is a specific role in the organization that can view and edit Administration Pages.
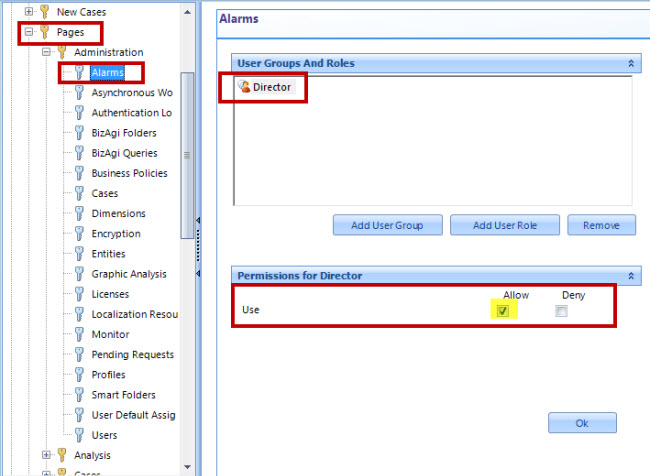
To allow the Director role to have control over the Administration Pages, follow the same steps as described above: Select the Page whose access is to be allowed or denied. Then select the Director role and check the box in the Allow column.
To restrict a User Group role, check the box in the Deny column, having selected the role of the group to be restricted.
For the change to be effective in Bizagi click on Ok.In Bizagi Studio, the user can define who will be allowed or restricted access to the following links:
![]() Asynchronous Work items Retries
Asynchronous Work items Retries
How to Grant Access Rights to Queries
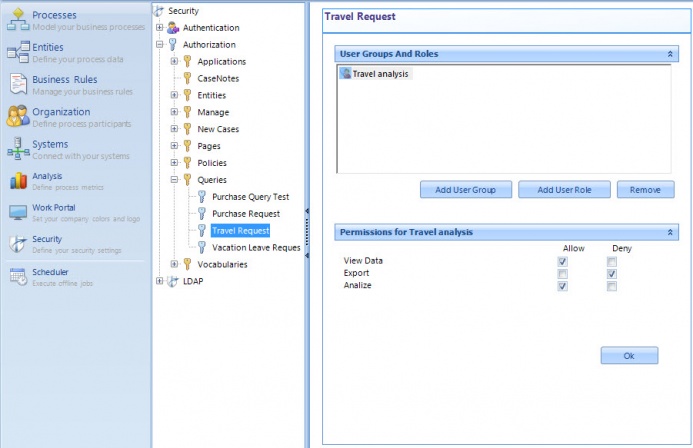
The authorization in this section allows control for editing queries defined in Bizagi. A list is displayed of all the queries defined. In our case, we are going to grant access to the travel request query to the users with the Travel Analysis role. In order to do that,select the role, assign the permissions and click Ok.
Related Articles
Authorization considerations in the different environments
Define Access Rights in Bizagi Studio
<comments />
