User Groups and Working Time Schema
From Business Process Management, BPM and Workflow Automation Wiki | BizAgi BPMS
<keywords content="keywords"> user groups, groups, user group </keywords>
Contents |
User Groups
User groups are user profiles or a set of characteristics of employees in the organization that allow to define levels of access, or Authorization. That is, access to to different sections or pages of the Work Portal.
It is important not to mistake user groups for roles. If you consider that only the users with a specific role can access one of the modules of the Web Application, you do not have to create a user group to allow it.
These following examples show how that user groups can have one or more characteristics and there can also be combinations within a group
Examples of a user group
1. Position: Branch Manager + Role: Commercial
2. Position: Credit Analyst + Skill: Corporate Customer Service
3. Role: Supervisor + Area: Presidency
|
Note: The assignation of permission in the security module is carried out by means of roles or profiles (user groups), which is why it is important to know how to create user groups in Bizagi beforehand. |
For more information about how to grant permissions to User Groups please refer to: Configure Authorization Control
How to Create a User Group
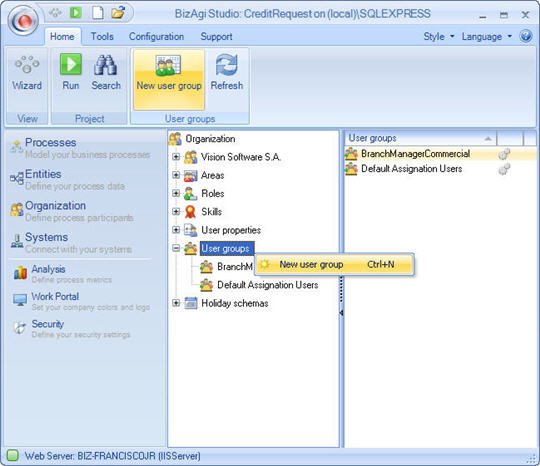
1.In the Bizagi menu, click on the Organization component, right click on User Groups and select the New User Group option or access it through the contextual menu of User Groups.
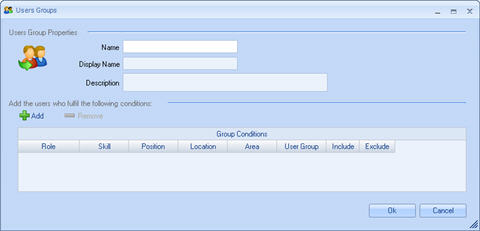
2.The User Group screen will then pop up, where you will fill in the following information:
|
Name: Name of the user group to be created. Display Name:Name of the group that will be available in the Web Application. Description: Detailed information on the objective and use of the group. Group Conditions: Conditions that the users must satisfy to belong to the group. Group conditions include a series of columns to include each of the characteristics required. To create a group condition, click on the “add” button. |
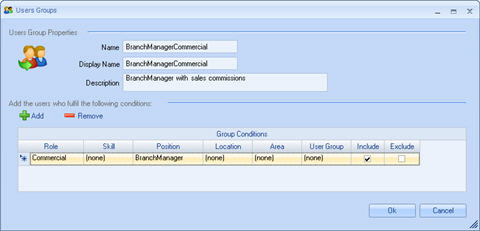
Each column in the table of group conditions indicates the characteristics that the user MUST have to belong to the group, and each row represents all the possible options of a user to form part of the group. That is to say, the columns represent the “AND” connectors and the rows represent the “OR” connectors.
|
Example: Account Position: Branch Manager + Role: Commercial This means: Position = Branch Manager ANDRole = Commercial |
|
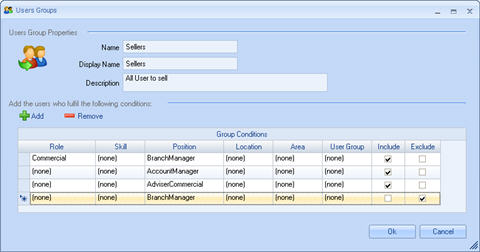
Example: (Position: Branch Manager + Role: Commercial)OR(Position: Account Manager) This means: (Position = Branch Manager ANDRole = Commercial) OR(Position = Account Manager) |
As you can see, the add button is always active. This means that the conditions described therein must always be satisfied to belong. But in the same user group, some employees can also be excluded.
|
Example: in the above case, we can exclude all those who belong to a specific region: |
There is also an option to make use of business rules to define who belongs to a group. In this case, the rules can return an array list of users or an integer with the user id that you want to configure.
|
Note: User groups can only be created in the development environment. In the production environment it is possible to include or exclude users from these groups with the Management Console |
Working Time Schema
The Working Time Schema refers to the work schedule, and each organization and each user has one. The durations of the activities will depend on the working time schema and therefore, the management of case expiration illustrated on the main screen of the application. It is possible to define one Working Time Schema for each organization.
How to create/edit the Working Time Schema
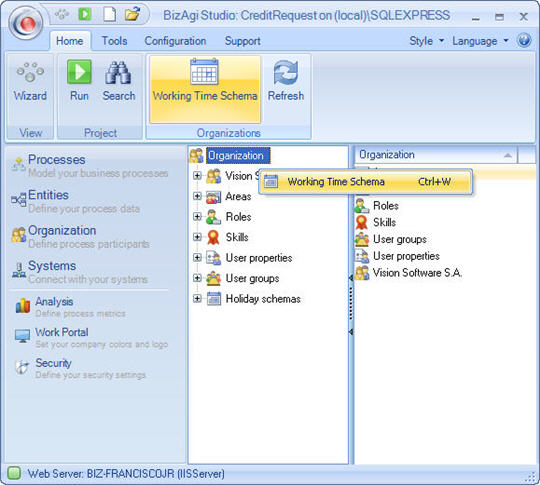
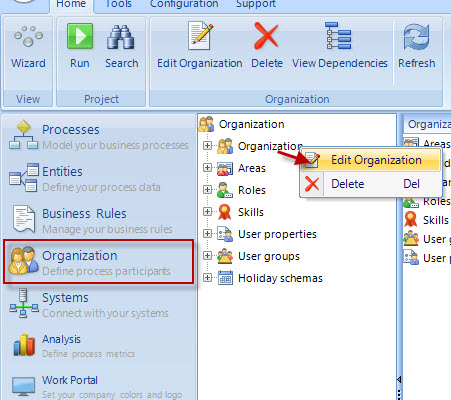
1.In the Bizagi menu, click on the Organization component, right click on Organization and select the Working Time Schema option or access it through the contextual menu of Organization.
|
Note:When creating a Project the Standard working time Schema is assigned to the organization by default. |
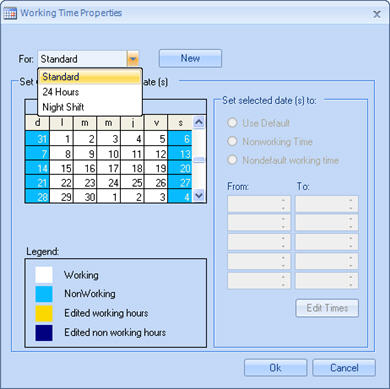
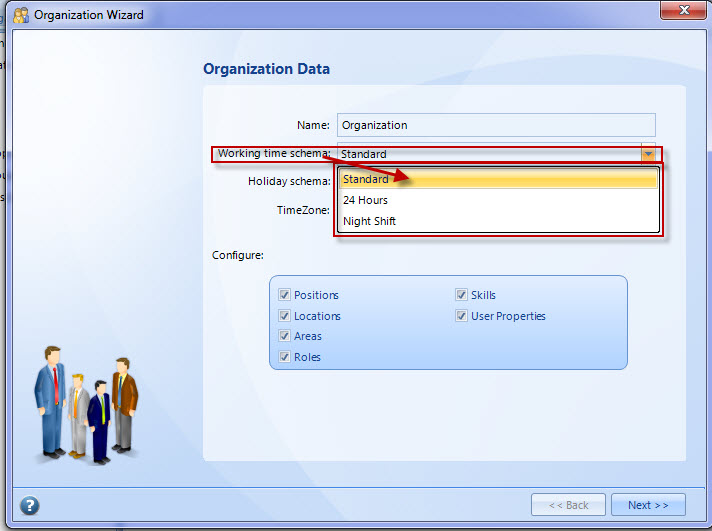
2.In the window WorkingTime Properties the Working Time Schema of the organization can be modified; select another Schema and click on Apply.
There are 3 types of working time schemas created by default:
![]() Standard: 8:00 AM-12:00M and 2:00 PM-6:00 PM from Monday through Friday
Standard: 8:00 AM-12:00M and 2:00 PM-6:00 PM from Monday through Friday
![]() 24 hours: 24 hours from Sunday through Sunday
24 hours: 24 hours from Sunday through Sunday
![]() Night Shift: 11:00 PM- 3:00 AM and 4:00 AM-8:00AM from Monday through Friday
Night Shift: 11:00 PM- 3:00 AM and 4:00 AM-8:00AM from Monday through Friday
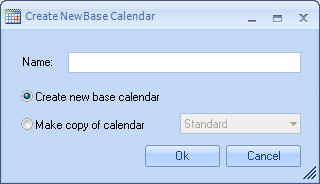
![]() In addition, new working time schemas can be defined. When you click on New, the following window will pop up, where you will include the name that you would like to assign to the new Working Time Schema.
In addition, new working time schemas can be defined. When you click on New, the following window will pop up, where you will include the name that you would like to assign to the new Working Time Schema.
Indicate whether you want a base calendar (corresponding to a Standard calendar) or
if you would like to copy another one. If you decide to copy the Standard calendar, it will be created exactly like the one created when you select Create new base calendar.
The new schema defined will be given the schedule from Monday through Friday from 8:00 AM to 12:00 PM and 2:00 PM to 6:00 PM by default.
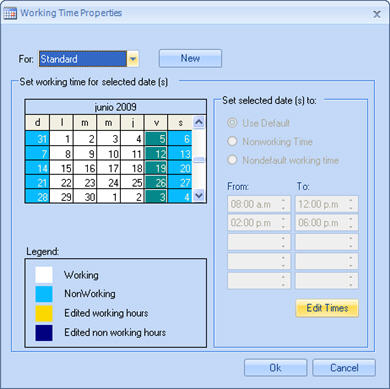
![]() In order to change the schedule, place the pointer of the mouse on one of the days of the week in the first row, press the CTRL key and select the rest of the columns you would like to modify. After that, click on Edit Times.
In order to change the schedule, place the pointer of the mouse on one of the days of the week in the first row, press the CTRL key and select the rest of the columns you would like to modify. After that, click on Edit Times.
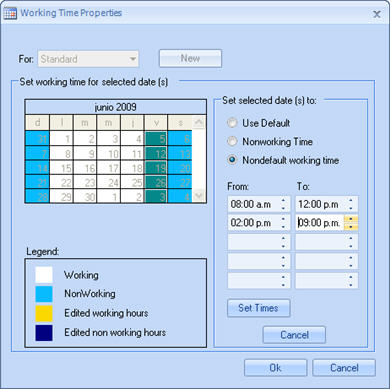
Select Non-default working time to edit the working time and you can modify it as required. When you click on assign, the New Working Time created will be given the working time chosen for the days you selected.
![]() In addition, for the new schema defined, or for any of the existing schemas by default, you can define exceptions of specific dates in order to mark non-working days or days when there is a different schedule for the entire organization. You can also define a nonworking day calendar and assign it to each geographic location. This would be done through the Holiday Schema in Organization.
In addition, for the new schema defined, or for any of the existing schemas by default, you can define exceptions of specific dates in order to mark non-working days or days when there is a different schedule for the entire organization. You can also define a nonworking day calendar and assign it to each geographic location. This would be done through the Holiday Schema in Organization.
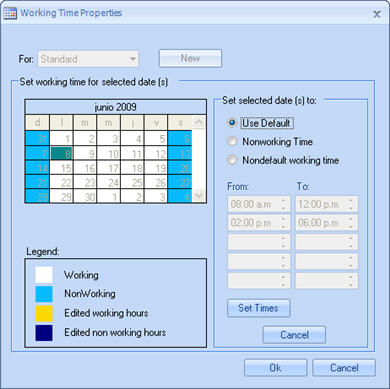
In order to do so, select the date or dates you would like to modify and carry out the procedure described above, keeping in mind the three options that can be assigned to the dates selected:
![]() Use default: Allows you to assign the working time of regular days.
Use default: Allows you to assign the working time of regular days.
![]() Nonworking time: Allows you to define the specific day as a nonworking day.
Nonworking time: Allows you to define the specific day as a nonworking day.
![]() Non-default working time: Allows you to modify the working time enabling the fields From, To, to redefine the schedules or include more on the same day, as required.
Non-default working time: Allows you to modify the working time enabling the fields From, To, to redefine the schedules or include more on the same day, as required.
![]() The Working Time Schema of the organization can be changed in Bizagi Studio, where holidays or the specific schedule of a particular day can be defined.
The Working Time Schema of the organization can be changed in Bizagi Studio, where holidays or the specific schedule of a particular day can be defined.
|
Example: A 60-minute activity is defined and will always be assigned to a user with a working time schema from 9:00 AM to 1:00 PM and from 2:00 PM to 6:00 PM, Monday through Friday. -If the activity is generated at 10:00 AM, the expected solution date is the same day at 11:00 AM. -If the activity is generated at 12:30 PM, the expected solution date is the same day at 2:30 PM (The time between 1:00 PM and 2:00 PM is not taken into account because it is not a part of the working time schema) -If the activity is generated at 5:30 PM on a Monday, Tuesday, Wednesday or Thursday, the expected solution date will be the following day at 9:30 AM. -If the activity is generated at 5:30 PM on a Friday, the expected solution date is the following Monday (if it has not been defined as a holiday) at 9:30 AM. |
How to change the Working Time Schema in an Organization
When there are Multiple Organizations, the user may want to select a specific Working Time Schema for each one of them. In order to assign or change the Working Time Schema associated to the Organization:
1) In the Modules View, right click on Organization in order to Edit the existent one.
2) Select the Working Time Schema to be associated to the Organization.
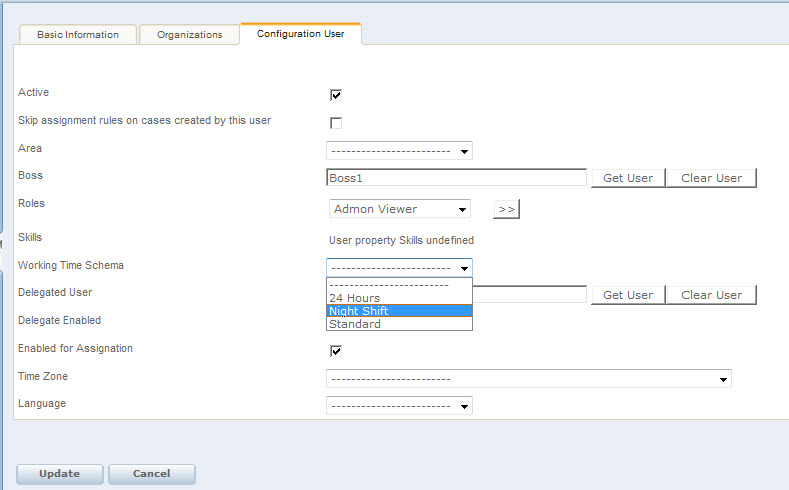
It is also possible to associate a different Working Time Schema for each user through the Web Application. It can be modified in the Admin Menu, more precisely in the Configuration User tab.
Holiday Schema
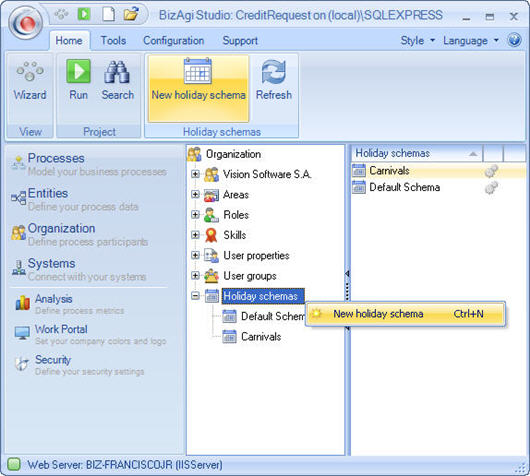
As indicated in the previous section, you can define the holidays or days off that apply for each of these work schedule schemas for the schedules available, however, it is sometimes more efficient to base them on the standard calendar and just define the holidays that apply for a specific region. Bizagi has the Holiday Schema option for this business situation:
In this option, you can define one or more business day schemas, which can later be assigned to the organization’s geographic locations wherever required.
|
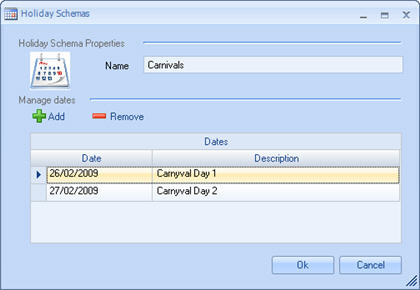
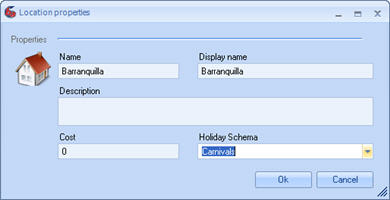
Example: in some countries, you do not work during carnival season. In the city of Barranquilla, Colombia, you do not work during the business days of carnival season; let’s assume they are February 27 and 28. In order to do so, create a new holiday schema: |
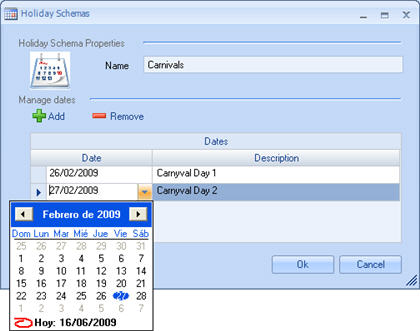
Complete each of the fields in the window that pop up on the screen:
|
Name: Name of the holiday schema. Use a clear name that applies for all the days you are including. Date: day of the holiday that year Description: reason for the holiday or name of the holiday. |
|
Note: holidays are complementary to the work shift schema, that is to say, in the above case, if the standard shift applies for Barranquilla, the holidays corresponding to the holiday schema will be added if it is assigned to the corresponding location: |
|
Note: To guarantee the correct performance of all environments once deployed, dates configured in Holiday Schema cannot be deleted. Dates can be added and then they must be deployed to be taken to production. |
|
Note: The time displayed in the user's work portal corresponds to the local computer's time. NOT the server time. |
<comments />
