Admin and Users Administration
From Business Process Management, BPM and Workflow Automation Wiki | BizAgi BPMS
<keywords content="keywords"> new user, create user, edit user, create a user, users, delegate, delegates, user preferences, preferences, users, user </keywords>
Contents |
Administration (Admin option)
In the administration module, the user can access various functions to administrate several options of the project.
To access the components in the administration section select the Admin option on the Web Application's Main Menu.
Users
A User is defined as someone who interacts with Bizagi's web application carrying out activities in processes, or managing business information.
Each user has an account through which he or she is identified in Bizagi. All the properties defined in the account allow or restrict the interaction with the application.
This function allows the administration of the users, either updating existing users or creating new ones.
Keep in mind that users CANNOT be deleted once they are created. However, they can be disabled if they are no longer needed.
How to Add a User
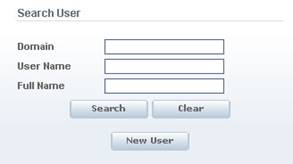
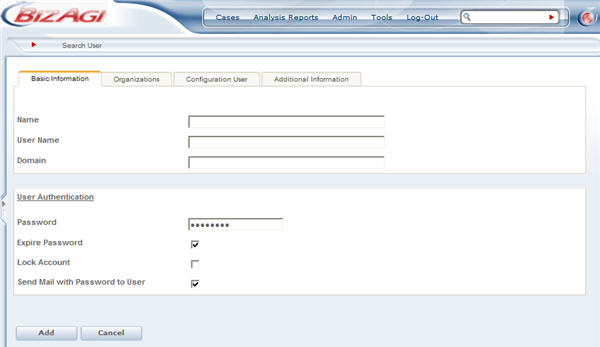
1. In the Admin section select the Users option. On the new screen click on the New User button.
2. In the new screen there are four different tabs:
- Basic Information
- Organizations
- Configure User
- Additional Information.
In each section the administrator submits the user's information, such as name, user name, domain, user’s e-mail, whether or not the user will be active, job, location, immediate superior and other user properties.
Name: Name of the person who is going to use the application. User name: User name of the person who is going to use the application. Domain: Domain of the network that the application belongs to. Password: Defines the password to be used to configure the type of Bizagi Authentication in the Bizagi Studio Security component. In the Development environment, when the user is created, the password is the user name. In the Production environment, when the user is created, the password is a Random number. It can be inmediately chaged, or sent to the user via email. Expired Password: this option expires / unexpires the account. This checkbox will be checked. Uncheck it to allow the user to start working with Bizagi. Locked Account: this option blocks / unblocks users access to the application. This checkbox will be checked. Uncheck it to allow the user to start working with Bizagi. Send Mail With Password to User: this option sends a mail to the user to remind the user what his entry code is for the application.
Location: The user’s geographic location. You can select the location from the corresponding level. Possitions: Find the Person in the organizational structure. Indicate the jobs and their level of hierarchy. In Bizagi, a user can have one or more jobs. Select the user’s job from the corresponding level and click on the add button
E-Mail: The e-mail of the application user. Active: This checkbox indicates whether the user is active or not to enter the application. Skip assignment rules on cases created by this user: Defines if the cases created by the user will evaluate assignation rules. If checked, every activity of a case created by the user will be assigned to the logged user. Area: The department or area that the user belongs to in the organization.
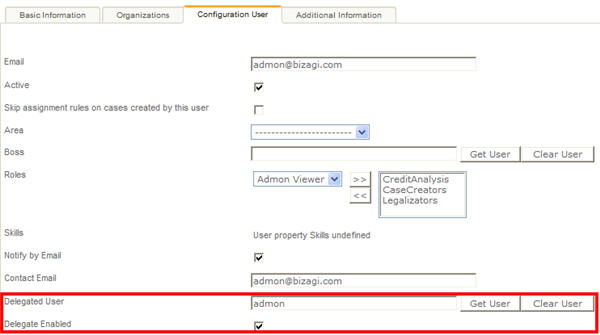
Roles: Role played by the person in the organization. In Bizagi, a user can have one or more roles. Once you have created the user, select the role and click on the add button. Skills: Skill or ability to carry out an action. Special skills that allow a person to carry out an activity. In Bizagi, a user can have one or more skills. Once you have created the user, select the Skill and click on the add button. Notify by Mail:This Checkbox defines whether or not the user will be notified by mail. Contact E-mail: If the user is enabled to be notified by mail, indicate the mailing address where the notifications sent from the application will be sent. Working Time Schema: The administrator can define if the new user is going to work with the Default Working Time Schema, or with a different one Delegated User: The user who is delegated the functions of the main user. Enabled for Assignation: When a user is enabled for assignment, he/she can be assigned activities within a process if he/she fills a specific profile. Time Zone: Defines the time zone for the user Language: Defines the language, when created.
Lists all the User properties created in Bizagi Studio |
3. When you have finished filling in the information, click on the “Add” button to save the new user’s information.
|
Note: User's information will be taken to production in the first deployment. Henceforth user's administration must be any performed directly in the production environment. |
How to Edit a User
1. In the Admin section select the Users option and look for the User that will be edited using the Domain, User Name or Full Name as search criteria. When the Search button is clicked and all fields are left blank, all the users will be displyed.
2. Once you have entered the search criteria, click on the “Search” button.
3. After that, a list of users that fill the search criteria will be shown, including some user information to help the identification (Id, user, domain, name and e-mail).
![]() Click on the Edit link of the user that will be modified.
Click on the Edit link of the user that will be modified.
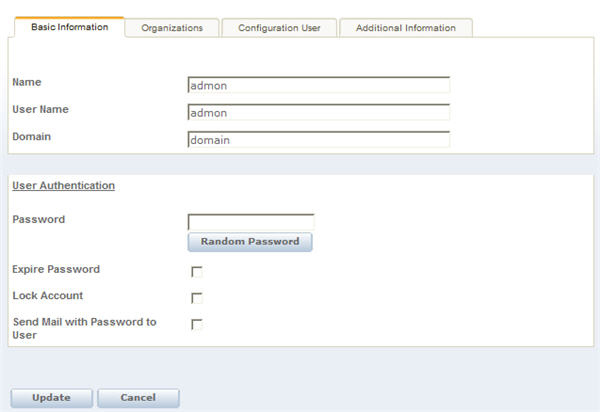
This will display all the user’s information distributed in four tabs:
- Basic Information
- Organizations
- Configure User
- Additional Information
Make the changes necessary and once you are done, click on Update.
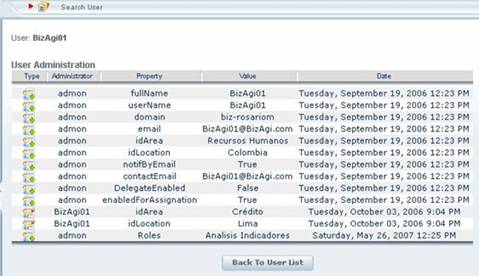
![]() The Log option presents information on modifications made to the user attributes, who made them, the value given them, and the date. The type of change indicates if the property was added, modified, or eliminated.
The Log option presents information on modifications made to the user attributes, who made them, the value given them, and the date. The type of change indicates if the property was added, modified, or eliminated.
Delegate Enabled
This selection permits delegation of a person's tasks to a delegated user. The user’s current pending activities can therefore be visualized and carried out by the delegated person.
The delegated user can see the information on who delegated the task on the tools menu, in the preferences option.
The delegated user can also see the delegated cases on the upper part of the activities screen.
Related Articles
- How to Create an Area, Role or Skill from Bizagi studio
- How to Create a location or a Position from Bizagi Studio
- How to Create a User Property from Bizagi Studio
- Users Authentication (Login)
<comments />

