How to Make String Operations
From Business Process Management, BPM and Workflow Automation Wiki | BizAgi BPMS
<keywords content="keywords">String, string, concatenation, length, Add, upper, substring</keywords>
Contents |
How to Make String Operations in Expressions
This document explains some string operations that may be required when automating processes with Bizagi.
The following are some, but not all, of the most commonly used string operations:
![]() Put the Letters in Capital Letters
Put the Letters in Capital Letters
![]() Calculate the length of the string
Calculate the length of the string
Concatenate Strings
An automated process may require the creation of an attribute that contains a string that results of the concatenation of other two strings. In the next example, a modification of the Purchase Request process has been made for teaching purposes. In the first activity of the process (Create Purchase Request), there are three attributes that will be used in this example ( Approval First Name, Approval Last Name, Approval Full Name). The attribute Approval Full Name will not be editable, and it will contain the result of the concatenation of the First Name and the Last Name of the person that is approving the purchase. The steps in order to concatenate the first and the last name in an expression are:
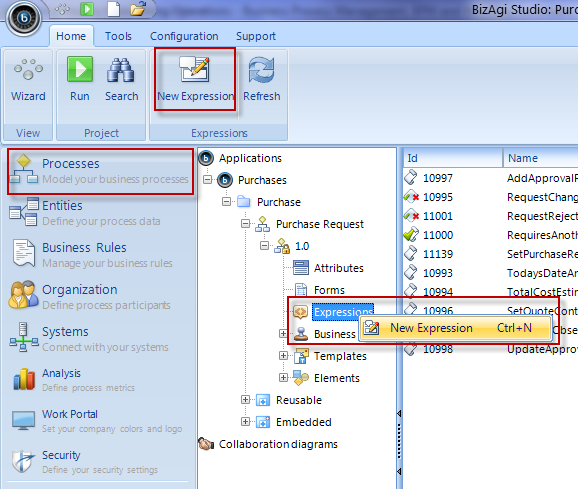
1.Create an Expression by going to Bizagi Studio > Select the Process (in this case Purchase Request) > Expressions > Execution Rules and then right click to open the New Expression option. Finally, click on New Expression
2. Select the script type of Expression.
3. Type the Name, Display Name and the Description of the Expression
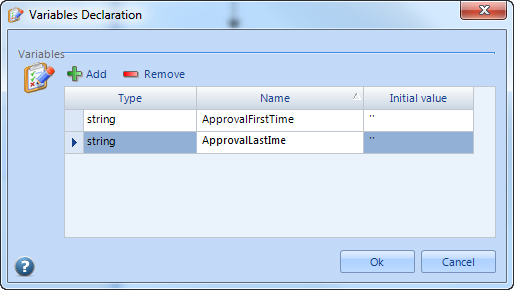
4. Declare the variables that are required in the Expression by right clicking on
Add the attributes (ApprovalFistName and ApprovalLastName) that are to be used in the Expression as indicated below.
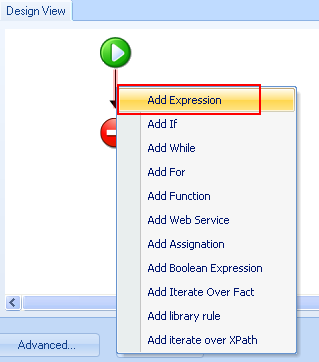
4. Create an expression to concatenate the Fist Name and Last Name and assign the result in the Attribute ApprovalFullName by right clicking on the black arrow and selecting Add Expression.
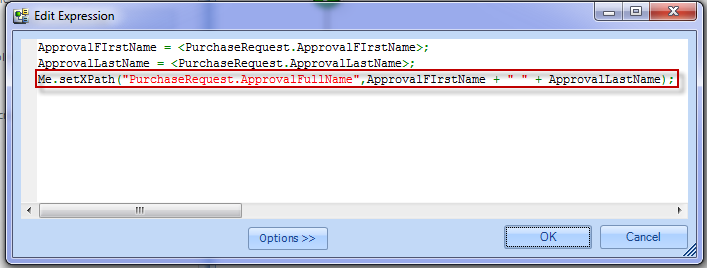
The concatenation is easily done by using the add (+) operator as shown in the image below. Click Ok and save the expression
Now, in order to finish the example, it is necessary to associate the expression that was previously created, to the activity Create Purchase Request in the Purchase Request process. The steps can be seen in this Article
Once the expression is associated to the process, the user can test the functionnality. In the images below, the three Attributes are displayed before, and after the expression is executed. Once the expression performs the concatenation, it can be evidenced in the Full Name render.
Put the letters in Capital Letters
For this example, the user has to perform the same steps explained for the Concatenation example, in order to create and associate the expression with the Purchase Request process. However, in this example, the next modifications need to be performed in the expression:
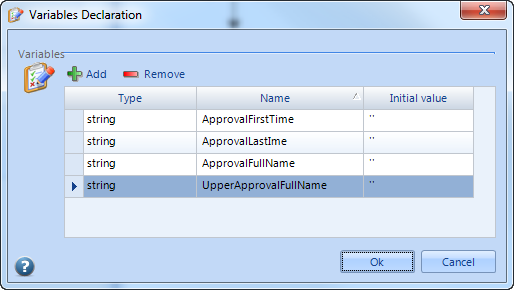
1. Creation of new variables in the expression
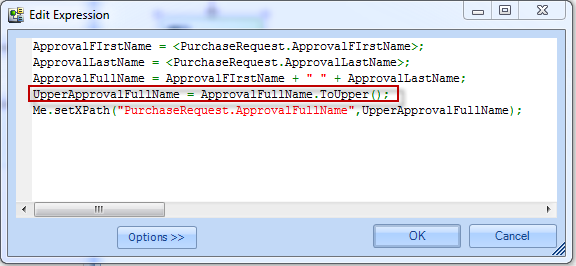
2. Include the Upper sentence into the Expression
Once this is done, the next step is to test the changes to the expression in the Work Portal. In this example, this is done in the first activity of the Purchase Request process. The result is shown in the images below:
In the first image, the user types the First and Last Name.
Since, in this example, the expression is associated to an Event On Save, once the user presses the Save button, the expression will be excecuted, and the Full Name field will be updated with the Concatenation of the First Name and the Last Name, but in capital letters.
Create a Substring
For this example, the user has to perform the same steps explained for the Concatenation example, in order to create and associate the expression with the Purchase Request process. However, in this example, the next modifications need to be performed in the expression:
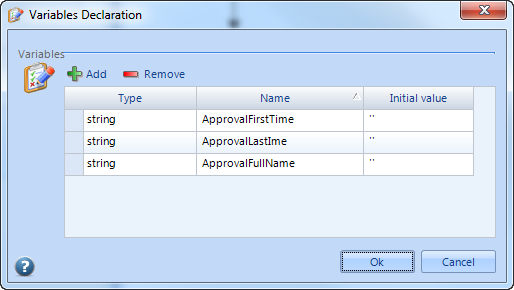
1. Creation of new variables in the expression
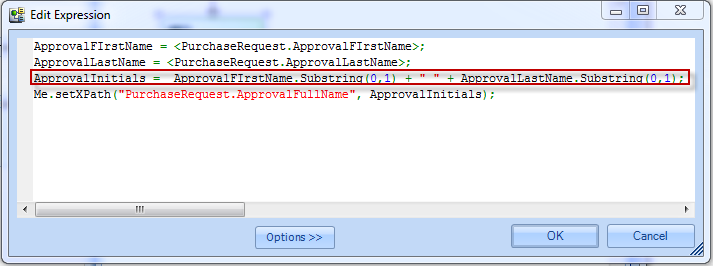
2. Include the Substring sentence into the Expression
Once this is done, the next step is to test the changes to the expression in the Work Portal. In this example, this is done in the first activity of the Purchase Request process. The result is shown in the images below:
In the first image, the user types the First and Last Name.
Since, in this example, the expression is associated to an Event On Save, once the user presses the Save button, the expression will be excecuted, and the Full Name field will be updated with the Initials of the First Name and the Last Name.
Calculate the length of the string
For this example, the idea is to modify the expression used in the Substring example by adding a condition that verifies that the length of the FirstName and the LastName is greater than 2, before continuing with the Substring, otherwise, the user will receive a validation message.
The expression would be as follows.
In the User Portal, the user will receive the message defined in the expression when the condition is not respected (in this case, the length of the First Name or the Last Name is less than 2).
On the other hand, if the conditions are respected, the Substring operation will be performed and the Approval Full Name will include the initials of the First and the Last name as defined in the expression
<comments />
