Example Advanced function: CHelper
From Business Process Management, BPM and Workflow Automation Wiki | BizAgi BPMS
<keywords content="keywords">
example CHelper, example object CHelper, example, class </keywords>
Examples of Advanced Function CHelper
CHelper.abortProcess
Bizagi allows cases to be forced closed without going through their whole flow. This is known as aborting a process.
Since these cases are not closed with a normal flow, their statistics are not taken into account for Analysis Reports.
The function CHelper.abortProcess, aborts any opened process with an Expression.
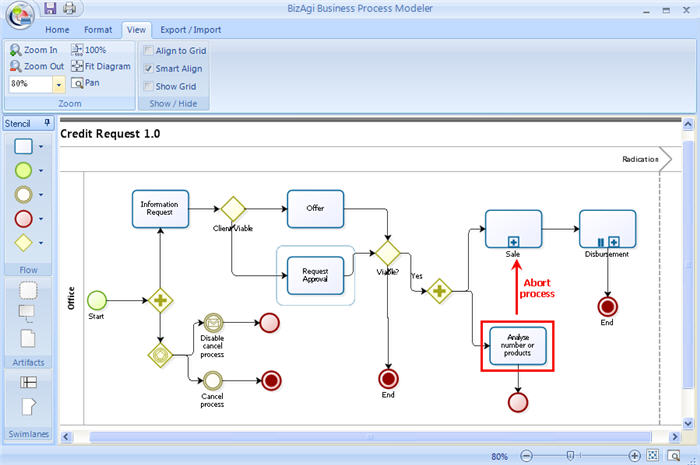
In this example, in a Credit Request process the Sale sub process will be aborted from the Analyze number of products activity. The assigned user may consider the credit request is not profitable enough to continue, so the sub process should be closed.
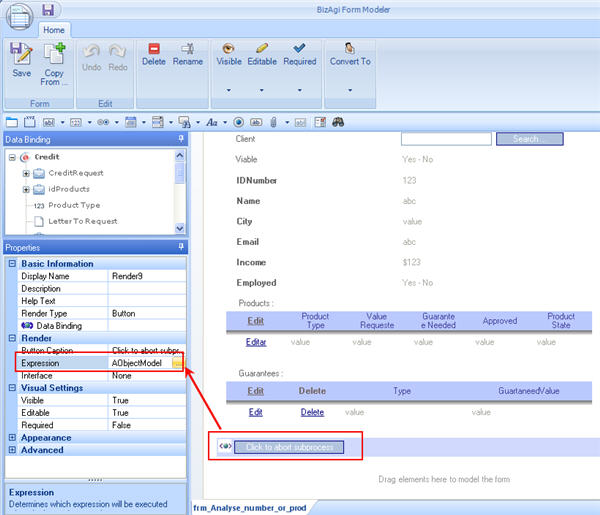
In order to abort the sub process, the Analyze number of products Form will have a button, that when clicked, the sub process will be aborted.
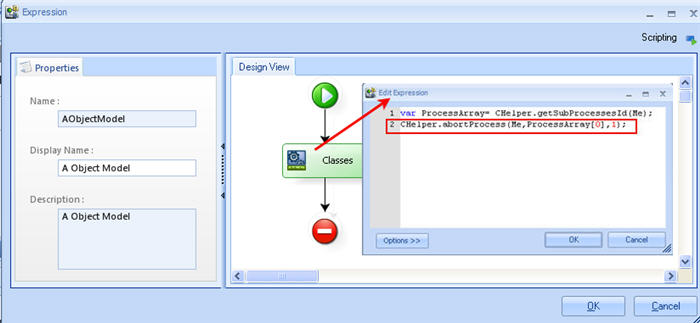
Create the Expression. The parameters of the function are:
- Me. This parameter is fixed.
- Case number. This parameter is the case number that will be aborted.
To obtain this value, we use another CHelper function that returns an array of sub processes. There will be at least one process as soon as the Analyze number of products is created. Therefore, the array of sub processes will have an item in the position [0].
- Abort Options. This parameter has three possibilities:
1, if only the process is to be aborted. (This is the case of the present example)
2, if the process and its parent process is to be aborted
3, if only the parent process is to be aborted, NOT the process itself.
In the form, create a button and relate the new Expression to it.
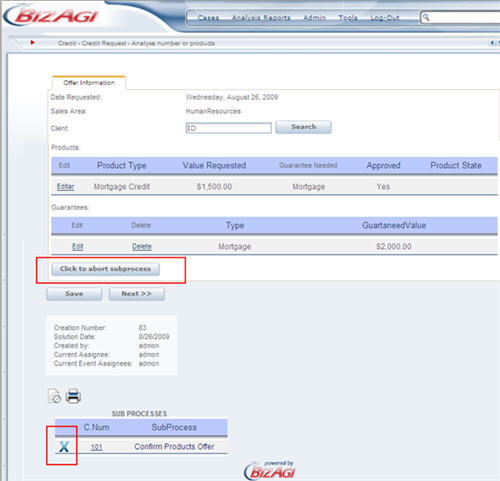
In the web application when the button is clicked, the sub process will be aborted.
CHelper.getCaseUsers
This method returns an array list (ArrayList) of ids of users (WFUser) who have worked in a particular case.
The case's radication number needs to be provided as this method's only input parameter "sRadNumber".
This method is specially useful for processes in which there are approvals or escalated activities (to follow-up which users have participated in the cases).
The syntax of the function is:
CHelper.getCaseUsers(sRadNumber)
In the following example, we will illustrate how to use this method:
We will show the array list of users who have worked in the case in a grid in an activity's form.
The relationship to the grid's collection is called "InfoCollection", and this collection's entity has an attribute called "HaveWorkedUser" which is a reference to the WFUser system entity.
To do this, we include a Bizagi expression as an activity action and make use of the CHelper.getCaseUsers method (as well as other helper methods) to add new records to the grid's collection.
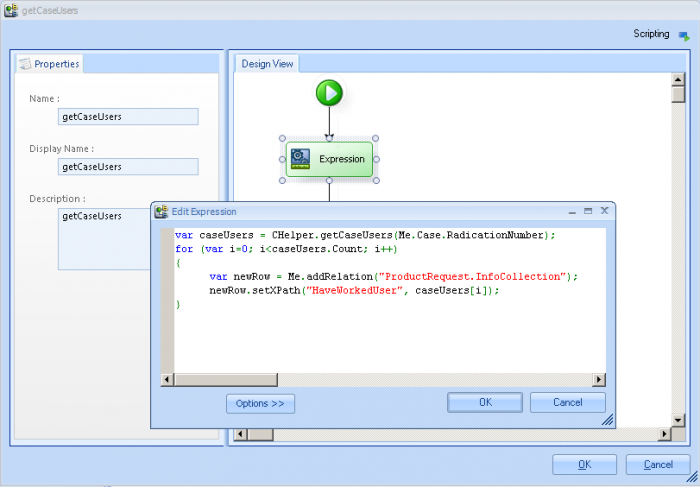
This is done in the getCaseUsers expression shown below:
The code in the expression is:
var caseUsers = CHelper.getCaseUsers(Me.Case.RadicationNumber);
for (var i=0; i<caseUsers.Count; i++)
{
	var newRow = Me.addRelation("ProductRequest.InfoCollection");
	newRow.setXPath("HaveWorkedUser", caseUsers[i]);
}
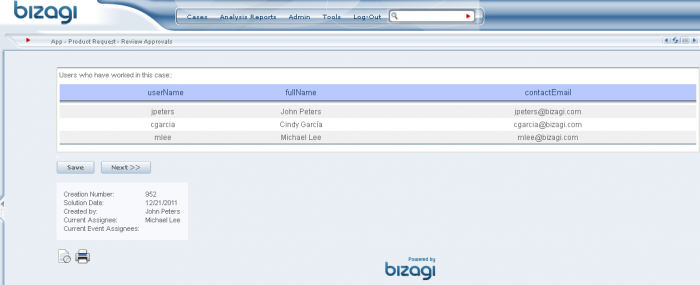
In our running process, the activity's grid will show automatically the dynamically added records:
CHelper.getEffectiveDuration
This method returns the difference between 2 dates expressed as a total of minutes (an integer).
This calculation is done with consideration of the organizational working time schema.
This means that the date difference (from dtFromDate to dtToDate) will not include non-working periods of time.
The syntax of the function is:
CHelper.getEffectiveDuration(Me,dtFromDate,dtToDate)
In the following example, we will illustrate how to use this method:
We will calculate the date difference between StartDate and EndDate according to the working hours in our organization's working time schema.
To do this, we include a Bizagi expression as an activity action and make use of the CHelper.getEffectiveDuration method to store in our DateDifference attribute the minutes total.
This is done in the CalculateDateDifference expression shown below:
The code in the expression is:
<Request.DateDifference> = CHelper.getEffectiveDuration(Me, <Request.StartDate>, <Request.EndDate>);
Notice that we may obtain the difference as complete hours from this calculation by: dividing this result by 60 (minutes in an hour).
Similarly, to obtain the difference days, we may divide the result by the number of working hours in a day (as defined in our organizational working time schema). By default, this would be done dividing by 480 (8 * 60).
View a detailed business example about Subtracting dates.
CHelper.getEffectiveDurationForUser
This method returns the difference between 2 dates expressed as a total of minutes (an integer).
This calculation is done with consideration of a specific user's working time schema.
This means that the date difference (from dtFromDate to dtToDate) will not include non-working periods of time for the given user (idUser).
The syntax of the function is:
CHelper.getEffectiveDurationForUser(idUser,dtFromDate,dtToDate)
In the following example, we will illustrate how to use this method:
We will calculate the date difference between StartDate and EndDate according to the working hours set in the working time schema of the user whom created the case.
To do this, we include a Bizagi expression as an activity action and make use of the CHelper.getEffectiveDurationForUser method to store in our DateDifference attribute the minutes total.
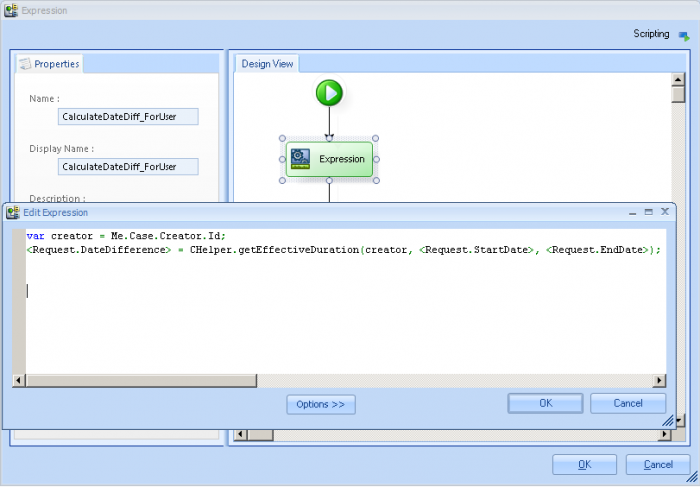
This is done in the CalculateDateDiff_ForUser expression shown below:
The code in the expression is:
var creator = Me.Case.Creator.Id;
<Request.DateDifference> = CHelper.getEffectiveDuration(creator, <Request.StartDate>, <Request.EndDate>);
Notice that we may obtain the difference as complete hours from this calculation by: dividing this result by 60 (minutes in an hour).
Similarly, to obtain the difference days, we may divide the result by the number of working hours in a day (as defined in that user's working time schema). By default, this would be done dividing by 480 (8 * 60).
CHelper.getEstimatedDate
This method returns the end date given a start date (dtFromDate) and a number of minutes (iDuration). This calculation is done by adding or substracting the number of minutes (iDuration) to the FromDate parameter, and based on the working time schedule defined for the organization.
This means that the calculated "due" date (iDuration number of minutes away from dtFromDate, either after or before) will not include non-working periods of time.
It is important to ackowledge that this method can receive either a positive or negative amount of minutes (which is the difference with respect to the CHelper.getSolutionDate method).
The syntax of the function is:
CHelper.getEstimatedDate(Me,dtFromDate,iDuration)
In the following example, we will illustrate how to use this method:
We will obtain the expected solution date according to the working hours in our organization's working time schema.
Therefore, this calculation will be done parting from the current system's date time (DateTime.Now) and adding or substracting a given duration ("minuteDifference", a positive or negative integer).
To do this, we include a Bizagi expression as an activity action and make use of the CHelper.getEstimatedDate method to store in our ExpectedDate attribute the solution date.
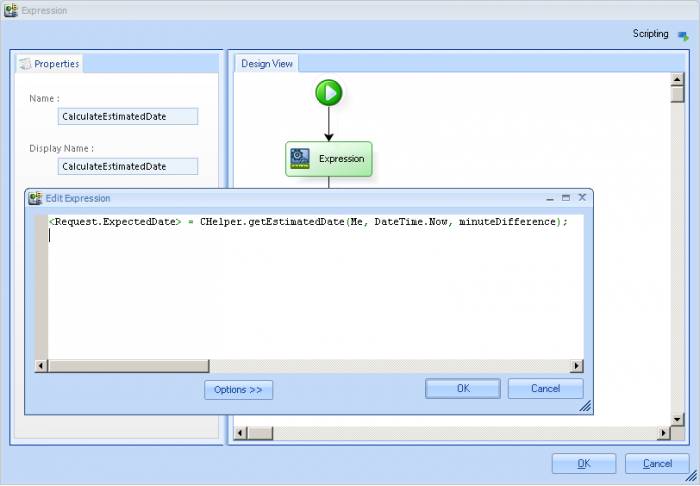
This is done in the CalculateEstimatedDate expression shown below:
The code in the expression is:
<Request.ExpectedDate> = CHelper.getEstimatedDate(Me, DateTime.Now, minuteDifference);
CHelper.getEstimatedDateForUser
This method returns the end date given a start date (dtFromDate) and a number of minutes (iDuration). This calculation is done by adding or substracting the number of minutes (iDuration) to the FromDate parameter, and based on the working time schedule defined for a specific user (idUser).
This means that the calculated "due" date (iDuration number of minutes away from dtFromDate, either after or before) will not include non-working periods of time for that given user.
It is important to ackowledge that this method can receive either a positive or negative amount of minutes (which is the difference with respect to the CHelper.getSolutionDateForUser method).
The syntax of the function is:
CHelper.getEstimatedDateForUser(idUser,dtFromDate,iDuration)
In the following example, we will illustrate how to use this method:
We will obtain the solution date parting from a StartDate and according to the working hours in that user's working time schema.
We will use a duration ("minuteDifference", expressed as a positive or negative amount of minutes) to obtain the solution date.
To do this, we include a Bizagi expression as an activity action and make use of the CHelper.getEstimatedDateForUser method to store in our ExpectedDate attribute the solution date.
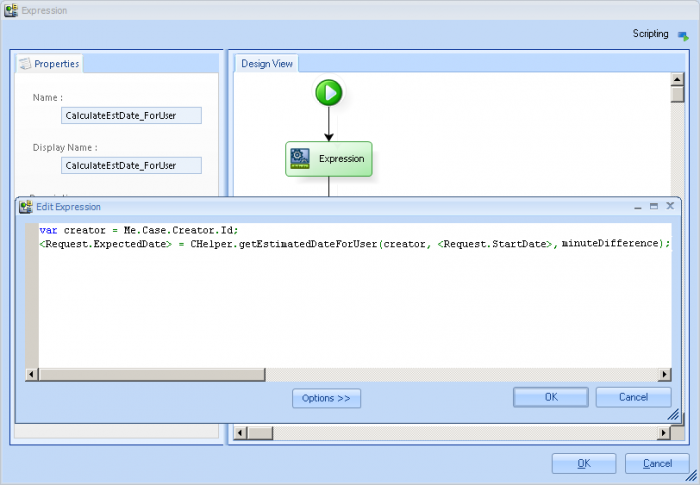
This is done in the CalculateEstDate_ForUser expression shown below:
The code in the expression is:
var creator = Me.Case.Creator.Id;
<Request.ExpectedDate> = CHelper.getEstimatedDateForUser(creator, <Request.StartDate>, minuteDifference);
CHelper.getSolutionDate
This method returns the end date given a start date (dtFromDate) and a number of minutes (iDuration). This calculation is done by adding the number of minutes (iDuration) to the FromDate parameter, and based on the working time schedule defined for the organization.
This means that the calculated "due" date (iDuration number of minutes away from dtFromDate) will not include non-working periods of time.
It is important to ackowledge that this method receives a positive amount of minutes (which is the difference with respect to the CHelper.getEstimatedDate method).
The syntax of the function is:
CHelper.getSolutionDate(Me,dtFromDate,iDuration)
In the following example, we will illustrate how to use this method:
We will obtain the expected solution date after a timer's execution (according to the working hours in our organization's working time schema).
Therefore, this calculation will be done at the timer's "onEnter" activity action; parting from the current system's date time (DateTime.Now) and adding the timer's minute duration.
To do this, we include a Bizagi expression as an activity action and make use of the CHelper.getSolutionDate method to store in our ExpectedDate attribute the solution date.
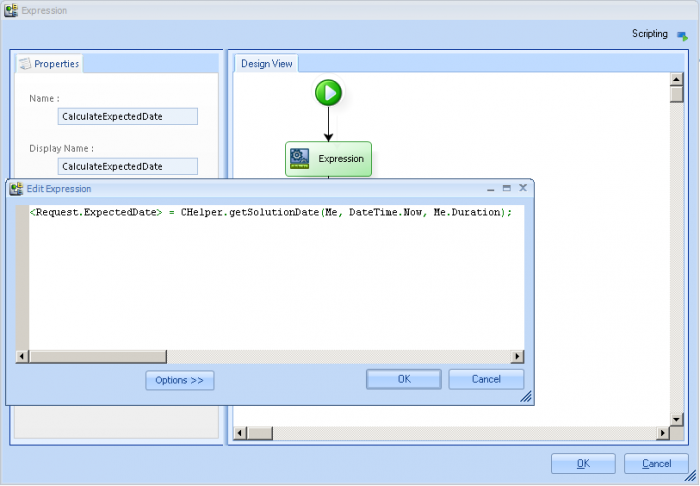
This is done in the CalculateExpectedDate expression shown below:
The code in the expression is:
<Request.ExpectedDate> = CHelper.getSolutionDate(Me, DateTime.Now, Me.Duration);
CHelper.getSolutionDateForUser
This method returns the end date given a start date (dtFromDate) and a number of minutes (iDuration). This calculation is done by adding the number of minutes (iDuration) to the FromDate parameter, and based on the working time schedule defined for a specific user (idUser).
This means that the calculated "due" date (iDuration number of minutes away from dtFromDate) will not include non-working periods of time for that given user.
It is important to ackowledge that this method receives a positive amount of minutes (which is the difference with respect to the CHelper.getEstimatedDateForUser method).
The syntax of the function is:
CHelper.getSolutionDateForUser(idUser,dtFromDate,iDuration)
In the following example, we will illustrate how to use this method:
We will obtain the solution date parting from a StartDate and according to the working hours in that user's working time schema.
We will add an average of duration minutes calculated (in the local variable "averageDuration") in a previous expression.
To do this, we include a Bizagi expression as an activity action and make use of the CHelper.getSolutionDateForUser method to store in our ExpectedDate attribute the solution date.
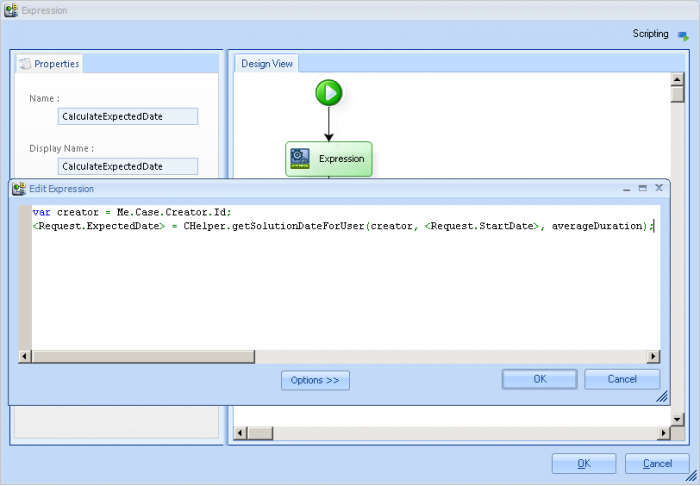
This is done in the CalculateExpectedDate expression shown below:
The code in the expression is:
var creator = Me.Case.Creator.Id;
<Request.ExpectedDate> = CHelper.getSolutionDateForUser(creator, <Request.StartDate>, averageDuration);
CHelper.getUsersForPosition
This method returns an array list (ArrayList) of ids of users (WFUser) who have a certain Position within the organization.
Its input parameter is the given position's id (idPosition).
This method is specially useful in expressions for assignation rules.
The syntax of the method is:
CHelper.getUsersForPosition(idPosition)
In the following example, we will illustrate how to use this method in a Product Request process to fill a grid (with these users) so that the Requester can select from it, the user which needs to perform the next activity (from a filtered set of users).
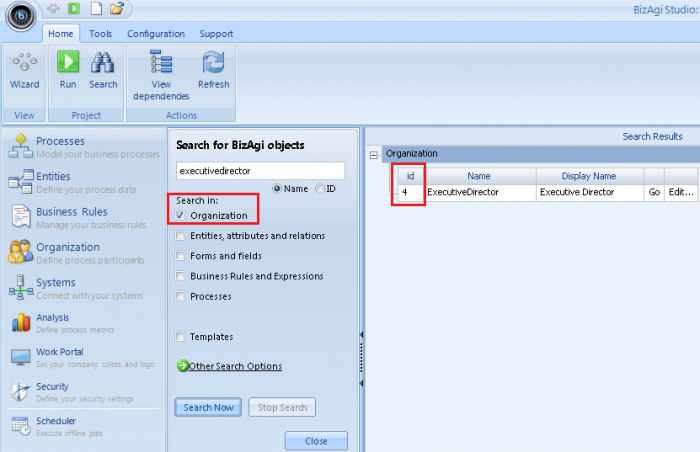
For this, we will use this method to obtain the array list of users id who have the "Executive director" position (for this, we need to previously have looked up the position's id in Bizagi). The Executive director position has its id as shown:
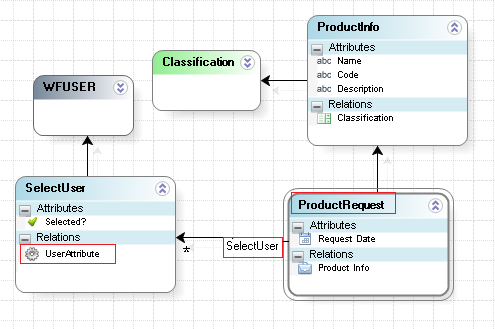
Our Product Request data model is the following:
Notice we will fill up the collection represented by the "SelectUser" relationship (by creating new records dynamically with the Me.addRelation method).
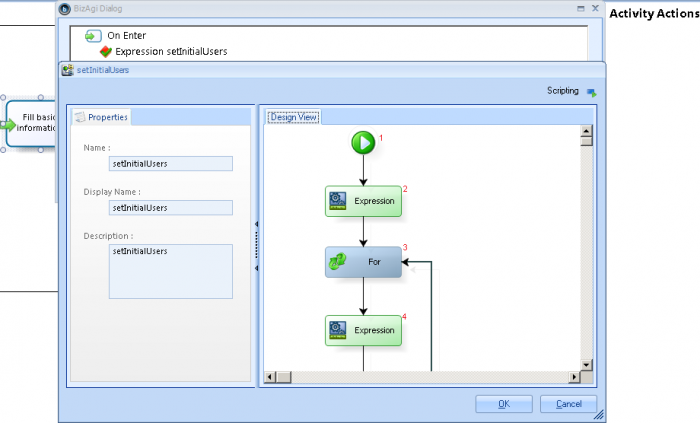
We use the CHelper.getUsersForPosition(idPosition) in an onEnter business rule called "setInitialUsers":
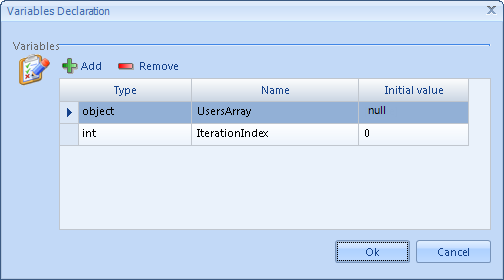
In this rule, first we declare our variables (inside the module marked with "1" in the previous image):
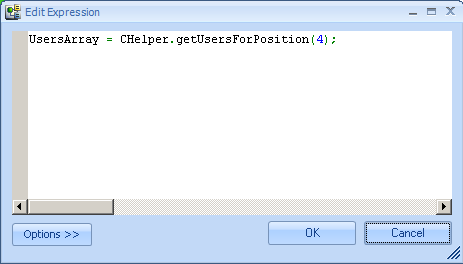
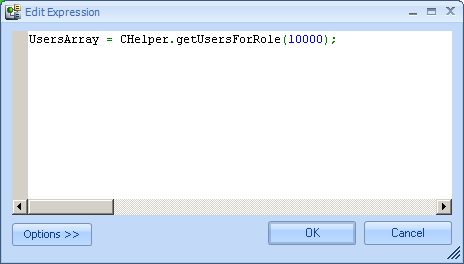
Then, we use the getUsersForRole method in the first expression module (inside the module marked with "2"):
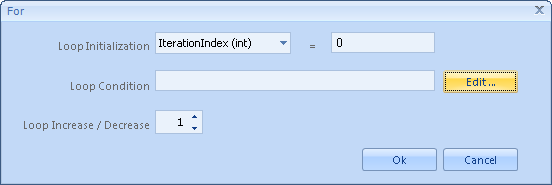
We configure the FOR module's parameters (inside the module marked with "3"):
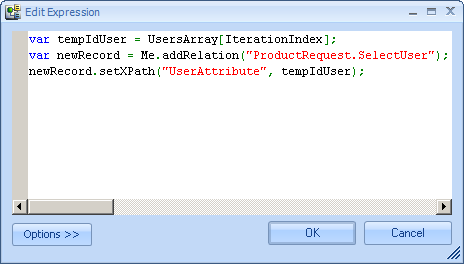
Finally, in the last expression module we set the user's id to the reference attribute of the WFUser in a new record (inside the module marked with "4"):
Now with this rule, in the process' execution, the requester end user will have the SelectUser grid filled with the users with the Executive Director position:
CHelper.getUsersForRole
This method returns an array list (ArrayList) of ids of users (WFUser) who have a certain Role within the organization.
Its input parameter is the given Role's id (idRole).
This method is specially useful in expressions for assignation rules.
The syntax of the method is:
CHelper.getUsersForRole(idRole)
In the following example, we will illustrate how to use this method in a Product Request process to fill a grid (with these users) so that the Requester can select from it, the user which needs to perform the next activity (from a filtered set of users).
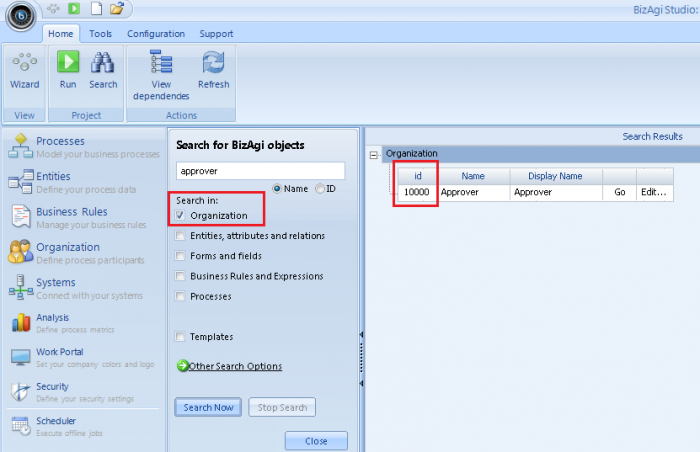
For this, we will use this method to obtain the array list of users id who have the "Approver" role (for this, we need to previously have looked up the role's id in Bizagi). The Approver role has its id as shown:
Our Product Request data model is the following:
Notice we will fill up the collection represented by the "SelectUser" relationship (by creating new records dynamically with the Me.addRelation method).
We use the CHelper.getUsersForRole(idRole) in an onEnter business rule called "setInitialUsers":
In this rule, first we declare our variables (inside the module marked with "1" in the previous image):
Then, we use the getUsersForRole method in the first expression module (inside the module marked with "2"):
We configure the FOR module's parameters (inside the module marked with "3"):
Finally, in the last expression module we set the user's id to the reference attribute of the WFUser in a new record (inside the module marked with "4"):
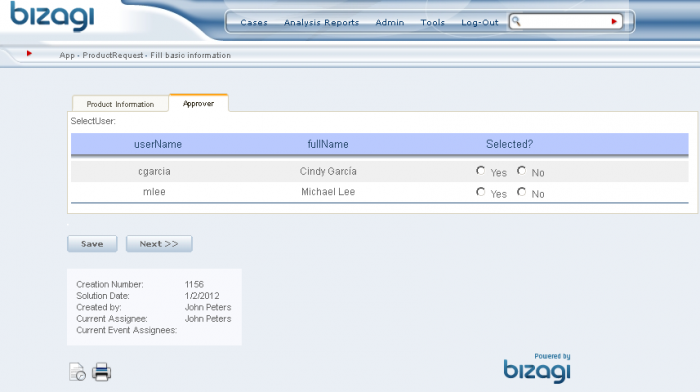
Now with this rule, in the process' execution, the requester end user will have the SelectUser grid filled with the users with the Approver role:
CHelper.getUsersForSkill
This method returns an array list (ArrayList) of ids of users (WFUser) who have a certain Skill within the organization.
Its input parameter is the given Skill's id (idSkill).
This method is specially useful in expressions for assignation rules.
The syntax of the method is:
CHelper.getUsersForSkill(idSkill)
In the following example, we will illustrate how to use this method in a Product Request process to fill a grid (with these users) so that the Requester can select from it, the user which needs to perform the next activity (from a filtered set of users).
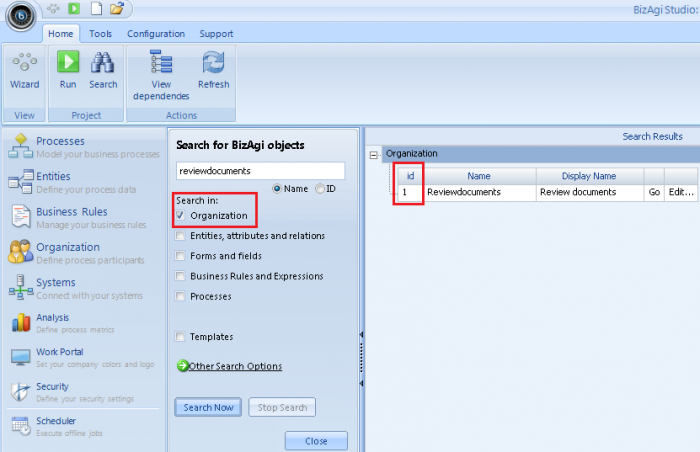
For this, we will use this method to obtain the array list of users id who have the "Review documents" skill (for this, we need to previously have looked up the skill's id in Bizagi). The Review documents skill has its id as shown:
Our Product Request data model is the following:
Notice we will fill up the collection represented by the "SelectUser" relationship (by creating new records dynamically with the Me.addRelation method).
We use the CHelper.getUsersForSkill(idSkill) in an onEnter business rule called "setInitialUsers":
In this rule, first we declare our variables (inside the module marked with "1" in the previous image):
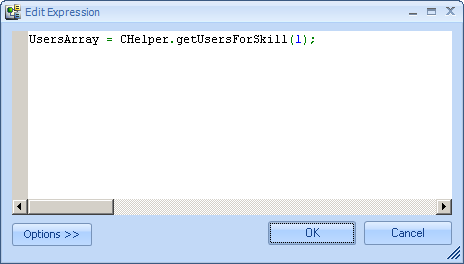
Then, we use the getUsersForSkill method in the first expression module (inside the module marked with "2"):
We configure the FOR module's parameters (inside the module marked with "3"):
Finally, in the last expression module we set the user's id to the reference attribute of the WFUser in a new record (inside the module marked with "4"):
Now with this rule, in the process' execution, the requester end user will have the SelectUser grid filled with the users with the Review documents skill:
CHelper.IsWorkingDay
Returns true if the day as the second parameter is a working day. Otherwise, returns false.
The correct syntax of the function is:
CHelper.IsWorkingDay(Me,dtDate)
In a Travel Request process, a user can start a case in the Register Travel Request activity. The user must enter the Departure Date. If the departure day is a not working day, a validation must appear showing this situation. Otherwise, the application can continue with the next activity.
To know if the Departure Date is a working day, we can use the IsWorkingDay from the CHelper object.
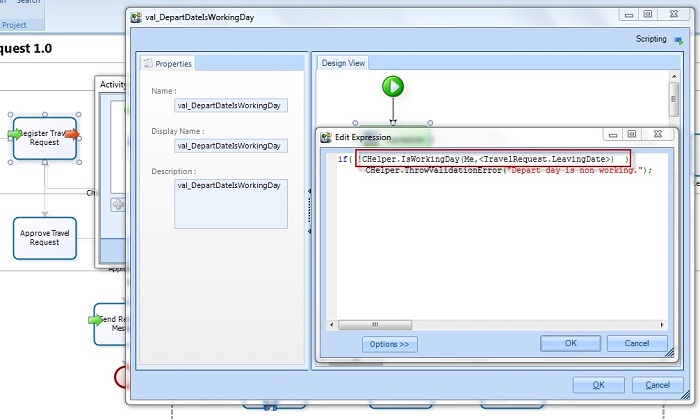
Create an expression at the “OnExit” of the Register Travel Request activity. Use the IsWorkingDay function and compare with the Departure Date of the case.
The code should be as follows:
if( !CHelper.IsWorkingDay(Me,<TravelRequest.LeavingDate>) ) CHelper.ThrowValidationError("Depart day is not a working day.");
CHelper.IsWorkingDayForUser
Returns true if the day as the second parameter is a working day according to the user's working schedule. Otherwise, returns false.
The correct syntax of the function is:
CHelper.IsWorkingDayForUser(idUser,dtDate)
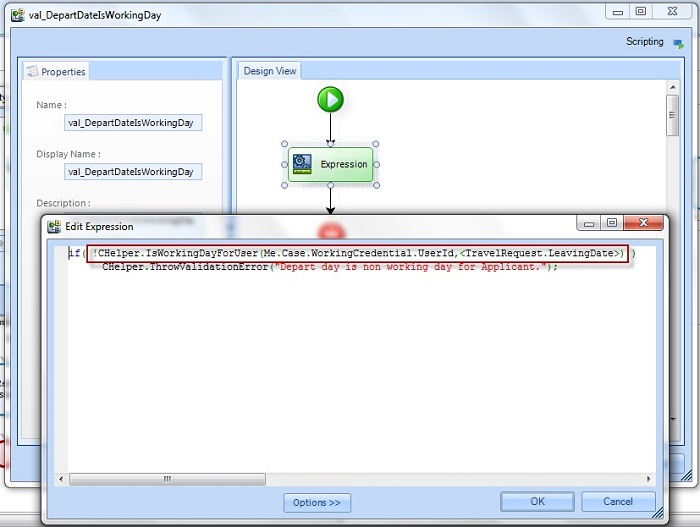
In a Travel Request process, a user can start a case in the Register Travel Request activity. The user must enter the Departure Date. If the departure day is a not working day according with the Working Time Schema of the User, a validation must appear showing this situation. Otherwise, the application can continue with the next activity.
To know if the Departure Date is a working day, we can use the IsWorkingDayForUser from the CHelper object.
Create an expression at the “OnExit” of the Register Travel Request activity. Use the IsWorkingDay function and compare with the Departure Date of the case.
The code should be as follows:
if( !CHelper.IsWorkingDayForUser(Me.Case.WorkingCredential.UserId,<TravelRequest.LeavingDate>) ) CHelper.ThrowValidationError("Depart day is not a working day for Applicant.");
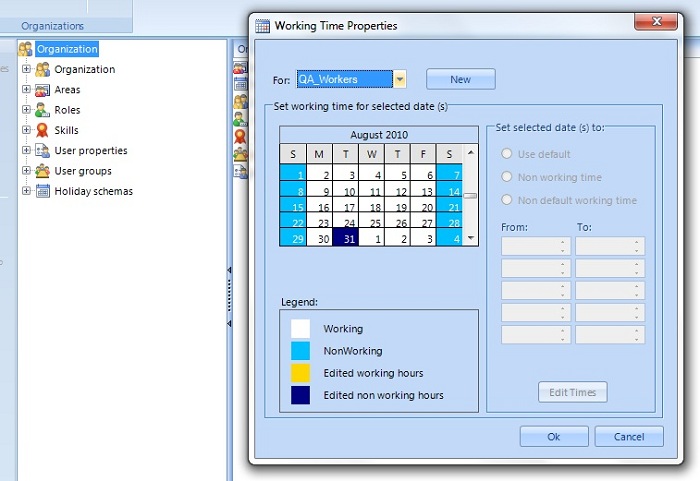
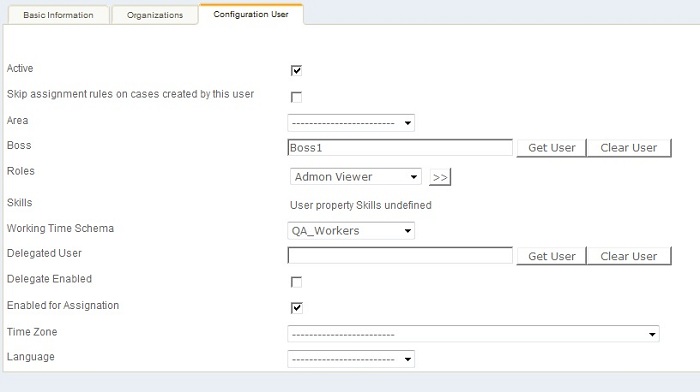
In order to perform a test, ensure that the user has a Working Time Schema with non-working day, and select that day in the Departure Day of the Travel Request case.
Ensure that the user has the Working Time Schema with the non-working day. In this example, the Working Time Schema is called QA_Workers.
Finally, when the user selects a non-working day, the validation will show the message.
CHelper.IsWorkingMinute
This method returns true if the date sent as the method's second parameter falls under the organization's working time schema. Otherwise, it returns false.
The evaluated date considers the calendar day as well as the time defined for it (hour of the day).
The syntax of the function is:
CHelper.IsWorkingMinute(Me,dtDate)
In the following example, we will illustrate how to use this method:
We have a process in which there is the need to set a meeting (a date and a specific hour).
We will want to validate if the date selected by the end user is a working hour for our organization's working time schema.
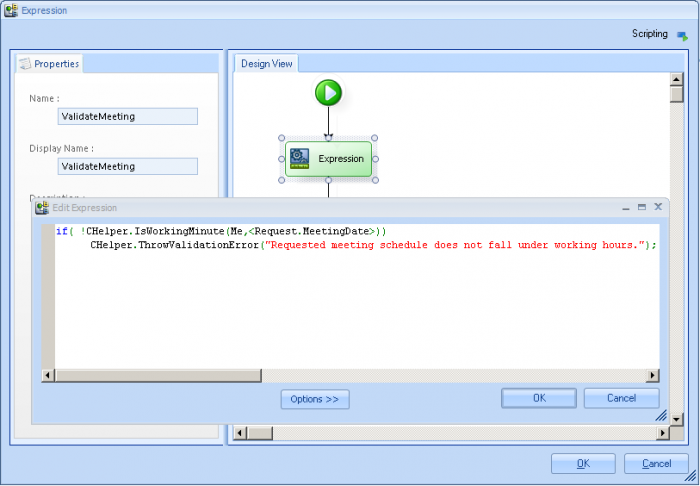
To do this, we include a Bizagi expression as an activity action at the onExit of the activity, so that we can make use of the CHelper.IsWorkingMinute method to notify the end user that the selected date is not a valid option (if that is the case).
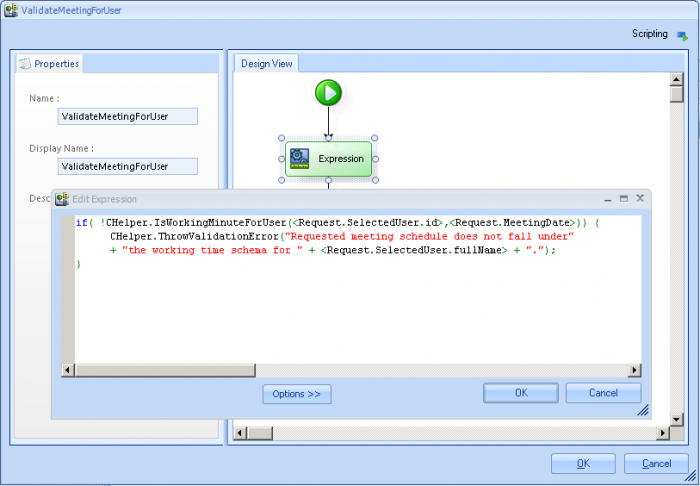
This is done in the ValidateMeeting expression shown below:
The code in the expression is:
if( !CHelper.IsWorkingMinute(Me,<Request.MeetingDate>))
	CHelper.ThrowValidationError("Requested meeting schedule does not fall under working hours.");
CHelper.IsWorkingMinuteForUser
This method returns true if the date sent as the method's second parameter falls under a user's working time schema. Otherwise, it returns false.
The evaluated date considers the calendar day as well as the time defined for it (hour of the day).
The specific user's Id is sent as the first parameter.
The syntax of the function is:
CHelper.IsWorkingMinuteForUser(idUser,dtDate)
In the following example, we will illustrate how to use this method:
We have a process in which there is the need to set a meeting (a date and a specific hour).
We will want to validate if the date selected by the end user is a working hour for the user selected to assist that meeting.
To do this, we include a Bizagi expression as an activity action at the onExit of the activity, so that we can make use of the CHelper.IsWorkingMinuteForUser method to notify the end user that the selected date is not a valid option (if that is the case).
This is done in the ValidateMeeting expression shown below:
The code in the expression is:
if( !CHelper.IsWorkingMinuteForUser(<Request.SelectedUser.id>,<Request.MeetingDate>)) {
	CHelper.ThrowValidationError("Requested meeting schedule does not fall under the working time schema for " + <Request.SelectedUser.fullName> + ".");
}
CHelper.ThrowValidationError
Validations are error messages written by the user, that are shown in the web application to tell the end user something. Validation messages are usually used On Exit Actions or in Grid Validations.
When they are executed (shown in the application) the action requested will not be carried out. For example, if a Validation is thrown when trying to save a new record of a grid, then the new record will not be saved, and the message will be shown.
If a validation is thrown when clicking Next in an activity, then the process will not continue and the message will be shown.
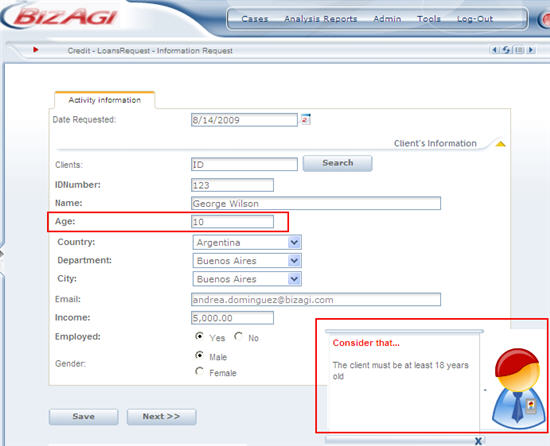
In a Credit Request process, to continue with the request of any client, he or she must have reached the age of majority.
If the age given in the first activity of the process, Information Request, is under 18, and the user clicks Next to continue with the case, then a Validation Error will be shown. The message contains whatever the final user needs to know about whatever is wrong with the activity.
1. Create the Expression to validate the age of the client from the On Exit actions in the activity. This way it will be executed when the user clicks Next on the web application.
2. In the web application, enter an age that is less than 18 to receive the message and click on Next. Notice how the message is displayed and the activity does not advance.
If you need more information or practice about How to Edit a Throw Validation Message, please refer to the following LINK
CHelper.trace
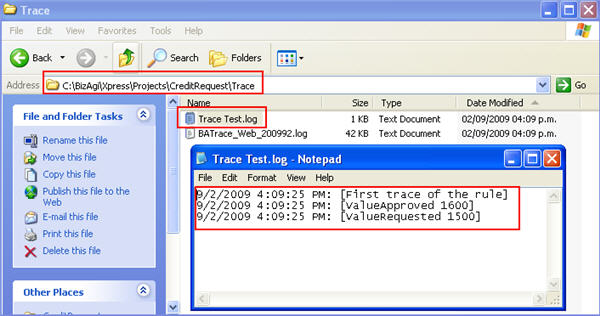
Traces are records of actions carried out in Bizagi while working on the web application. They are very useful when creating Expressions: they help the user to see values of attributes or the correct syntax a complex Expression, might have.
The correct syntax of the function is:
CHelper.trace("FileName","Text to trace");
When using a variable the syntax is
CHelper.trace("FileName","Text to trace "+variable);
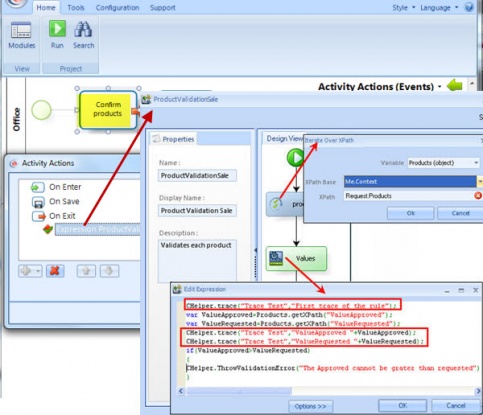
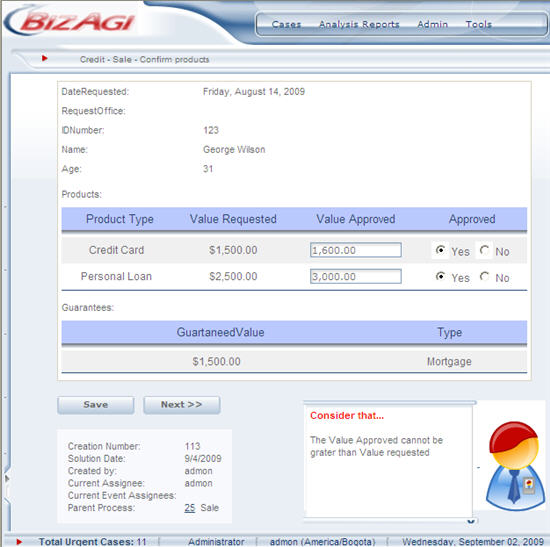
In a Credit Request process, a client can request several products. Each of them has a Value Requested that the client asked for.
In order to continue the process, the user must enter an Approved state for each product and a Value Approved. However, the Value Approved must not exceed the Value Requested.
This is a complex Expression, that must be traced in order to see if the conditions are met. The rule iterates over each product and evaluates the condition:
Since the Expreesion is placed On Exit, to test it, it is necessary to go to the web application, fill the required attributes and click Next
Go to the folder and look for the trace file: C:\Bizagi\[Enterprise o Xpress]\Projects\"Name of the Project"\Trace
Traces have to be configured for Bizagi to create the files.
Related Articles
<comments />
