How to create PDF files with Unicode characters
From Business Process Management, BPM and Workflow Automation Wiki | BizAgi BPMS
<keywords content="keywords"> PDF report, PDF reports, document, PDF document, PDF file, PDF, file, documents, files, FOP, reports, report, special characters, double byte, euro, japanese, arabic, glyph, UTF, UTF-8, european special characters, european characters, eastern, eastern characters, eastern european, font, chinese, korean, alt, greek, cyrillic, character sets, character set, unicode, unicode characters </keywords>
Contents |
How to Create PDF Files with Unicode characters
Overview
The objective of this article is to illustrate how to generate a PDF file with unicode characters support for our process in Bizagi.
This means printing in a PDF file the business data containing glyphs and symbols from character sets, other than those from the traditional western alphabets.
These unicode special characters include japanese, korean, chinese, arabic, greek, cyrillic and other european characters, amongst others.
Before you begin
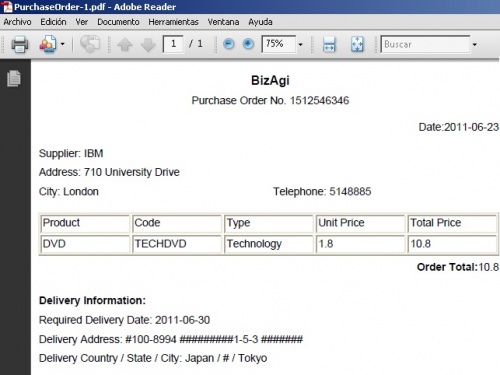
Because the default .Net web service that uses ApacheFOP does not print unicode characters in the PDF (but "#" symbols instead), we will illustrate how to create and publish a web service in Java that covers this requirement, so that this web service can be invoked instead.
In order to determine if the characters to be included are considered within the special characters sets, it is recommended to check out the Unicode Code Charts Reference.
Take into account that the Create PDF files with Apache FOP.Net article presents a similar but easier procedure, mainly because it explains how to create PDF documents with support only for the Western/Latin character set.
The difference between this 'how-to' and the other one, relies on the web service development, which in this case uses the Apache FOP Project's component in its original Java release.
Follow the steps described below (these apply for both the Xpress and Enterprise Editions of Bizagi), if you wish to include unicode characters in your PDF file, or if your PDF file already shows a "#" symbol instead of the characters it should print.
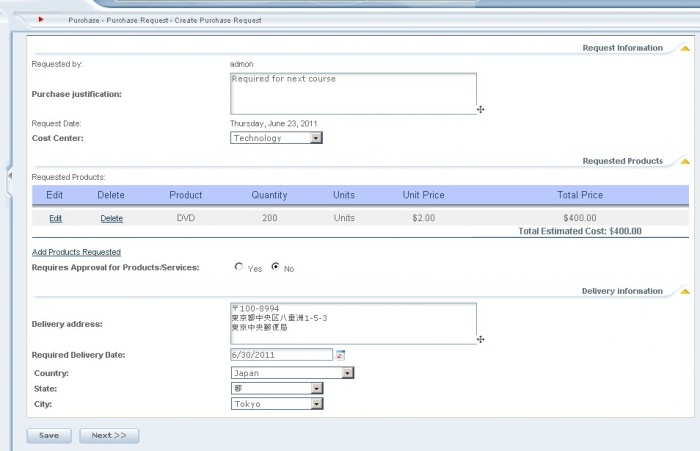
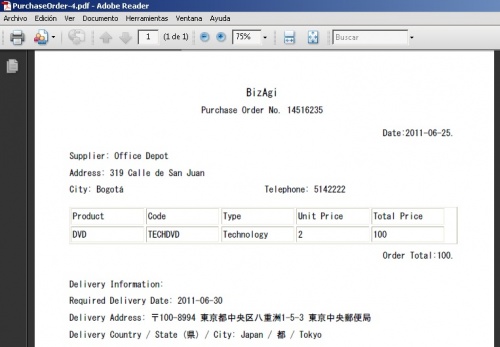
In this example we will illustrate how to create a PDF containing Japanese characters.
PDF without Unicode support:
PDF with Unicode support:
Prerequisites
1. Glassfish 3.0.1 installed and configured (recommended), or any other Application Server supporting Java web services.
You may download Glassfish from the official Glassfish page.
The path where Glassfish is installed will be addressed from now on as "%GLASSFISH_HOME%".
2. Netbeans 6.9 installed (recommended) or any other IDE to develop projects in Java.
You may download Netbeans from the official netbeans.org page. The path where our projects in Netbeans are created will be addressed from now on as "%WORKSPACE_PATH%".
3. Apache FOP 1.0 project (or higher) for Java.
This component is required to develop the web service which creates the PDF file.
You may download the binary distribution found at the Apache FOP project official webpage.
The path where Apache FOP is extracted to, will be addressed from now on as "%APACHEFOP_HOME%".
4. Unicode support for Acrobat Adobe Reader, as well as those special characters Windows fonts installed in that server.
Note: Adobe Acrobat Reader is known to detect the language package it requires to install while attempting to open a PDF that contains unicode characters.
What you need to do
To generate PDF files supporting unicode characters, the following steps are carried out:
1. Configuring the chosen Font.
2. Developing the web service in Java.
3. Configuring the web service invocation in Bizagi.
Example
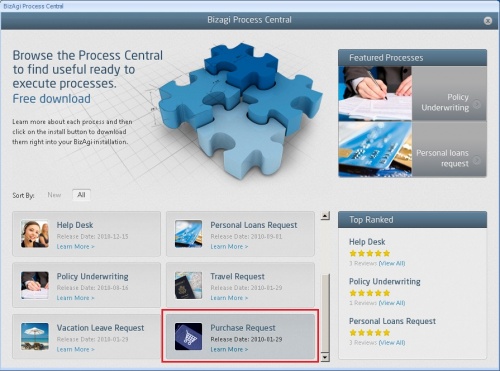
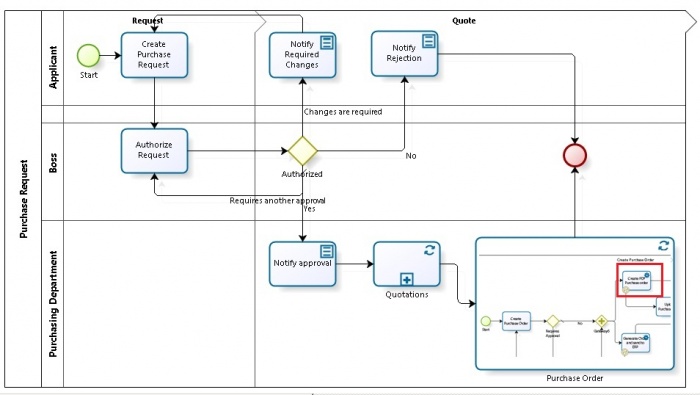
The exercise described in this 'how-to' was based on the Purchase Request process installed from the Free Process Central templates.
The PDF file output of this example is created in the "Create PDF Purchase order" service task of the "Purchase Order" subprocess.
For this example, it will be shown that the web service we will create for Unicode character support, will override that one available at "http://www.Bizagi.com/ESB/ESBServices.asmx" (as invoked from the initial process template).
Configuring the chosen Font
Font configuration involves 3 minor steps that are carried out in order to allow the Apache FOP component to reference the correct font for PDF creation.
These minor steps are: identifying the font containing the special characters in the server, generating and referencing a metrics file for the font file, and editing the XSL-FO transformation file.
|
Alert: In Apache FOP 0.94 versions and above, some fonts do not need the supply metrics files to register those fonts for the component. However, it is still recommended to perform these steps as described below. |
Identifying the font containing the special characters in the server
The purpose of this step is to enable us to identify which Windows fonts in the server holds the special characters we wish to print in PDF files.
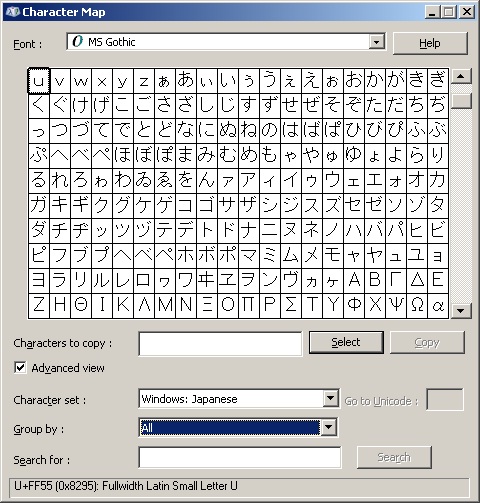
To identify our font, we can use Windows's Character map utility:
Now that we have identified that Japanese characters are represented with the MS Gothic font, we can look up the files used in the operating system for that particular font.
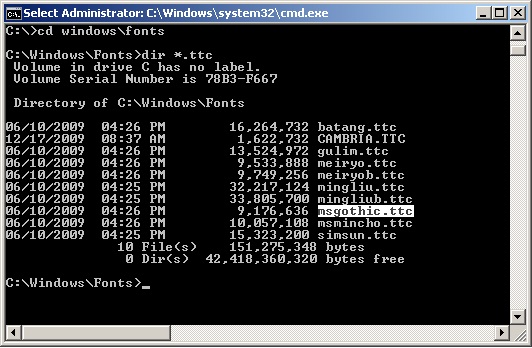
In Windows installations, these ".ttc" font files are located under C:\Windows\Fonts.
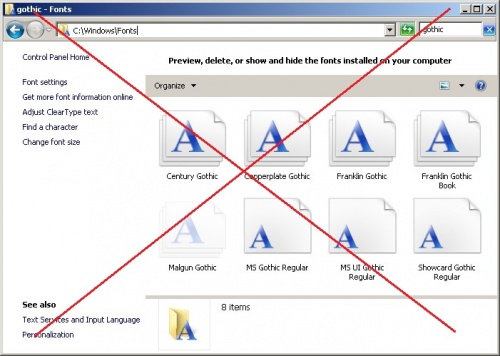
Notice that it is best to look for the font directly from a command prompt (instead of looking it up in Windows explorer), mainly because this way we can easily see the real name of the file.
Generating and referencing a metrics file for the font file
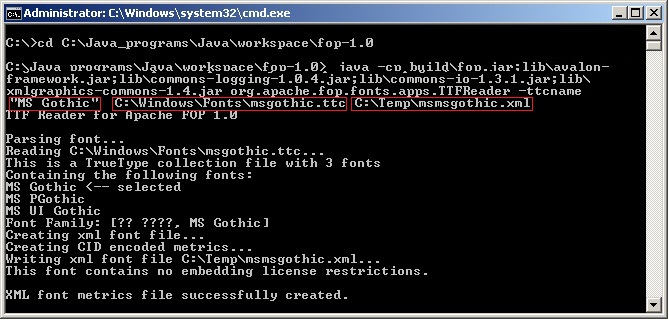
Knowing which font file we need to use, we can now generate an xml metrics file for the Apache FOP component to instantiate while creating the PDF.
We type the following in a command prompt at the %APACHEFOP_HOME% folder: java -cp build\fop.jar;lib\avalon-framework.jar;lib\commons-logging-1.0.4.jar;lib\commons-io-1.3.1.jar;lib\xmlgraphics-commons-1.4.jar org.apache.fop.fonts.apps.TTFReader -ttcname "MS Gothic" C:\Windows\Fonts\msgothic.ttc C:\Temp\msmsgothic.xml
Notice that the "commons-logging", "commons-io", and "xmlgraphics-commons" .jars referenced in the command line are included inside the APACHE FOP component (in the "%APACHEFOP_HOME%\lib" folder).
Therefore, ensure that this line contains the corresponding name (with the version number, which will depend on the APACHE FOP version downloaded).
For the line above, we are saving the metrics file as "C:\Temp\msmsgothic.xml".
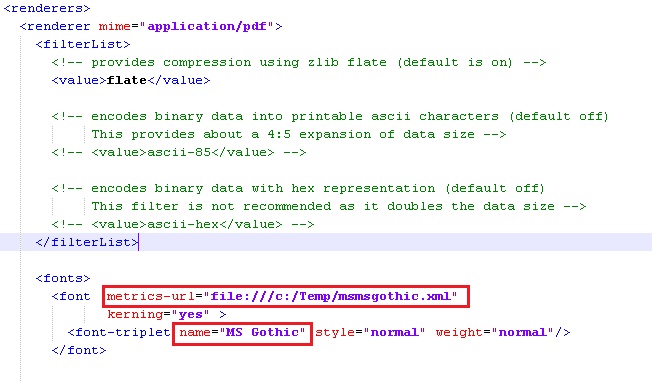
This command generates an xml metrics file that is referenced in the FOP configuration file. To include this reference, first create a configuration file (it may be initially duplicated from the one found at "%APACHEFOP_HOME%\conf").
For this example, we created the duplicate as "C:\Temp\mycfg.xml".
Edit this configuration file as shown below:
|
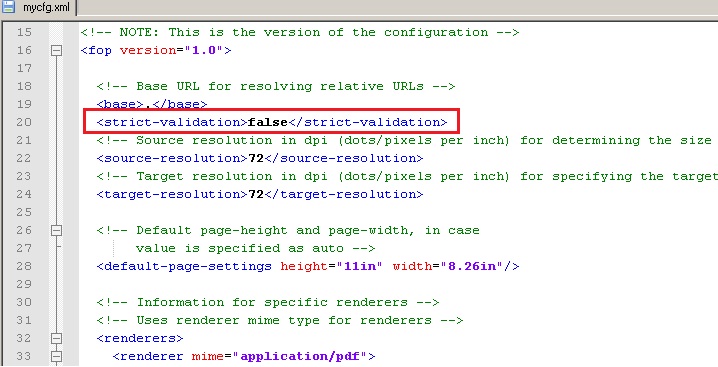
Alert: If you plan on using a XSL-FO transformation working in an earlier version of Apache FOP (from a version prior to 0.94), ensure that this transformation file compiles with the 0.94 released validations. Further information can be found in the Upgrading reference. |
For this example, we set the relaxed validation option in the FOP configuration file so that our XLS-FO is compliant (since it was built for a previous version of FOP -0.20-).
A full detailed explanation, FAQs and original reference of these steps can be found at the Apache FOP project FAQs.
Editing the XSL-FO transformation file
Once we have defined which font will be used in our PDF creating web service, we need to edit the XSL-FO transformation file so that it references the font set-up previously. This way we ensure that the unicode characters glyphs can be found in the corresponding font.
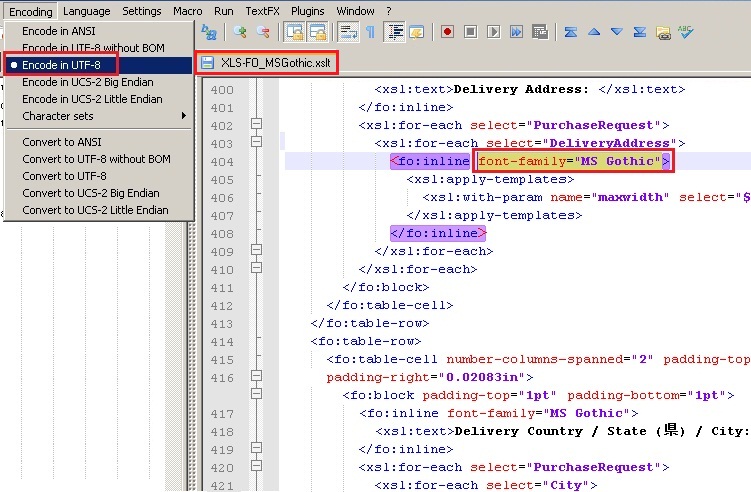
To do this, include font-family="MS Gothic" as an attribute of the "<fo:block>", "<fo:text>", and/or "<fo:inline>" nodes in the XSL-FO transformation file. Replace any other existing font-family setting for the one supporting your unicode characters, if that particular field will contain information represented in those unicode special characters.
Finally, save this file ensuring that the physical file itself is encoded as "UTF-8". This should be done especially if the XSL-FO transformation file contains unicode characters as well (otherwise it will not display them correctly).
For this example, we used the same XLS-FO transformation file that was already set for the input in the "Create PDF Purchase order" service task.
Developing the web service in Java
At this point we have completed the steps related to setting up the required font for the unicode special characters. Now we will develop the Java web service so that it: creates a PDF file from an incoming XML-formatted string, and uses the FOP configuration file for the FOP component.
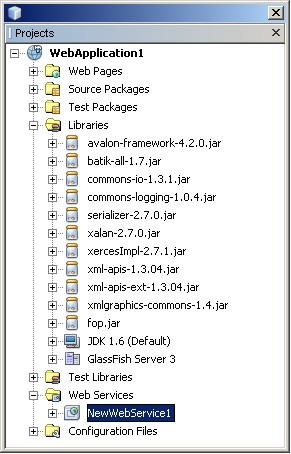
In this example, the web service was developed in Netbeans 6.9 and our project is called "Web Application1" (created in the path of the Netbeans workspace: %WORKSPACE_PATH%).
Its structure is as shown:
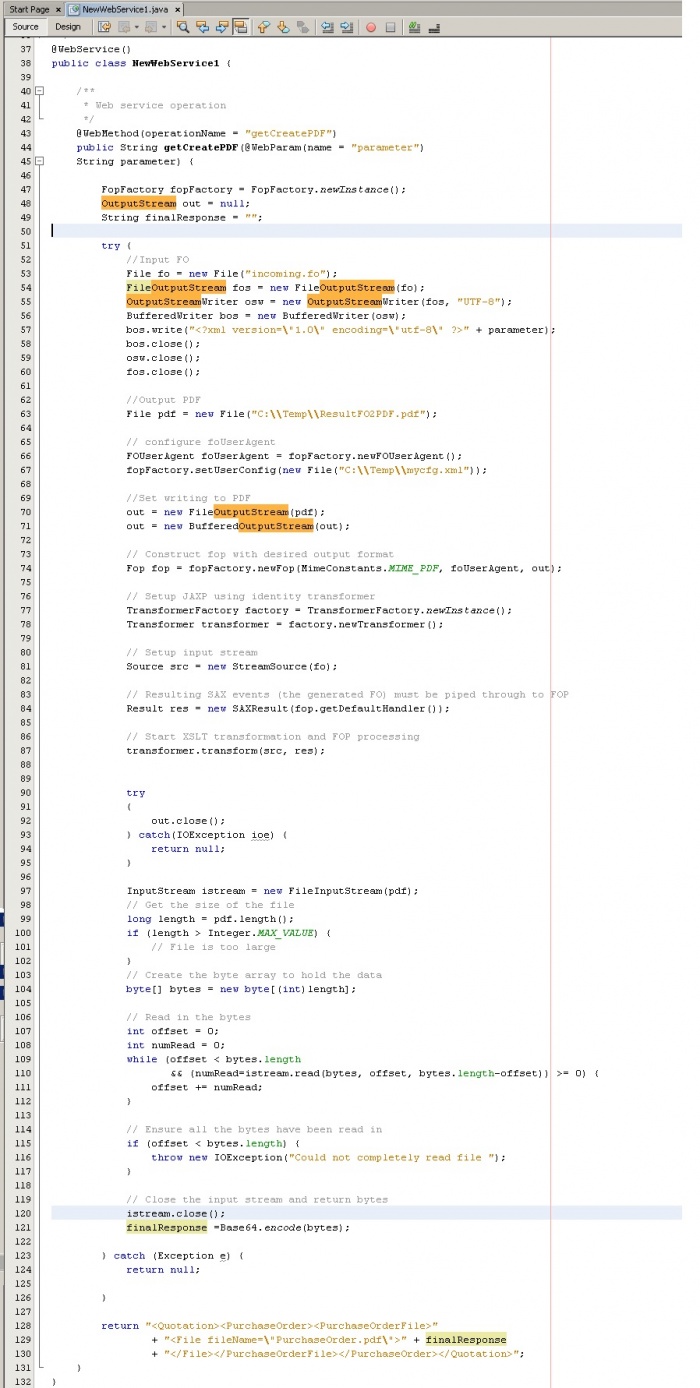
Our "NewWebService1.java" class code contains our creating-pdf method:
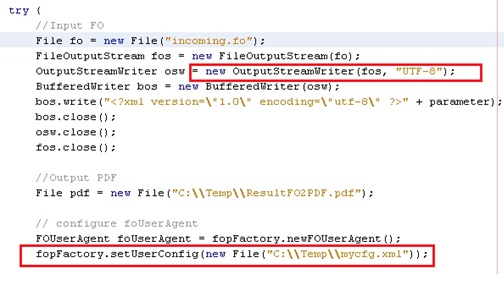
Notice that we use the proper enconding and then set FOP settings with the FOP configuration file:
Our return string in XML format sends back to Bizagi the file bytes adjusted to the Purchase Request data model (as expected by the SOA layer to update the File).
Download the complete project here.
Publishing the web service (in Glassfish)
Once the the project compiles correctly as a .war file, we deploy this .war file in the Glassfish server.
For this example "WebApplication1.rar" is our project's web application deployment file, and our web service is in the "NewWebService1.java" class. Glassfish was installed using port 8080.
Therefore, publishing the web service is done by:
- Locating the project's workspace directory. The output WebApplication1.war file is found at the "dist" folder ("%WORKSPACE_PATH%\WebApplication1\dist").
- Copying that WebApplication1.war file into Glasshfish autodeploy folder ("%GLASSFISH_HOME%\glassfish-3.0.1\glassfish\domains\domain1\autodeploy"). Take into account that this is just one way to deploy the application. Glassfish will deploy itself the contents of its "autodeploy" folder and generate the files (for example the wsdl) required for the web service to be published.
- Starting (or restarting) the glassfish server domain.
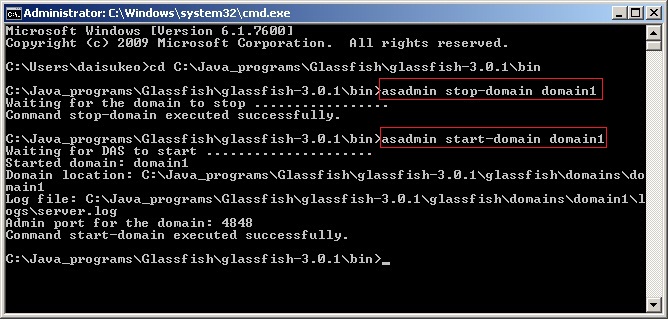
This can be done from a command prompt by typing: "asadmin start-domain domain1" located at the Glassfish bin ("%GLASSFISH_HOME%\glassfish-3.0.1\glassfish\bin\").
Notice that if it is necessary to restart the server domain, you can do this by stopping/starting the service.
To stop the service type: "asadmin stop-domain domain1".
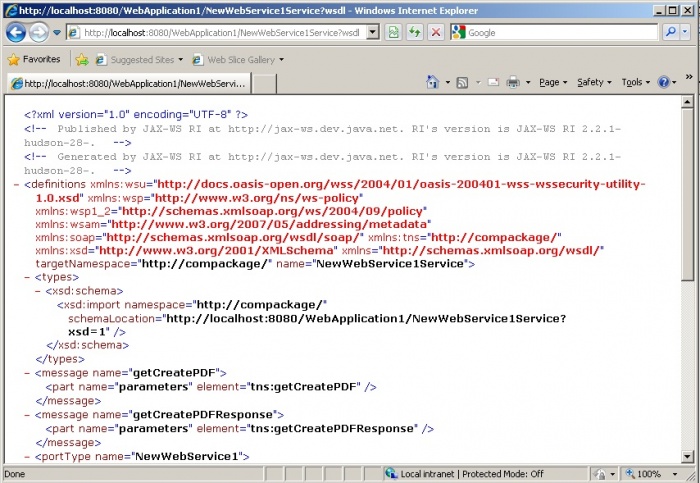
Once the Glassfish server domain service is started successfully, you may check that the WebApplication1.war was deployed correctly by accessing the web service definition wsdl file.
This is done by typing the following address in your browser: "http://localhost:8080/WebApplication1/NewWebService1Service?wsdl".
Configuring the web service invocation in Bizagi
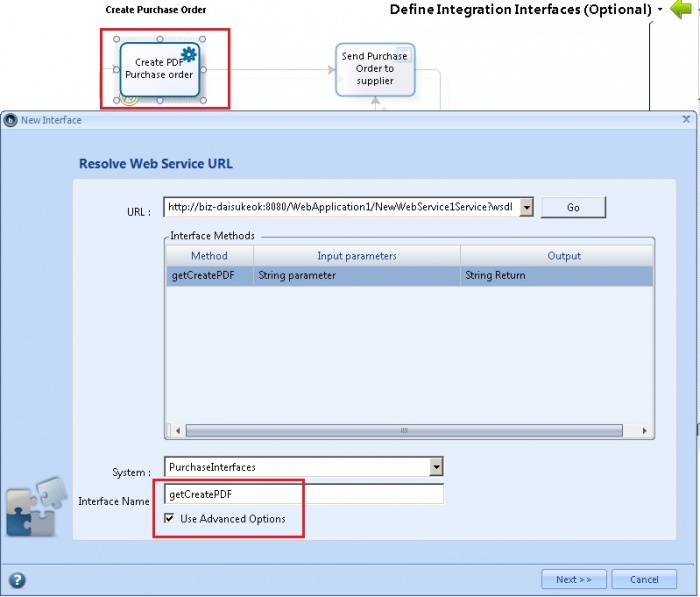
Now that the web service is published, its invocation can be configured with the Interfaces wizard in Bizagi Studio (setting it to point out to "http://%GLASSFISH_SERVER%:%GLASSFISH_PORT%/WebApplication1/NewWebService1Service?wsdl").
To invoke the web service in our Purchase Request process, go to the sixth step of the Process Wizard ("Integrate") and redefine the interface configuration for the "Create PDF Purchase order" service task (located inside the Purchase Order subprocess):
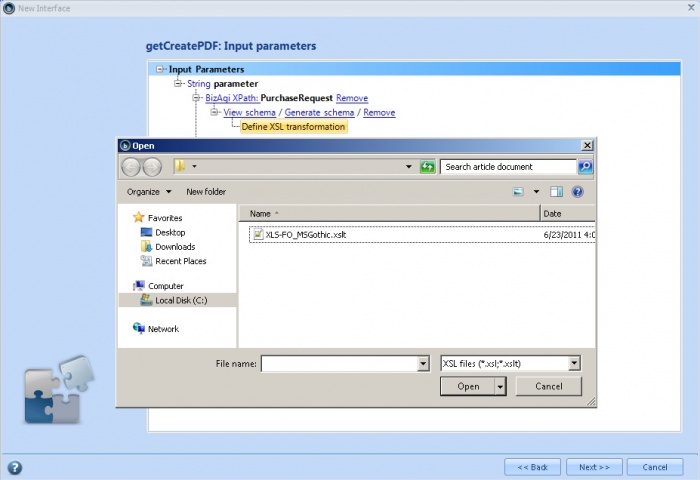
Remember that for its input parameters this configuration needs: selecting the schema information, and the created XLS-FO transformation file (as detailed here).
Select the following data fields to retrieve the schema:
Load the XLS-FO transformation file:
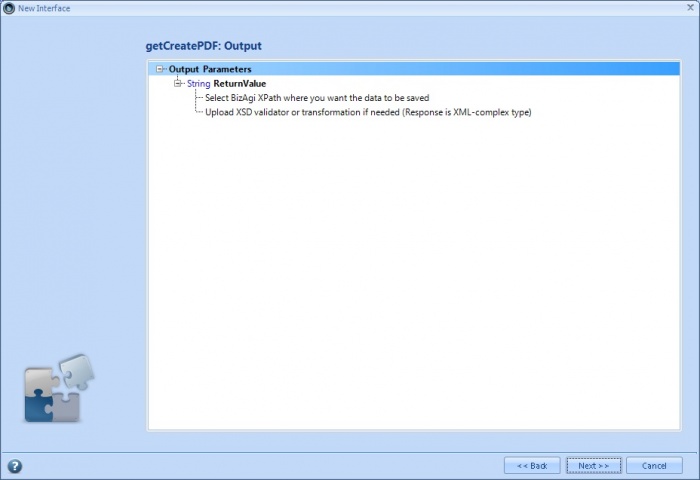
For this example, we have already adjusted the return type of our web service as a string (with XML format) that has the data model structure of our Purchase Request process. Therefore, we don't need to configure any detail for the output of the web service invocation.
Bizagi will automatically update the Purchase Order File with the PDF.
In the last step click on "Finish".
Execution
At this point, we are set to create our PDF with unicode characters support for the Purchase Request process.
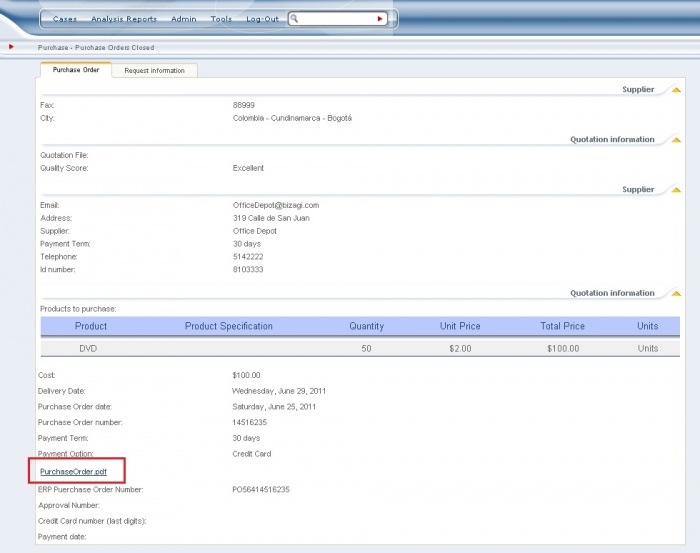
Execute your process in Bizagi's work portal to see the PDF generation:
Related Articles
- How to Create PDF Files with just Western/Latin character support.
- For the Enterprise Editions there is another way to create the PDF file here is how.
- Bizagi offers a way to generate RTF files by configuring a template, learn here about Bizagi Letters.
- Uploading files using SOA Layer
Read in this external link a detailed explanataion about the fonts advanced configuration with Apache FOP:
<comments />
