How to Create PDF Files
From Business Process Management, BPM and Workflow Automation Wiki | BizAgi BPMS
<keywords content="keywords"> PDF report, PDF reports, PDF, file, FOP, NFop, reports, report, PDF file, PDF files, PDF document, document, documents, files, PDF documents </keywords>
Contents |
How to Create PDF Files
Overview
The objective of this article is to illustrate the generation of PDF files for processes in Bizagi.
These PDF files support the Western/Latin character sets. To include Unicode special characters in PDF files, refer to How to create PDF files with Unicode characters.
What you need to do in Bizagi
To generate PDF files for your Bizagi processes, the following steps are carried out:
1. Having an attribute to store the PDF file. 2. Creating the PDF template and transformation file. 3. Creating the Web service that generates the PDF. 4. Configuring the web service invocation in Bizagi.
Example
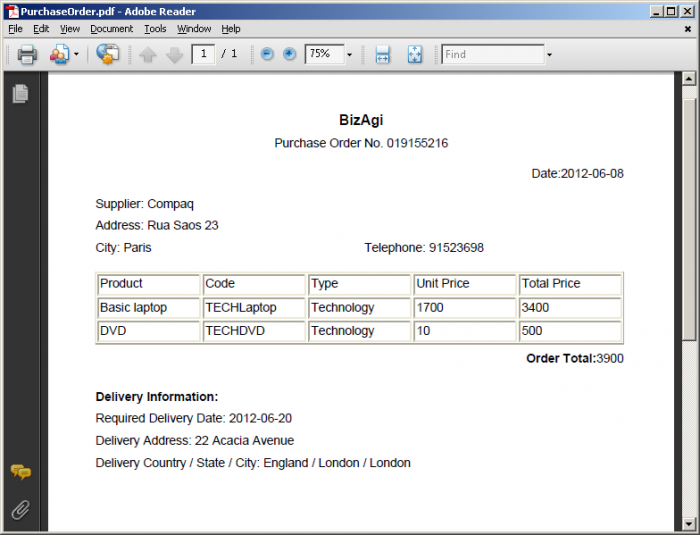
The following example was completed using the Office Supply Request process from My Second Process, and the PDF file created contains details of the Purchase Order. (This documentation refers to Bizagis latest version) The example is no longer available in 9.1.x versions.
The instructions shown below apply to both the Xpress and the Enterprise Editions of Bizagi.
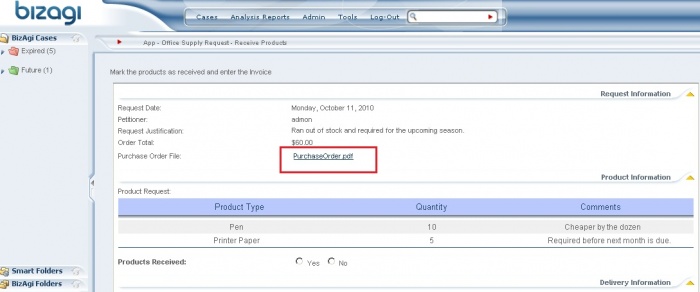
The PDF file is created in the Generate Purchase Order service task, and it can then be viewed in the Receive Products task.
The strategy covered here is to invoke a web service from Bizagi. The web service creates the PDF file with business data, using an Apache component called FOP.
The web service response will automatically update the PDF so that it is saved as a File-type attribute in Bizagi's data model.
Having an attribute to store the PDF file
To work with this example (and starting from the Office Supply Request process completed as instructed in the "My Second Process" document), three additions were made to the process' data model:
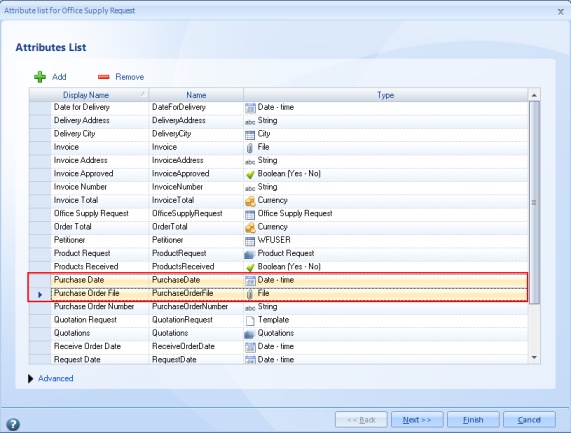
1. Creation of two new attributes in the process entity (Office Supply Request):
- A File attribute called PurchaseOrderFile. Its display name is Purchase Order File.
- A Date-Time attribute called PurchaseDate. Its display name is Purchase Date.
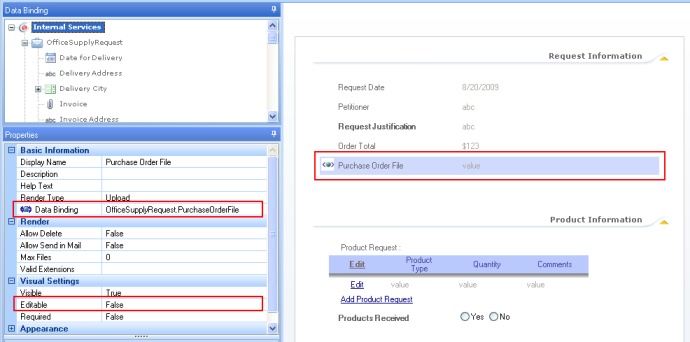
2. Inclusion of these newly created attributes in the form of the Receive Products activity, as a non-editable render.
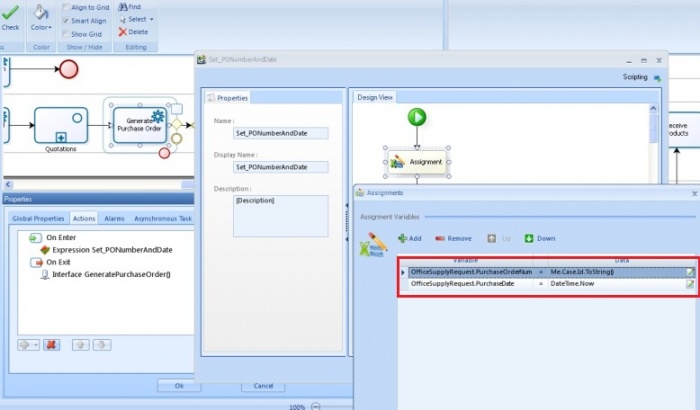
3. Setting the date value for the Purchase Date attribute. This was done by including an assignment in an onEnter expression at the Generate Purchase Order service task as shown below.
Creating the PDF template and transformation file
The next step is to design how will the PDF look like, and to create its corresponding XSL-FO transformation file.
This XSL-FO file will be used as the input parameters transformation for the web service invocation in Bizagi. A product that facilitates the generation of this transformation file is Altova StyleVision.
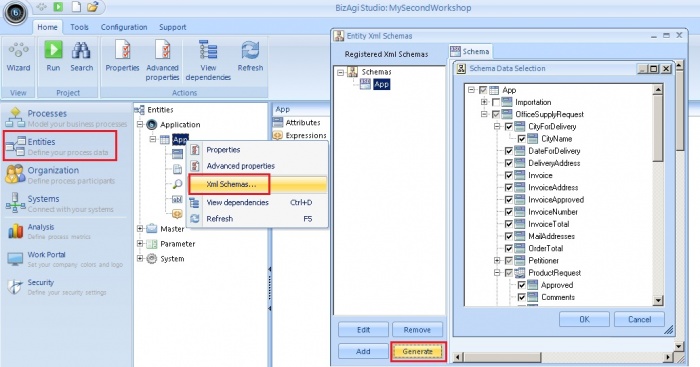
For this example, Altova StyleVision was used to design our output PDF according to the data model of "My Second Process". Therefore, in order to create this design, we need to gather the schema information using Bizagi Studio as shown:
Notice that we generate the schema for our OfficeSupplyRequest process and mark the specific information we wish to include in our purchase order PDF.
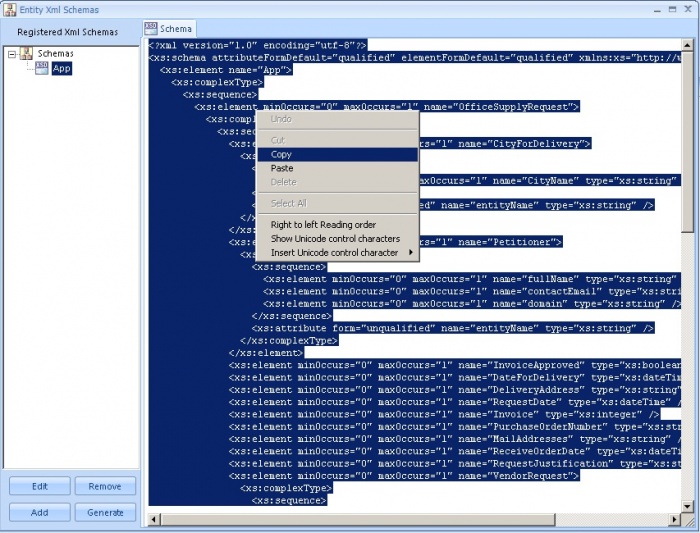
The generated schema content is copied so that we can save it into a file.
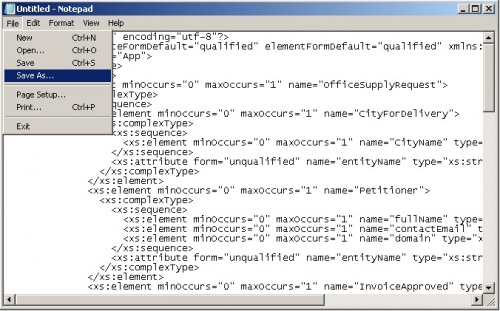
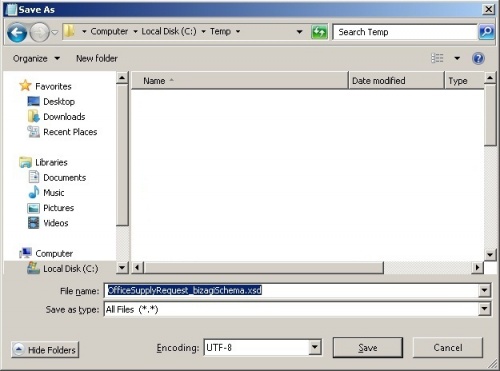
We save that file as an .xsd schema file.
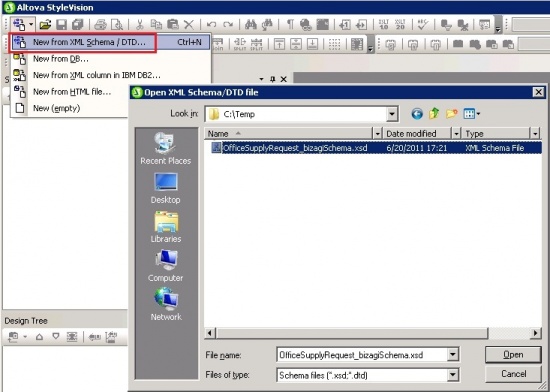
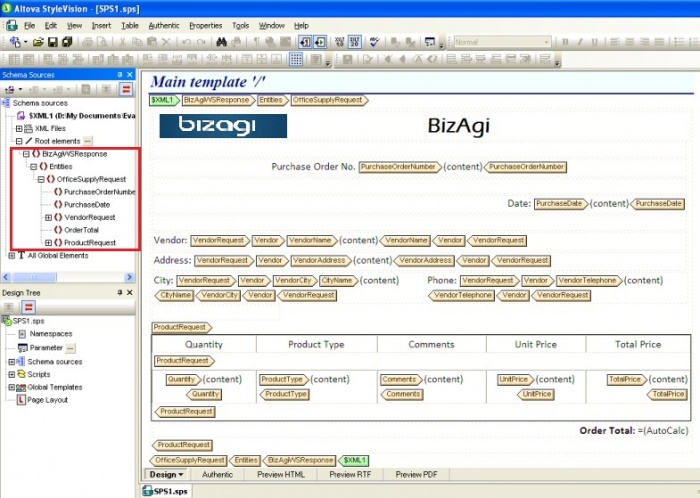
Once we have saved the schema, we can create the PDF design using the schema's structure as input for Altova.
Notice that this PDF design example contains an image (which is Bizagi's logo).
You may download the image used in this file here and save it in a local path (in the Web Service server). Ensure that you modify the XSL-FO transformation file to include your corresponding image's local path.
|
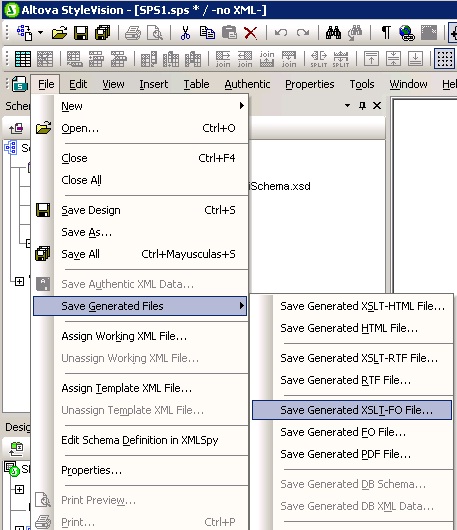
Alert: Bizagi works with XSLT 1.0. Using XSLT 2.0 is not supported. Therefore, in Altova StyleVision, before the XSLT-FO file is generated, remember to select XSLT 1.0. |
After we have finished our PDF's design by generating the contents and tables, we save the generated XLS-FO transformation file.
|
Alert: Some versions of Altova StyleVision subsequent to 2008, include a "<fo:declarations>" element which is unrecognized by the Apache FOP.Net component. Therefore, in order to create the web service in .Net, ensure that the XSL-FO transformation file is edited so that this element (and its content) is not present. |
You may download the resulting transformation file, as well as the Altova Stylevision's .sps file that generates the transformation here in this .rar.
Creating the Web service that generates the PDF
Now that we have the purchase order file PDF design, we proceed to create the web service which receives the dynamic request from Bizagi. The PDF is generated from the XML information in XSL-FO format, through the use of the Apache FOP. Apache FOP is a Java open source project that also runs on the .NET Framework (the NFop component).
In this example, our web service is created through Visual Studio with the .Net component of Apache Fop.
Download the Apache FOP component for .Net or from this external link: http://sourceforge.net/projects/nfop/
To view how to create this web service in Java so that the PDF supports unicode special characters, click here.
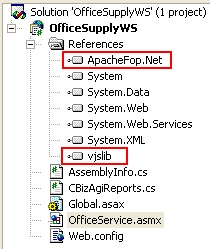
Ensure you add the reference for the NFop component and also the vjslib from the Framework library in the .Net project.
Include this namespaces for the Web Service class:
using System;
using System.ComponentModel;
using System.Web;
using System.Web.Services;
using System.Xml;
Our Web Method has in its code:
[WebMethod]
public XmlDocument GeneratePurchaseOrder(string sFileContent)
{
	//Generate the PDF file
	sbyte[] bufSByte = CBizagiReports.GeneratePDF(sFileContent);
	byte[] bufByte = new byte[bufSByte.Length];

	//Copy the sbyte[] to a byte[]
	System.Text.UTF8Encoding utf = new System.Text.UTF8Encoding();
	Buffer.BlockCopy(bufSByte, 0, bufByte, 0, bufSByte.Length);

	//Load an empty StringBuilder into an XmlWriter
	System.Text.StringBuilder sb = new System.Text.StringBuilder();
	System.IO.TextWriter tw = new System.IO.StringWriter(sb);
	XmlTextWriter m_XmlWriter = new XmlTextWriter(tw);

	//Write the bytes in the StringBuilder in Base 64
	m_XmlWriter.WriteBase64(bufByte, 0, bufByte.Length);

	//Build the Xml document
        string sRes = "<App><OfficeSupplyRequest><PurchaseOrderFile><File fileName=\"PurchaseOrder.pdf\">";
        sRes += sb.ToString();
        sRes += "</File></PurchaseOrderFile></OfficeSupplyRequest></App>";
	XmlDocument xDoc = new XmlDocument();
	xDoc.LoadXml(sRes);

	//Return de Xml document
	return xDoc;
}
In the project, we create the CBizagiReports.cs class with the following code:
using System;
using System.IO;
using org.apache.fop.apps;
using org.xml.sax;
using java.io;

namespace OfficeSupplyWS
{
	public class CBizagiReports
	{
		internal static sbyte[] GeneratePDF(string sInput)
		{
			sbyte[] buf;
			try
			{
				InputSource source = new InputSource(new java.io.StringReader(sInput));
				ByteArrayOutputStream stream = new ByteArrayOutputStream();
				Driver driver = new Driver(source, stream);
				driver.setRenderer(1);
				driver.run();
				buf = stream.buf;
			}
			catch (Exception exception)
			{
				throw new ApplicationException(exception.Message);
			}
			return buf;
		}

	}
}
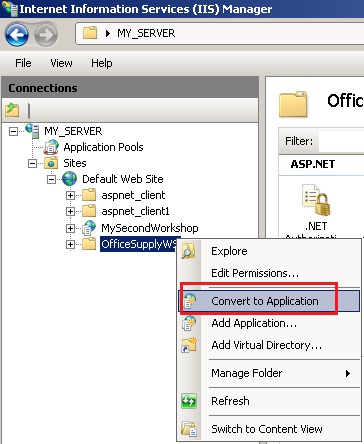
Once you have compiled the project successfully, convert it to an application in your IIS so that it can be referenced as a web service URL.
This way, your web service is published as: "http://[my_server]/OfficeSupplyWS/OfficeService.asmx" (for this example, OfficeSupplyWS is our .Net project).
Notice that for the Enterprise Editions the PDF file can also be created via Component Library. If you have the Enterprise Edition you can choose either one. For the Xpress Edition, it is necessary to follow the next step in this article.
Configuring the web service invocation in Bizagi
The last step is to configure the invocation to our created web service.
Through the interfaces wizard for our project, we can easily complete this step as follows:
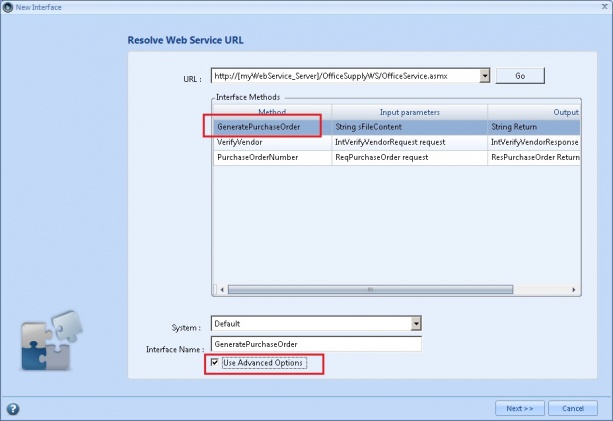
In Bizagi Studio, go to the sixth step of the Process Wizard (Integrate) and click on the Generate Purchase Order service task.
Enter the URL of the Web Service previously created and select the GeneratePurchaseOrder method and mark the Use Advanced Options checkbox.
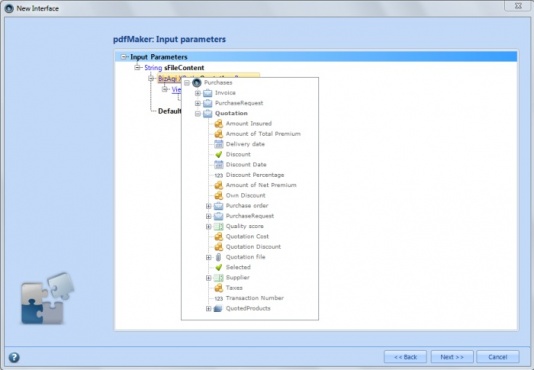
Once the user clicks on next, the input parameters need to be inserted. To do that, double click on Parameters and select the entity of the Data Model.
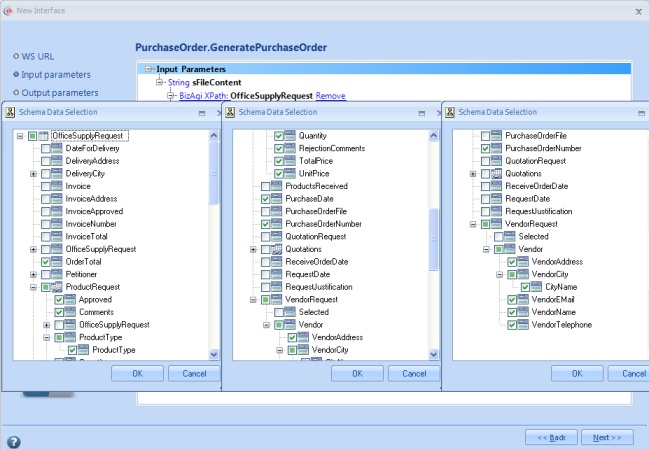
For the web service input parameters, select the XPath OfficeSupplyRequest and define the XSD by marking the corresponding information we want to send from our data model: OfficeSupplyRequest
-- OrderTotal
-- ProductRequest
-- -- Approved
-- -- Comments
-- -- ProductType
-- -- -- ProductType
-- -- Quantity
-- -- TotalPrice
-- -- UnitPrice
-- PurchaseDate
-- PurchaseOrderNumber
-- VendorRequest
-- -- Vendor
-- -- -- VendorAddress
-- -- -- VendorCity
-- -- -- -- CityName
-- -- -- VendorEMail
-- -- -- VendorName
-- -- -- VendorTelephone
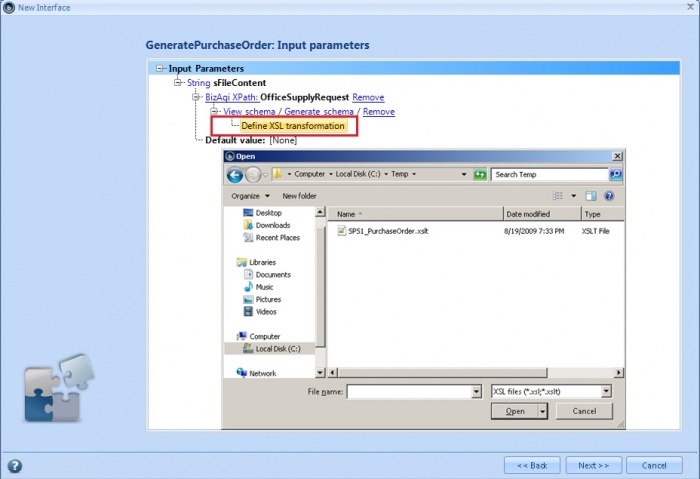
Once we have set the XSD used in the web service, associate the XLS-FO transformation file created with Altova Stylevision (SPS1_PurchaseOrder.xslt) by double clicking on Define XSL transformation.
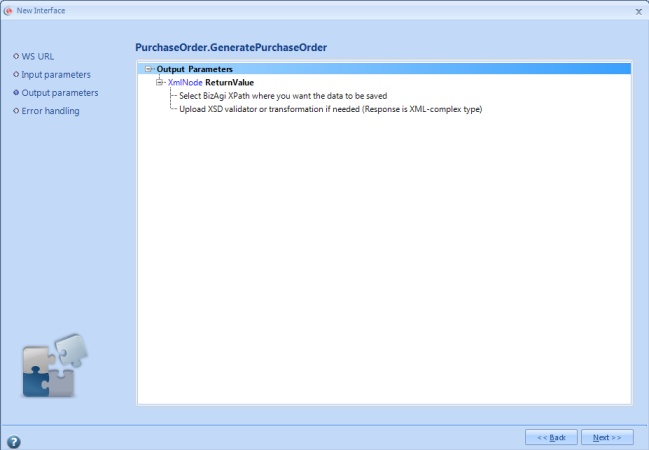
For this example, we don't need to configure anything else in the output parameters because our web service response sends out the PDF information structured with our data model so Bizagi will update the Purchase Order File attribute automatically.
In the last step click on Finish as well.
Execution
At this point, we are set to create our PDF in the OfficeSupplyRequest process so that it can be viewed in the Receive Products task.
To see this example working, execute the Office Supply Request process in Bizagi’s work portal.
We can see that Bizagi uploads the PDF file into our attribute:
Related Articles
- Create PDF files with Unicode character support.
- For the Enterprise .NET Edition there is another way to create the PDF file here is how
- Bizagi offers a way to generate RTF files by configuring a template, learn here about Bizagi Letters.
- Uploading files using SOA Layer
- View how to enhance the PDF generation with dynamic administration of the templates used
Read and learn more about creating PDF files with .NET, from these external links:
<comments />
