WebLogic Configuration to Work with Bizagi
From Business Process Management, BPM and Workflow Automation Wiki | BizAgi BPMS
<keywords content="keywords">WebLogic, weblogic, Weblogic, Enterprise edition, enterprise edition, JEE, configurate, configuration</keywords>
|
Applies to ENTERPRISE JEE EDITION |
WebLogic Configuration to Work with Bizagi
Bizagi's Enterprise JEE Edition can be installed in different application servers (i.e. WebLogic, WebSphere, JBoss). The configuration procedure in each server may vary a little from one to another.
This article focuses in WebLogic configuration to work with Bizagi.
Pre-requisites
- Installed JDK 6.
- Environment variable JAVA_HOME properly configured.
- Installed Weblogic Server 11g (version 10.3.2.0). Weblogic can be downloaded from the official Oracle site. Weblogic's installation path will be referenced as <WEBLOGIC_HOME> from this point on.
- User domain created in Weblogic.
We recommend setting up JBoss Application server in the following operating systems:
- Win7Enterprisex32.
- Mandriva Linux release 2010..2(Official) for i586.
Server options
If you wish to download the installer, bear in mind that you need to download the corresponding file according to the operative system (and bits supported).
The files required for the installation of Weblogic Server 11g (Versión 10.3.2.0) can be downloaded from Oracle's official website.In the website you may find different download alternatives according to the operative system. For this article. the package used was Oracle WebLogic Server 11gR1 (10.3.2) + OEPE - Net Installer.
Microsoft Windows (Windows x86)
* net_oepe111130_wls1032_win32.exe
Linux (Linux x86)
* net_oepe111130_wls1032_linux32.bin
In Windows x64-bit machines, the installation path of the JDK should not consist of directories containing parentheses as "Program Files (x86)". This causes an error during startup of the application server.
Remember that once Weblogic is installed, a user domain has to be created (as an example, this article refers to "bizagi_domain").
Starting the Server (domain)
To start Weblogic, use the direct access from the Start menu (e.g. Oracle Weblogic > User Projects > bizagi_domain > Start Admin Server) or execute the following file in a command prompt:
<WEBLOGIC_HOME>/user_projects/domains/<USER_DOMAIN>/bin/startWebLogic.cmd
Stopping the Server (domain)
To stop Weblogic, use the direct access from the Start menu (e.g. Oracle Weblogic > User Projects > bizagi_domain > Stop Admin Server) or execute the following file in a command prompt:
<WEBLOGIC_HOME>/user_projects/domains/<USER_DOMAIN>/bin/stopWebLogic.cmd
Administration Console
To access the Administration Console type the following address in the browser of your choice. Then enter the username and password (as it was defined when the domain was created using Weblogic).
http://localhost:7001/console/login/LoginForm.jsp
Procedure
Extracting the Configuration Files
For the initial configuration of the server, several .jars are required. These .jars are located in the folder ConfigurationFiles that has been delivered by Bizagi with the JEE edition.
The folder and file structure of the ConfigurationFiles.rar is as shown:
--ConfigurationFiles
-- -- bizagi (Bizagi deploy files)
-- -- -- BizAgi-ejb.jar
-- -- configuration (External components required by Bizagi)
-- -- -- BizAgiJDBCDriver-1.0-1.jar:
-- -- -- eclipselink.jar: Persistence Framework
-- -- -- javaee.jar
-- -- -- jsf-myfaces-1.2.8.war: Presentation Framework
-- -- -- log4j.jar:
-- -- -- ojdbc6.jar: Oracle data access driver
-- -- -- sqljdbc.jar: SQL Server data access driver
-- -- docs (Installation and configuration documents)
-- -- jiNET (other files)
-- -- security (Custom security component)
-- -- -- JBoss
-- -- -- -- BizAgi.JAAS.jar
-- -- -- -- BizAgi.Security.Common.jar
-- -- -- BizAgi.Glassfish.Security.jar
-- -- -- BizAgi.Security.Common.jar
-- -- -- BizAgi.Websphere.Security.jar
-- -- -- bizAgiSecurityProvider.jar
The location of this folder in your local server's path will be referenced as your <PATH_CONFIGURATION_FILES> from this point on.
Setting the Environment Variables
Bizagi requires the setting of some server variables. In this section the variables and values they should have are shown.
For Microsoft Windows
1. Stop the server; this may be done as explained previously, or by just closing the window that opened when the server was started.
2. Open the file:
<WEBLOGIC_HOME>/user_projects/domains/<USER_DOMAIN>/bin/startWebLogic.cmd
Find the line:
set JAVA_OPTIONS=%SAVE_JAVA_OPTIONS%
At the end, add these two environment variables:
-Dcompilation.classpath=<PATH_CONFIGURATION_FILES>\bizagi\BizAgi-ejb.jar;<PATH_CONFIGURATION_FILES>\configuration\javaee.jar

-DiNET_HOME=<PATH_CONFIGURATION_FILES>\JiNET
NOTE: If the server was installed in a Linux machine, change the path separator symbol for (:) and include between double quotes (").
- Change the variables (<>) by the actual paths of the required files.
- The change of line between variables is necessary.
3. Save the file.
Setting the Authentication Module
1. Copy the custom authentication module included in the ConfigurationFiles
<PATH_CONFIGURATION_FILES>\security\bizAgiSecurityProvider.jar
Into the following path:
<WEBLOGIC_HOME>\wlserver_10.3\server\lib\mbeantypes\
2. Start the application server and open the Administration Console.
3. Go to the section SecurityRealms and select the item myrealm.
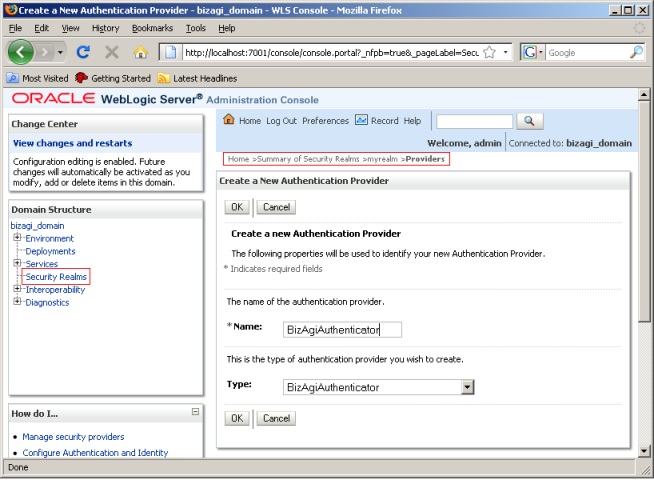
4. Then select the tabs Providers / Authentication and click on New. A form will appear to create a new authentication provider; enter the Name here and select BizagiAuthenticator for Type.
Click on OK.
5. It is important to clarify that the realm used here is the one that comes configured on the server, so the newly created provider operates on a shared context, i.e. it is part of a set of authenticators that will respond in a specified order. Therefore, the list of providers must be configured as follows:
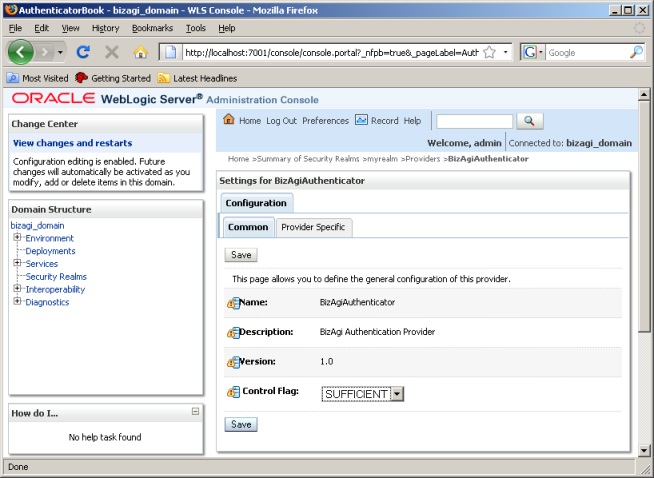
a. Locate the BizAgi authentication module in the top of the list (Click on Reorder). This step is necessary to ensure that Bizagi users can be authenticated.
b. Change the value of the attribute Control Flag to "SUFFICIENT" in the "BizAgiAuthenticator" provider Settings, and click on Save.
Setting the Data Access Configuration
Bizagi supports SQL Server and Oracle database engines.
Microsoft SQL Server
Before setting up the data resource, it is necessary to check with the "SQL Server Configuration Manager" the option of TCP/IP remote connections is enabled and the default port is 1433 (avoid using a dynamic port). This is done to ensure the connection to the configured database.
1. Copy the JDBC driver that is part of the configuration files of Bizagi:
<PATH_CONFIGURATION_FILES>\configuration\sqljdbc.jar
In the library repository of the user’s domain:
<WEBLOGIC_HOME>\user_projects\domains\bizagi_domain\lib\
Then copy the log management library:
<PATH_CONFIGURATION_FILES>\configuration\log4j.jar
In the library repository of the user’s domain:
<WEBLOGIC_HOME>\user_projects\domains\bizagi_domain\lib\
2. Restart the application server.
3. Log on to the Administration Console and in the Domain Structure navigation pane, go to the Service – JDBC – Data Sources section.
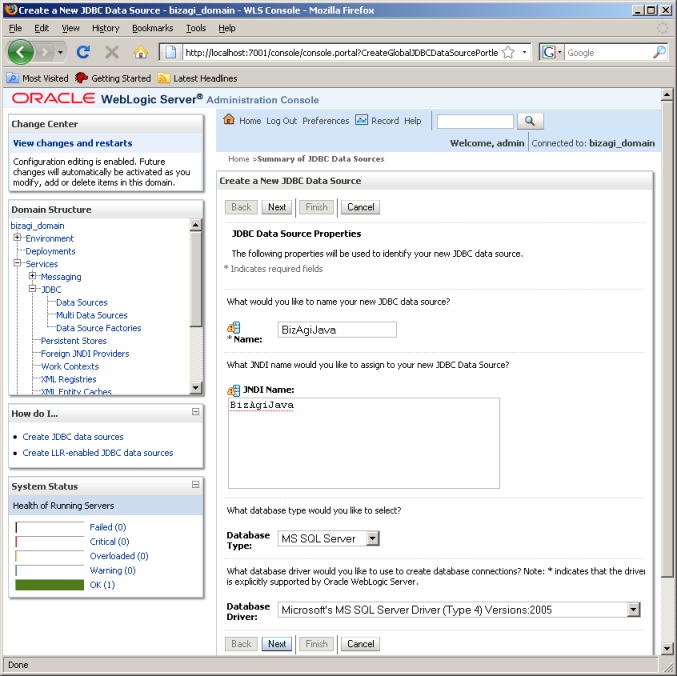
4. Create the JDBC data source (Click on "New"): The highlighted text corresponds to the name of the section in the Administration Console.
a. JDBC Data Source Properties: Enter the following information to identify the data source:
Name: BizAgiJava
JNDI NAME: BizAgiJava
Database Type: MS SQL Server
Database Driver: Microsoft’s MS SQL Server Driver (Type 4) Versions: 2005
Click on Next.
b. Transaction Options: Deselect the Supports Global Transactions box and continue with the creation of the data source.
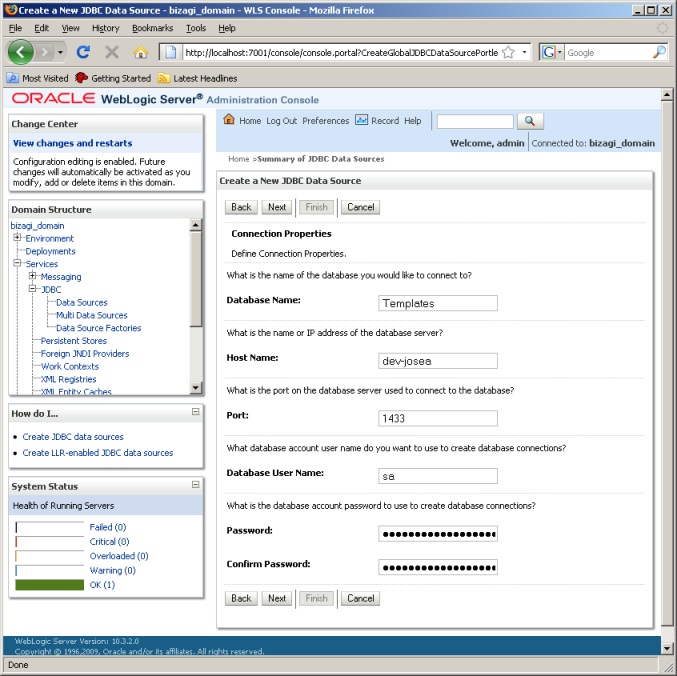
c. Connection Properties: Enter the connection information for the Bizagi database. Example:
d. Test Database Connection: Click on Test Configuration, the message "Connection test succeeded" should appear.
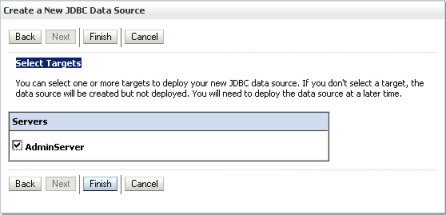
e. Select Targets: Select the server instance that was created during the installation and in which the data source will be created. (Click on Finish).
Oracle
1. Edit the <PATH_CONFIGURATION_FILES>\JiNET\config\web.config file's "ProviderType" key.
By default this key has the value "MSSqlClient" (for SQL Server), but for an Oracle database, remove the comments from the line with the "Oracle" value and add those comments to the other key; like this:</span>
<add key="PROVIDERTYPE" value="Oracle" /> <!--add key="PROVIDERTYPE" value="MSSqlClient" /-->
2. Log on to the Administration Console and in the Domain Structure navigation pane, go to the Service – JDBC – Data Sources section.
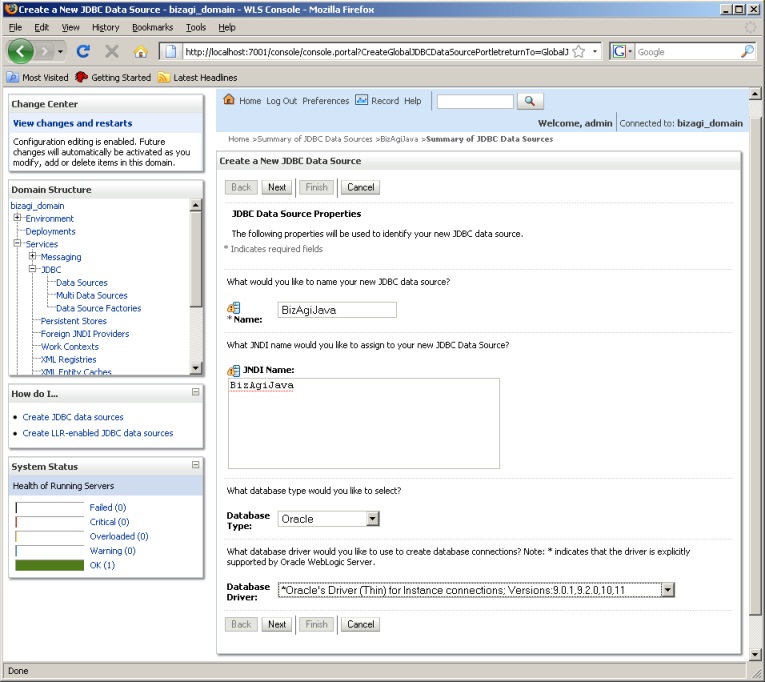
3. Create the JDBC data source (Click on "New"): The highlighted text corresponds to the name of the section in the Administration Console.
a. JDBC Data Source Properties: Enter the following information to identify the data source:
Name: BizAgiJava
JNDI NAME: BizAgiJava
Database Type: Oracle
Database Driver: Oracle’s Driver (Thin) for instance connections; Versions:9,10,11
Click on Next.
b. Transaction Options: Deselect the Supports Global Transactions box and continue with the creation of the data source.
c. Connection Properties: Enter the connection information for the Bizagi database. Example:
d. Test Database Connection: Click on Test Configuration, the message "Connection test succeeded" should appear.
e. Select Targets: Select the server instance that was created during the installation and in which the data source will be created. (Click on Finish).
Setting the Messaging Service (JMS)
Bizagi uses the Java Messaging Service to process asynchronous tasks. To configure this service, follow these steps:
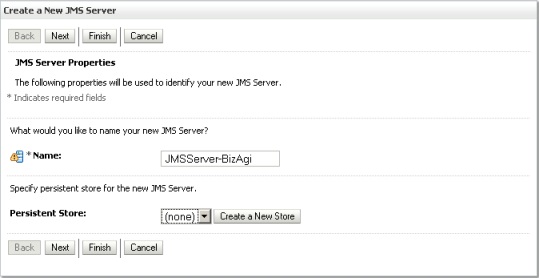
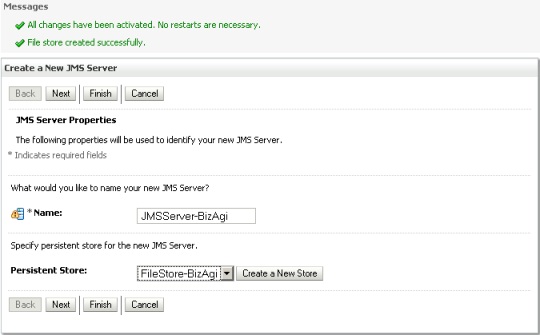
1. Define a JMS server on the user's domain.
a. Log on to the Administration Console and in the Domain Structure navigation pane, go to the Services – Messaging – JMS Servers section.
b. Create a new JMS server (Click on New).
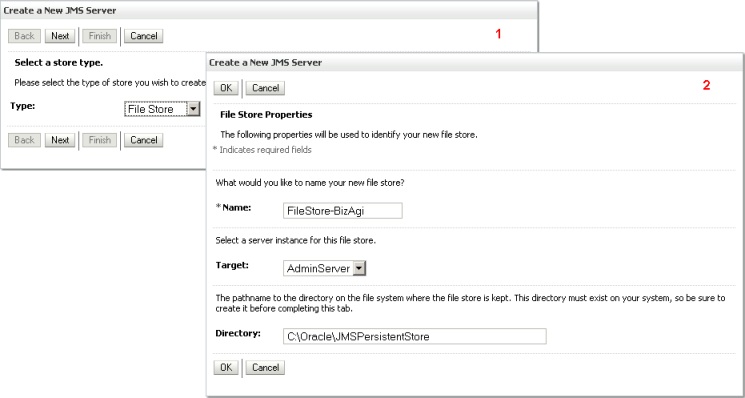
c. Click on Create a New Store.
d. Select the new persistent store and click on Next.
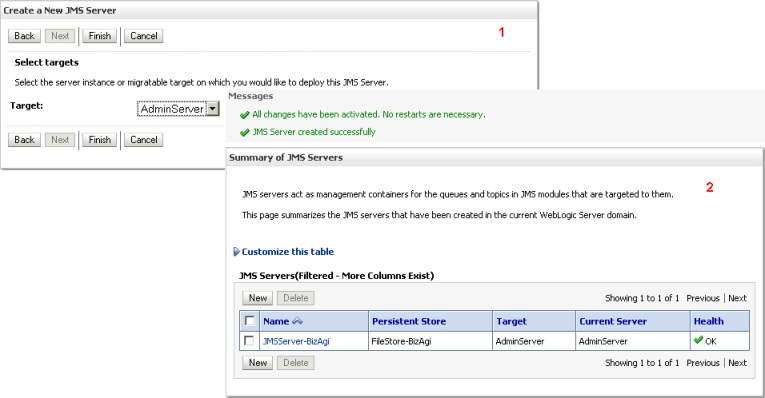
e. Select the server instance that was created during installation and in which the JMS Server will be created. (Click on Finish).
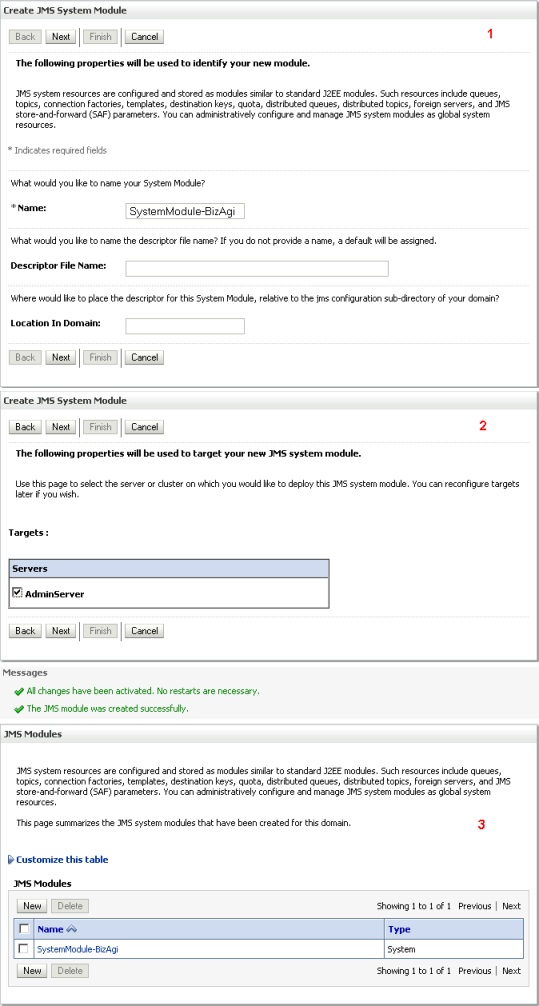
2. Define a JMS module on the user's domain.
a. Log on to the Administration Console and in the Domain Structure navigation pane, go to the Services – Messaging – JMS Modules section.
b. Create a new JMS module (Click on New).
3. Add to the JMS module the connection resources: The highlighted text corresponds to the name of the section in the Administration Console.
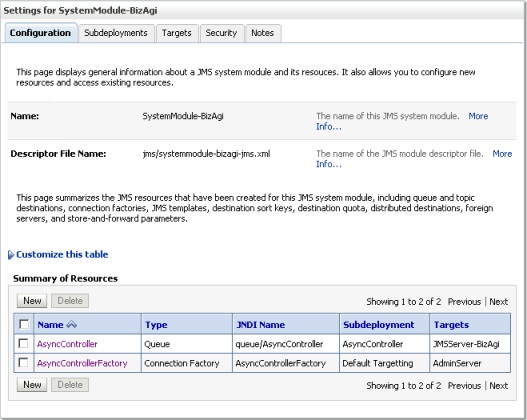
a. JMS Modules: Click on the created module (e.g. SystemModule-BizAgi).
b. Summary of Resources: Locate the Configuration tab and click on New to add a resource.
c. Create the resources:
Setting the Connection Factory
- Choose the type of resource you want to create: select Connection Factory and click on Next.
- Connection Factory Properties: Enter the following information and click on Finish:
Name: AsyncControllerFactory
JNDI Name: AsyncControllerFactory
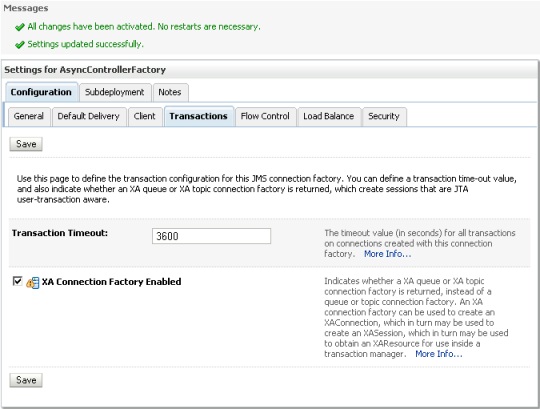
- Summary of Resources: Click on the resource AsyncControllerFactory, then go to the tab Configuration / Transactions and select the XA Connection Factory Enabled option and finally click on Save.
Setting the Queue
- Choose the type of resource you want to create: select Queue and click on Next.
- JMS Destination Properties: Enter the following information and click on Next:
Name: AsyncController
JNDI Name: queue/AsyncController
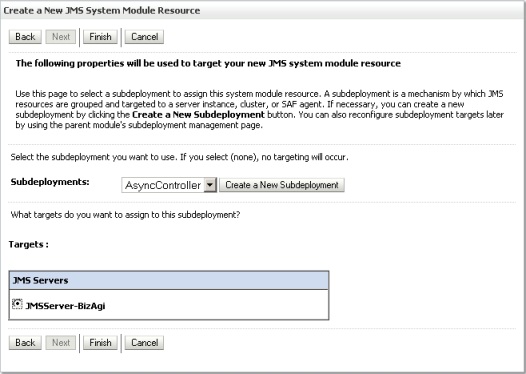
- Associate the Queue resource to the JMS server: click on Create a New Subdeployment, assign the name AsyncController and click on OK to finish.
Select the JMS server and click on Finish.
d. Configuration of JMS resources completed.
Configuring the Shared Libraries
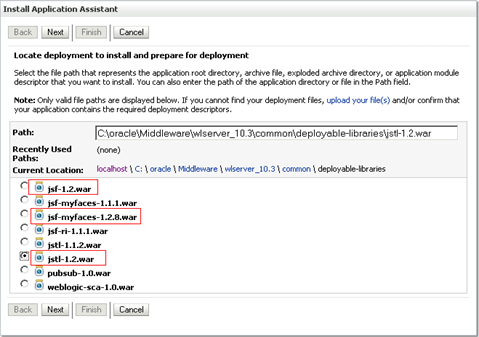
The steps described below should be repeated to install successfully the required libraries:
- jstl-1.2.war
- jsf-1.2.war
- jsf-myfaces-1.2.8.war
|
Note: Before starting the installation of the libraries, copy the file <PATH_CONFIGURATION_FILES>\configuration\jsf-MyFaces-1.2.8.war in the folder <WEBLOGIC_HOME>\wlserver_10.3\common\deployable-libraries\ |
1. Log on to the Administration Console and in the Domain Structure navigation pane, go to the Deployments section. Then click on Install.
2. Locate deployment to install and prepare for deployment: Locate the library (archive.war) to be installed and click on Next.
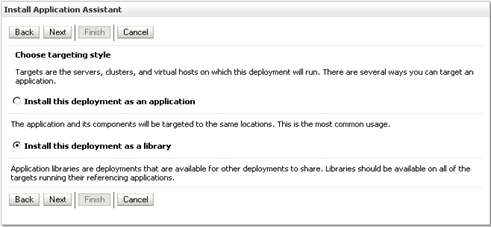
3. Choose targeting style: Selected the Install this deployment as a library option and click on Next.
4. Optional Settings: Click on Finish.
Configuring the Administrator User (domain\admon)
To perform some internal operations, Bizagi requires an administrator user that is part of the security context defined by the Weblogic server.
1. Log on to the Administration Console and in the Domain Structure navigation pane go to the Security Realms section. Click on the resource "myrealm".
2. Select the Users and Groups tab and locate the internal Users tab, then click on New and enter the following information in the form:
Name: domain\admon
Description: BizAgi Administrator User (Optional)
Provider: DefaultAuthenticator
Password: bizagi$91
3. Click on OK.
After this configuration, the server will be ready to deploy the application.
Related articles
- Installing Bizagi Enterprise JEE Edition
- JBoss configuration to work with Bizagi
- WebSphere configuration to work with Bizagi
<comments />
