JBoss configuration to work with Bizagi
From Business Process Management, BPM and Workflow Automation Wiki | BizAgi BPMS
|
Applies to ENTERPRISE JEE EDITION |
Contents |
JBoss configuration to work with Bizagi
Overview
With Bizagi's Enterprise JEE Edition, your processes can be installed unto different JEE Application Servers (i.e. WebLogic, WebSphere, JBoss).
The configuration procedure for each Application Server to work with Bizagi, may slightly vary according to each server's differences.
This article focuses in JBoss configuration to work with Bizagi in a Test or Production environment.
For the Development environment (Bizagi Studio), no configuration steps are required because Bizagi Enterprise JEE Edition installs a bundled JBoss 7.1.1 automatically.
Further information and system requirements about JBoss 7 can be reviewed at JBoss community official webpage
Pre-requisites
To configure your JBoss Application Server in a Test or Production environment, the following are required:
- Installed JAVA SE's JDK 6, update 31.
- JAVA_HOME environment variable properly configured.
- JBoss 7.1.1 installed. JBoss can be downloaded from the JBoss community web page. The downloadable file is hosted at Sourceforge.net.
- JBOSS_HOME environment variable properly configured.
- Having at hand Bizagi's "BizAgi-ear-JBoss-dist.zip" file for JBoss configuration.
About JBoss
Installing JBoss requires only extracting the JBoss file ("jboss-as-7.1.1.Final.zip") into a server's local folder.
It is required that this local folder and path does not contain blank spaces.
This path chosen to extract JBoss will be referenced as your <JBOSS_HOME> from this point on.
To learn more about JBoss' installation process, we recommend to read the guides published at the official JBoss website.
Server options
Once JBoss has been installed, options to start or stop its service for Bizagi projects are described below.
Starting the Server
To start JBoss Application Server, locate the <JBOSS_HOME>/bin folder and run the <i>standalone</i> executable file.
In Linux OS, run the standalone.sh in a command prompt with the following parameters:
standalone.sh -b 0.0.0.0
In Windows OS, run the standalone.bat in a command prompt with the following parameters:
standalone.bat -b 0.0.0.0
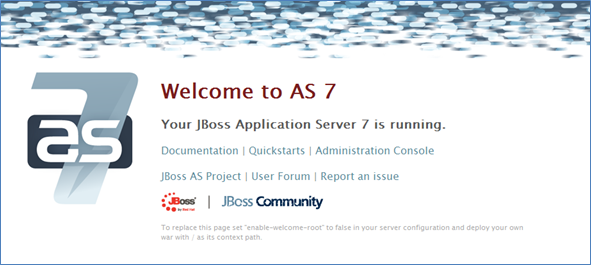
You may validate that JBoss has started successfully and is running, by openning the following URL in a browser:
http://localhost:8080/
The following screen should load up:
Notice that 8080 corresponds to the port number on which your JBoss' service was set to attend http requests.
Stopping the Server
To stop JBoss Application Server, there are 2 options:
- Use CTRL+C keystroke on the command prompt running JBoss' startup.
- Locate the <JBOSS_HOME>/bin folder and run the <i>jboss-cli</i> executable file.
For the second option, in Linux OS, run the jboss-cli.sh in a command prompt with the following parameters:
jboss-cli.sh --connect command=:shutdown
For the second option, in Windows OS, run the jboss-cli.bat in a command prompt with the following parameters:
jboss-cli.bat --connect command=:shutdown
What you need to do
To configure JBoss 7.1.1 to work with Bizagi, the procedure is carried out:
1. Extract module files used by Bizagi into JBoss.
2. Edit JBoss' executable parameters file.
3. Edit JBoss' configuration xml.
After these steps, your JBoss installation will be configured for Bizagi processes to be deployed as applications in JBoss Application Server 7.1.1.
Procedure
The following steps describe in detail how to configure and modify settings of the default JBoss installation in order to work with Bizagi.
Extract module files used by Bizagi into JBoss
In this step, some module files used by Bizagi are required as additional modules to be included in JBoss.
Such module files are not included in a JBoss 7.1.1 clean installation by default.
Extract BizAgi-ear-JBoss-dist.zip
Extract the BizAgi-ear-JBoss-dist.zip into a local folder of your server.
It is required that this local folder and path does not contain blank spaces.
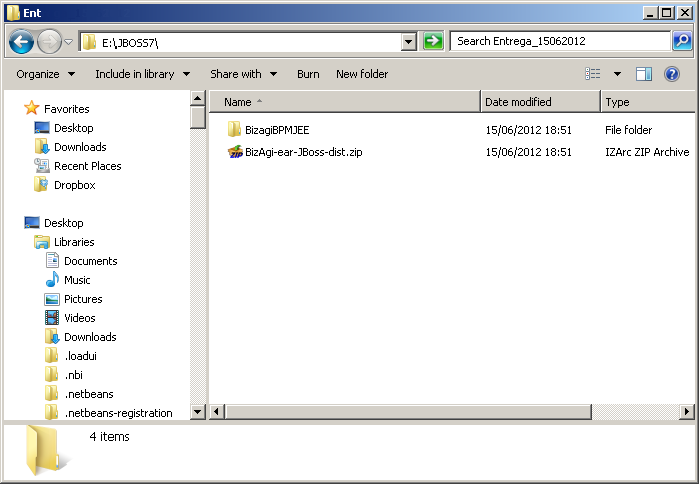
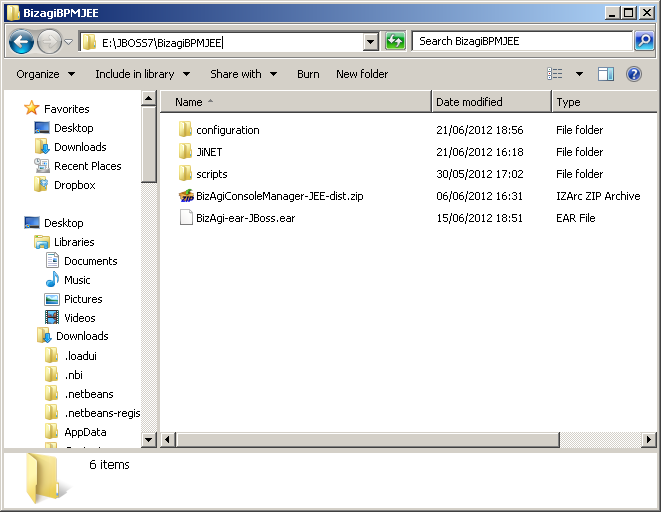
This path chosen to extract this zip will be referenced as your <BIZAGI_JEE_HOME> from this point on. In it, there will be a created "BizagiBPMJEE" folder, and structure:
Notice that in this example, our <BIZAGI_JEE_HOME> is E:\JBOSS7\.
Your extracted zip should have the follwing folder structure and files:
Extract BizagiJbossModules.zip
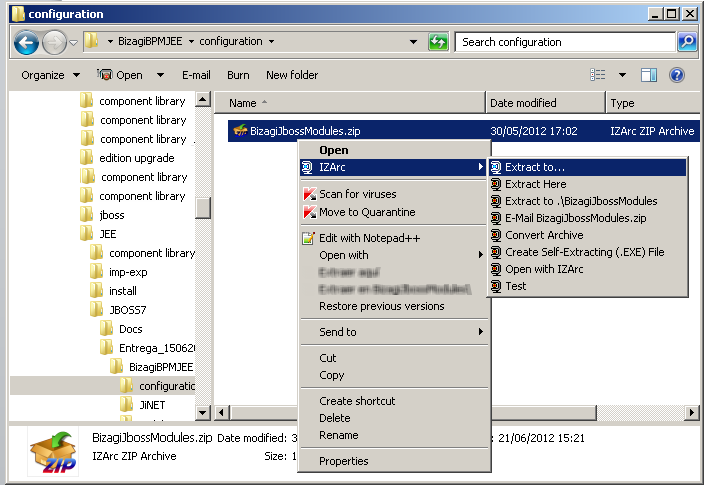
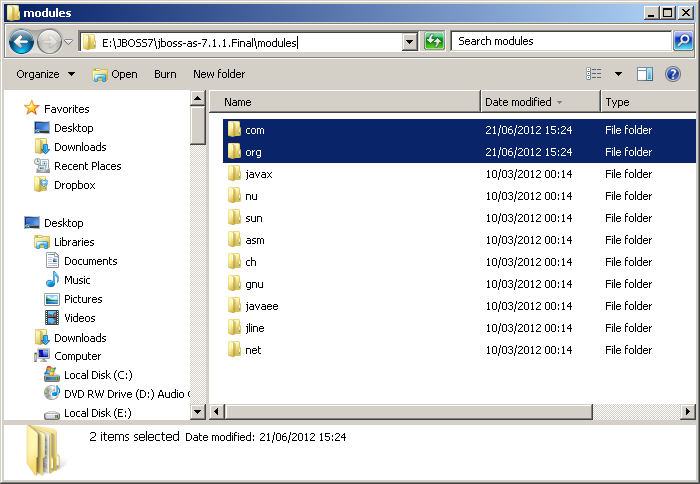
Locate the BizagiJbossModules.zip found at the "BizagiBPMJEE/configuration" folder of your <BIZAGI_JEE_HOME> (as previously extracted).
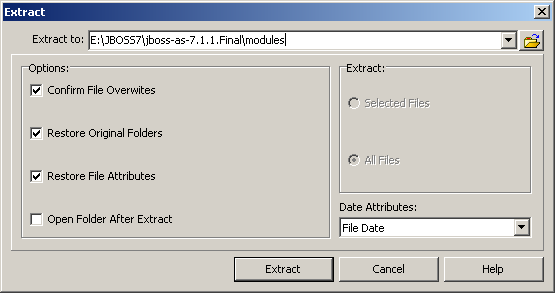
While extracting these files, choose your <JBOSS_HOME>/modules/ folder as the target.
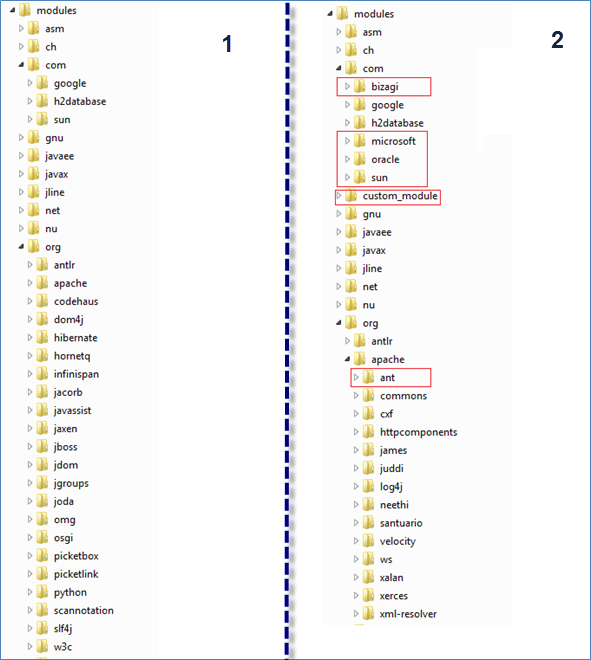
This means that in the <JBOSS_HOME>/modules/ folder, the following files will be added to the "com" and "org" folders of JBoss' installation:
The following image illustrate the detail of extracted new files and folders into the JBoss modules. On the left hand view (1), we see the default folders and files
Edit JBoss' executable parameters file
In a clean installation, JBoss will start up its service with some variables set up by default.
However when doing this for Bizagi processes, it is required to both: include JiNet for JBoss' service startup, and tune up the assigned memory used by JBoss for its service.
This is done by editing JBoss executable's parameters file.
Notice that in Linux, this file is located as "<JBOSS_HOME>/bin/standalone.conf".
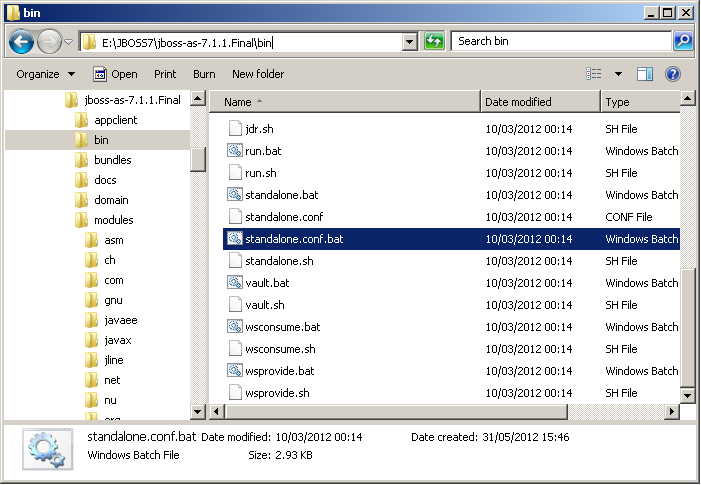
In Windows OS, this file is located as "<JBOSS_HOME>/bin/standalone.conf.bat".
In Linux
To edit the <JBOSS_HOME>/bin/standalone.conf file in Linux OS for starting up JBoss, follow these steps:
1. Edit this file by including the following at the end of the file:
# Bizagi Configuration
JAVA_OPTS="$JAVA_OPTS -DiNET_HOME=<BIZAGI_JEE_HOME>/BizagiBPMJEE/JiNET"
JAVA_OPTS="$JAVA_OPTS -Xms512m -Xmx768m -XX:MaxPermSize=768m"
Notice you should replace <BIZAGI_JEE_HOME> for the corresponding home path of your installed Bizagi JBoss distribution files.
Keep in mind you should use the slash character (/) instead of backslashes (\) for the path.
Notice that the for the first line, the minimum required memory for startup should be 512M for the first parameter, and 768M for the other parameters.
Keep in mind you may increase the assigned memory as desired, taking into consideration your server's hardware capabilities.
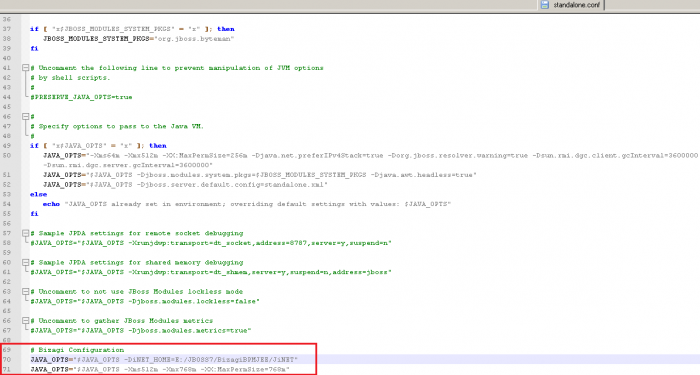
At the end, the <JBOSS_HOME>/bin/standalone.conf file should look like:
In Windows
To edit the <JBOSS_HOME>/bin/standalone.conf.bat file in Windows OS for starting up JBoss, follow these steps:
1. Edit this file by modifying the set memory for startup, approximately in line #49.
Notice that the minimum required memory for startup should be 512M for the first parameter, and 768M for the other parameters.
set "JAVA_OPTS=-Xms512M -Xmx768M -XX:MaxPermSize=768M"
Keep in mind you may increase the assigned memory as desired, taking into consideration your server's hardware capabilities.
2. Edit this file by including the following in the last part of the line #52:
-DiNET_HOME=<BIZAGI_JEE_HOME>/BizagiBPMJEE/JiNET
Notice you should replace <BIZAGI_JEE_HOME> for the corresponding home path of your installed Bizagi JBoss distribution files.
Keep in mind you should use the slash character (/) instead of backslashes (\) for the path.
While including this adjustment, the complete line should be:
set "JAVA_OPTS=%JAVA_OPTS% -Dsun.rmi.dgc.client.gcInterval=3600000 -Dsun.rmi.dgc.server.gcInterval=3600000 -Djava.net.preferIPv4Stack=true -DiNET_HOME=<BIZAGI_JEE_HOME>/
At the end, the <JBOSS_HOME>/bin/standalone.conf.bat file should look like:
Edit JBoss' configuration xml
For JBoss standalone startup, Bizagi requires including additional settings, modules, properties, drivers and the project's data source, amongst others.
To do this, locate the standalone.xml file located at the "<JBOSS_HOME>/standalone/configuration/" folder and edit it according to the steps below.
Including the authentication module
To include the authentication module in JBoss service, include the following lines in the standalone.xml:
<security-domain name="BizAgiRealm" cache-type="default">
	<authentication>
		<login-module code="com.bizagi.security.jaas.BizAgiLoginModule" flag="required" module="com.bizagi.security"/>
	</authentication>
</security-domain>
These lines should go into the "<security-domains>" element of the "<subsystem xmlns="urn:jboss:domain:security:1.1">" section.
At this point, the standalone.xml file should look like the image below.
Including the drivers for data access
To include the drivers for data access in JBoss, include the following lines in the standalone.xml:
<driver name="MICROSOFTSQLSERVER" module="com.microsoft.sqlserver">
	<driver-class>com.microsoft.sqlserver.jdbc.SQLServerDriver</driver-class>
</driver>
<driver name="ORACLE" module="com.oracle.ojdbc6">
	<driver-class>oracle.jdbc.driver.OracleDriver</driver-class>
</driver>
These lines should go into the "<drivers>" element.
At this point, the standalone.xml file should look like the image below.
Including the data source for your project
The following step varies according to the database engine (Oracle or SQL Server) you are using as the main database of your Bizagi project.
For Oracle
To include the specific Oracle data source for your project in JBoss, follow first include the following lines in the standalone.xml:
<datasource jta="true" jndi-name="java:/BizAgiJava" pool-name="BizAgiJava" enabled="true" use-ccm="true">
	<connection-url>jdbc:oracle:thin:@//[databaseServer]:[servicePort]/[serviceName]</connection-url>
	<driver>ORACLE</driver>
	<transaction-isolation>TRANSACTION_READ_COMMITTED</transaction-isolation>
	<security>
		<user-name>[schemaUser]</user-name>
		<password>[schemaUserPassword]</password>
	</security>
	<validation>
		<validate-on-match>false</validate-on-match>
		<background-validation>false</background-validation>
	</validation>
	<statement>
		<share-prepared-statements>false</share-prepared-statements>
	</statement>
</datasource>
These lines should go into the "<datasources>" element of the "<subsystem xmlns="urn:jboss:domain:datasources:1.0">" section.
At this point, the standalone.xml file should look like the image below.
Then, make sure you set the proper values for:
- [databaseServer]: The name of the Oracle's database server.
- [servicePort]: The port number on which Oracle's database listens to.
- [serviceName]: The database instance's service id.
- [schemaUser]: The project name in Bizagi which represents the schema user in the Oracle database.
- [schemaUserPassword]: The password for this schema user.
For SQL Server
To include the specific SQL Server data source for your project in JBoss, follow first include the following lines in the standalone.xml:
<datasource jta="true" jndi-name="java:/BizAgiJava" pool-name="BizAgiJava" enabled="true" use-ccm="true">
    <connection-url>jdbc:sqlserver://[databaseServerInstance]:[instancePort];databaseName=[SQLdatabase]</connection-url>
    <driver>MICROSOFTSQLSERVER</driver>
    <transaction-isolation>TRANSACTION_READ_COMMITTED</transaction-isolation>
    <security>
		<user-name>[userLogin]</user-name>
        <password>[userLoginPassword]</password>
    </security>
    <validation>
		<validate-on-match>false</validate-on-match>
        <background-validation>false</background-validation>
    </validation>
    <statement>
		<share-prepared-statements>false</share-prepared-statements>
    </statement>
</datasource>
These lines should go into the "<datasources>" element of the "<subsystem xmlns="urn:jboss:domain:datasources:1.0">" section.
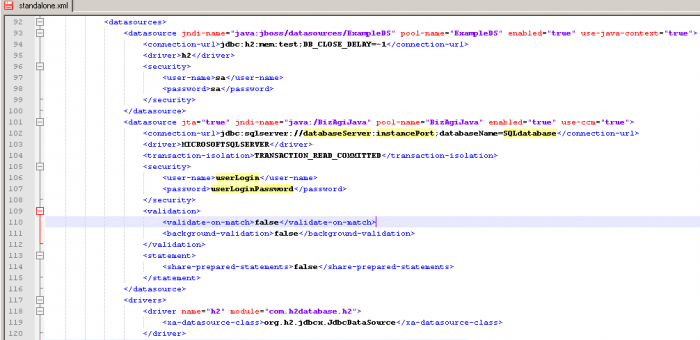
At this point, the standalone.xml file should look like the image below.
Then, make sure you set the proper values for:
- [databaseServerInstace]: The name of the SQL Server's database server, and instance if it is a named instance.
- [instancePort]: The port number on which SQL Server's database starts up.
- [SQLdatabase]: The name of Bizagi's project which corresponds to the database name.
- [userLogin]: The user login to access SQL Server's instance.
- [userLoginPassword]: The password for this user login.
Including the message service (JMS)
To include the JMS -message service in JBoss, several additions are needed.
1. First include the following lines in the standalone.xml:
<extension module="org.jboss.as.messaging"/>
These lines should go into the "<extensions>" element.
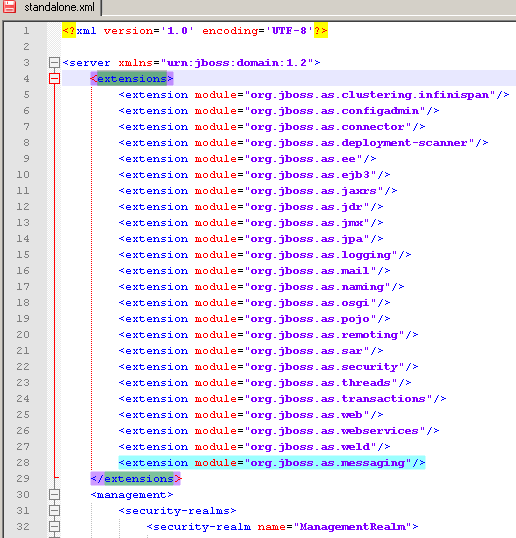
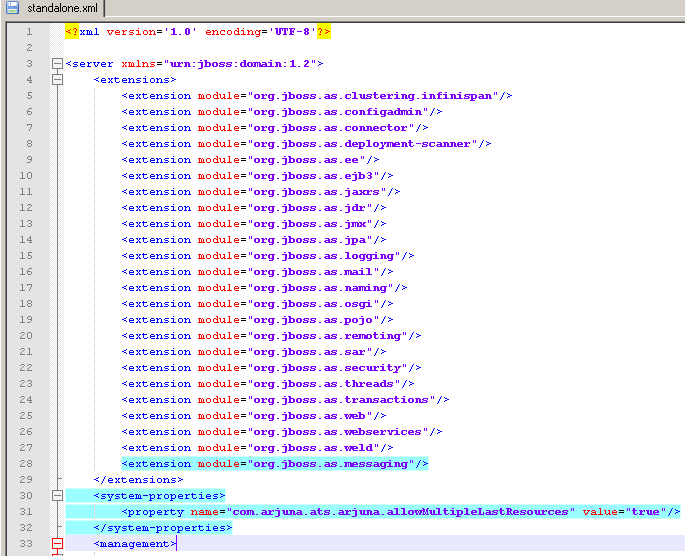
At this point, the standalone.xml file should look like the image below.
2. Next, include the following lines into the "<subsystem xmlns="urn:jboss:domain:ejb3:1.2">" element:
<mdb>
	<resource-adapter-ref resource-adapter-name="hornetq-ra"/>
	<bean-instance-pool-ref pool-name="mdb-strict-max-pool"/>
</mdb>
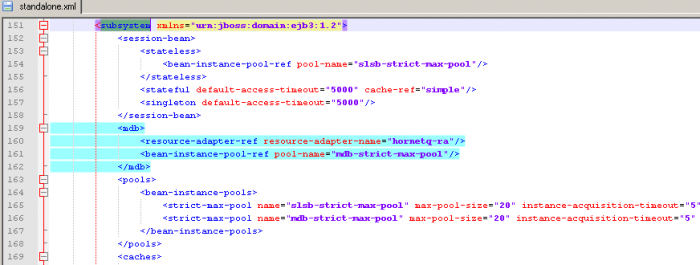
This edition will have the file look like:
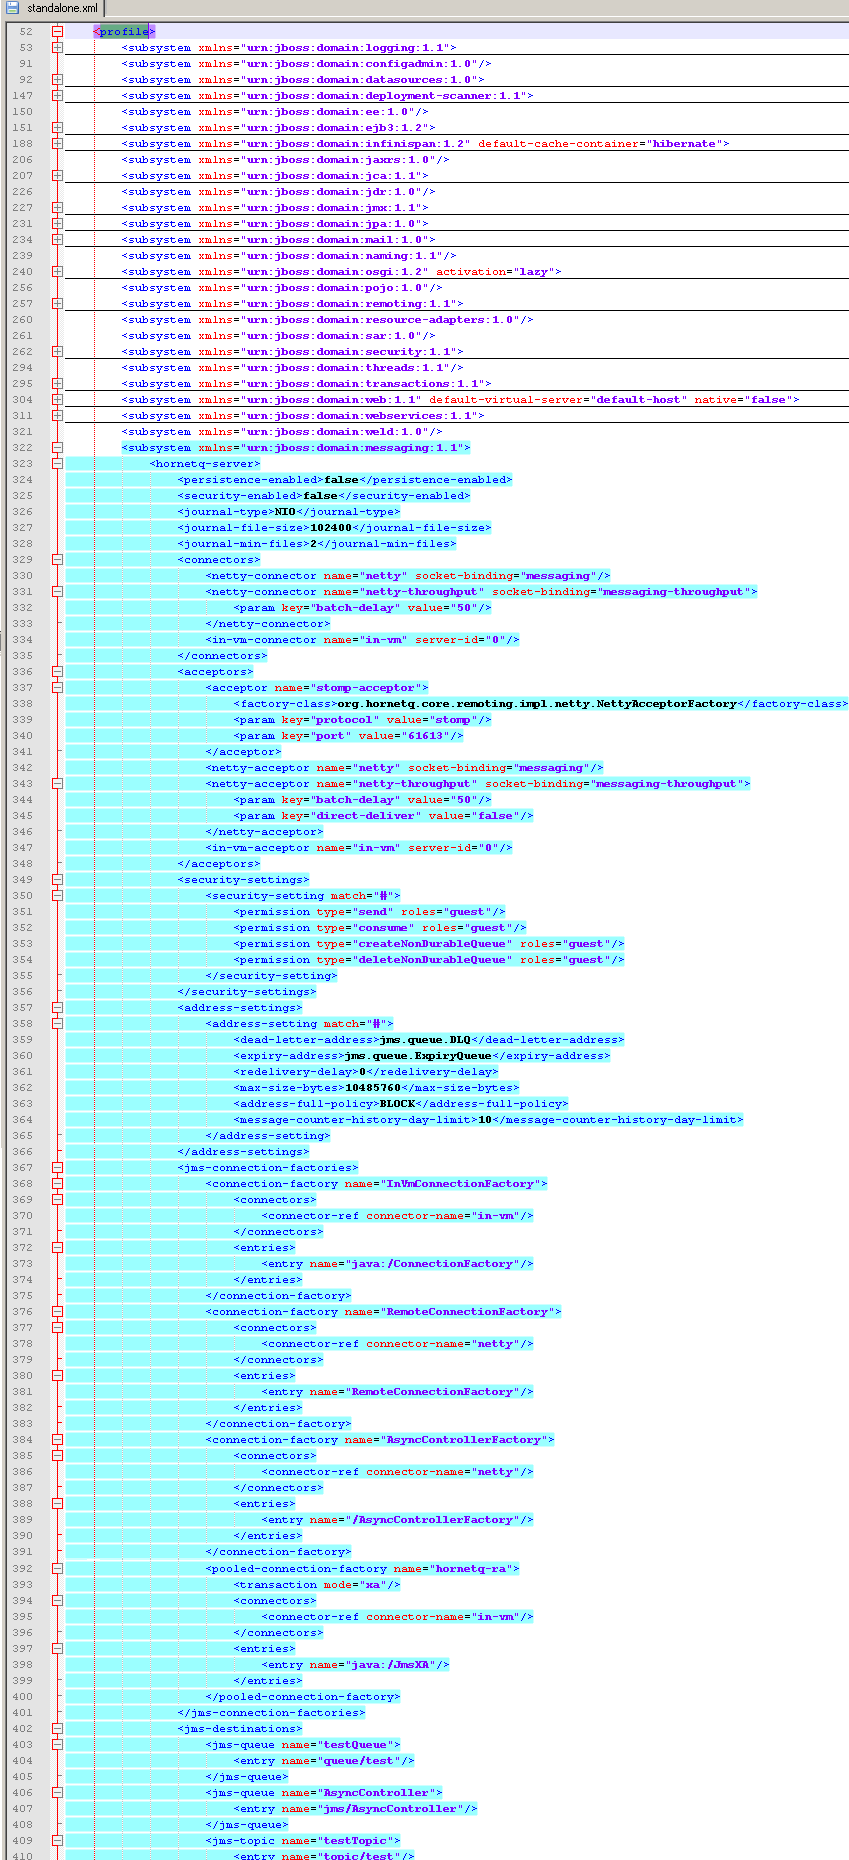
3. Then, include the following subsystem lines into the "<profile>" element:
<subsystem xmlns="urn:jboss:domain:messaging:1.1">
	<hornetq-server>
		<persistence-enabled>false</persistence-enabled>
		<security-enabled>false</security-enabled>
		<journal-type>NIO</journal-type>
		<journal-file-size>102400</journal-file-size>
		<journal-min-files>2</journal-min-files>
		<connectors>
			<netty-connector name="netty" socket-binding="messaging"/>
			<netty-connector name="netty-throughput" socket-binding="messaging-throughput">
				<param key="batch-delay" value="50"/>
			</netty-connector>
			<in-vm-connector name="in-vm" server-id="0"/>
		</connectors>
		<acceptors>
			<acceptor name="stomp-acceptor">
				<factory-class>org.hornetq.core.remoting.impl.netty.NettyAcceptorFactory</factory-class>
				<param key="protocol" value="stomp"/>
				<param key="port" value="61613"/>
			</acceptor>
			<netty-acceptor name="netty" socket-binding="messaging"/>
			<netty-acceptor name="netty-throughput" socket-binding="messaging-throughput">
				<param key="batch-delay" value="50"/>
				<param key="direct-deliver" value="false"/>
			</netty-acceptor>
			<in-vm-acceptor name="in-vm" server-id="0"/>
		</acceptors>
		<security-settings>
			<security-setting match="#">
				<permission type="send" roles="guest"/>
				<permission type="consume" roles="guest"/>
				<permission type="createNonDurableQueue" roles="guest"/>
				<permission type="deleteNonDurableQueue" roles="guest"/>
			</security-setting>
		</security-settings>
		<address-settings>
			<address-setting match="#">
				<dead-letter-address>jms.queue.DLQ</dead-letter-address>
				<expiry-address>jms.queue.ExpiryQueue</expiry-address>
				<redelivery-delay>0</redelivery-delay>
				<max-size-bytes>10485760</max-size-bytes>
				<address-full-policy>BLOCK</address-full-policy>
				<message-counter-history-day-limit>10</message-counter-history-day-limit>
			</address-setting>
		</address-settings>
		<jms-connection-factories>
			<connection-factory name="InVmConnectionFactory">
				<connectors>
					<connector-ref connector-name="in-vm"/>
				</connectors>
				<entries>
					<entry name="java:/ConnectionFactory"/>
				</entries>
			</connection-factory>
			<connection-factory name="RemoteConnectionFactory">
				<connectors>
					<connector-ref connector-name="netty"/>
				</connectors>
				<entries>
					<entry name="RemoteConnectionFactory"/>
				</entries>
			</connection-factory>
			<connection-factory name="AsyncControllerFactory">
				<connectors>
					<connector-ref connector-name="netty"/>
				</connectors>
				<entries>
					<entry name="/AsyncControllerFactory"/>
				</entries>
			</connection-factory>
			<pooled-connection-factory name="hornetq-ra">
				<transaction mode="xa"/>
				<connectors>
					<connector-ref connector-name="in-vm"/>
				</connectors>
				<entries>
					<entry name="java:/JmsXA"/>
				</entries>
			</pooled-connection-factory>
		</jms-connection-factories>
		<jms-destinations>
			<jms-queue name="testQueue">
				<entry name="queue/test"/>
			</jms-queue>
			<jms-queue name="AsyncController">
				<entry name="jms/AsyncController"/>
			</jms-queue>
			<jms-topic name="testTopic">
				<entry name="topic/test"/>
			</jms-topic>
		</jms-destinations>
	</hornetq-server>
</subsystem>
This part of the file will look like:
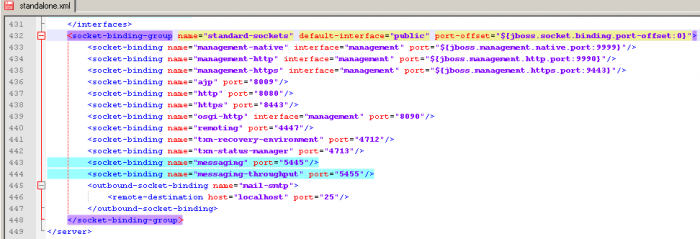
4. Finally, include the following lines into the "<socket-binding-group>" element:
<socket-binding name="messaging" port="5445"/>
<socket-binding name="messaging-throughput" port="5455"/>
Our standalone.xml file will look like:
Including JTA configuration
To include the JTA configuration in JBoss service, include the following lines in the standalone.xml:
<system-properties>
	<property name="com.arjuna.ats.arjuna.allowMultipleLastResources" value="true"/>
</system-properties>
These lines should go into the "<extensions>" element.
At this point, we have finished the edition of the standalone.xml file, and this part should look like the image below:
Save the file changes.
What next?
After finishing these steps, your JBoss installation is configured to work with Bizagi processes!
You may now startup JBoss 7.1.1 and have your Bizagi processes deployed as applications.
View further information on how to deploy your Bizagi processes into JBoss Application Server.
Take into account that if your project uses replication or virtualization (as integration methods in Bizagi), then for your project's production environment you will need to configure virtualization and replication in a JEE Application server.
Related Articles
- Installing Bizagi Enterprise JEE Edition
- Enterprise JEE requirements
- Deployment of the Application to a JEE Server.
- Websphere configuration to work with Bizagi
- Weblogic configuration to work with Bizagi
<comments/>

