WebSphere Configuration to Work with Bizagi
From Business Process Management, BPM and Workflow Automation Wiki | BizAgi BPMS
<keywords content="keywords">configuration, configurate, Bizagi, enterprise edition, WebSphere, Websphere, websphere, Install, JEE</keywords>
|
Applies to ENTERPRISE JEE EDITION |
WebSphere Configuration to Work with Bizagi
Bizagi's Enterprise JEE Edition can be installed in different application servers (i.e. WebLogic, WebSphere, JBoss). The configuration procedure in each server may vary a little from one to another.
This article focuses in WebSphere configuration to work with Bizagi.
To learn more about WebSphere's installation process, we recommend to read the guides published at the official website documentation.
Prerequisites
- Installed JDK 6.
- Environment variable JAVA_HOME properly configured.
- WebSphere Application Server V7 installed. WebSphere can be downloaded from the official IBM site.
Once WebSphere application server is installed, it is very important to update it with the latest set of improvements. To do this download and install the following:
1. IBM Update Installer for WebSphere Software
2. Fix Pack for IBM WebSphere Application Server V7.0: Apply the last available pack.
Server options
In some instructions presented in this artic, a server named "Server1" is used as example.
Starting the Server (domain)
To start Websphere, use the direct access from the Start menu (e.g. IBM WebSphere > Application Server V7.0 > Profiles > AppSrv01 > Start the Server) or execute the following file in a command prompt:
<WEBSPHERE_HOME>/profiles/AppSrv01/bin/startServer.bat Server1
Stopping the Server (domain)
To stop Websphere, use the direct access from the Start menu (e.g. Oracle WebSphere > Application Server V7.0 > Profiles > AppSrv01 > Stop the Server) or execute the following file in a command prompt:
<WEBSPHERE_HOME>/profiles/AppSrv01/bin/stopServer.bat Server1
Using the Administration Console
To access the Administration Console type the following address in the browser of your choice. Then enter the username and password.
https://localhost:9043/ibm/console/logon.jsp
Procedure
Extracting the Configuration Files
For the initial configuration of the server, several .jars are required. These .jars are located in the folder ConfigurationFiles that has been delivered by Bizagi with the JEE edition.
The folder and file structure of the ConfigurationFiles.rar is as shown:
--ConfigurationFiles
-- -- bizagi (Bizagi deploy files)
-- -- -- BizAgi-ejb.jar
-- -- configuration (External components required by Bizagi)
-- -- -- BizAgiJDBCDriver-1.0-1.jar:
-- -- -- eclipselink.jar: Persistence Framework
-- -- -- javaee.jar
-- -- -- jsf-myfaces-1.2.8.war: Presentation Framework
-- -- -- log4j.jar:
-- -- -- ojdbc6.jar: Oracle data access driver
-- -- -- sqljdbc.jar: SQL Server data access driver
-- -- docs (Installation and configuration documents)
-- -- jiNET (other files)
-- -- security (Custom security component)
-- -- -- JBoss
-- -- -- -- BizAgi.JAAS.jar
-- -- -- -- BizAgi.Security.Common.jar
-- -- -- BizAgi.Glassfish.Security.jar
-- -- -- BizAgi.Security.Common.jar
-- -- -- BizAgi.Websphere.Security.jar
-- -- -- bizAgiSecurityProvider.jar
The location of this folder in your local server's path will be referenced as your <PATH_CONFIGURATION_FILES> from this point on.
Setting the Environment Variables
Bizagi needs that some server variables are set. In this section are referenced the variables and values they should have.
In Microsoft Windows
1. Start the application server then enter into the administration console.
2. Go to the navigation pane, to the section Server/Server Types/WebSphere application servers. Here select the server instance (for example, Server1), go to Server Infrastructure/Java and Process Management and click the link Process definition. Then click on Java Virtual Machine in the pane Additional Properties.
- To improve the server’s performance and avoid memory space problems configure the parameters Initial heap size and Maximum heap size with the respective values 256 and 1024.
- In the Generic JVM arguments parameter, copy the following environment variables:
1.     -Dcompilation.classpath=<PATH_CONFIGURATION_FILES>\bizagi\BizAgi-ejb.jar;<PATH_CONFIGURATION_FILES>\configuration\javaee.jar

2.     -DiNET_HOME=<PATH_CONFIGURATION_FILES>\JiNET

3.     -Duser.language=en

4.     -Duser.country=US
NOTE: If the server was installed in a Linux machine, change the path separator symbol for (:) and included between double quotes (").
- Change the variables (<>) by the actual paths of the required files.
- Click on Ok and then on Save in the message box to save changes made in the local configuration.
3. Restart the server.
Setting the Authentication Module
1. Copy the custom authentication module included in the ConfigurationFiles in the server installation path <WEBSPHERE_HOME>/lib/ext/
<PATH_CONFIGURATION_FILES>\configuration\log4j.jar
<PATH_CONFIGURATION_FILES>\security\ BizAgi.WebSphere.Security.jar
<PATH_CONFIGURATION_FILES>\ security \ BizAgi.Security.Common.jar
2. Start the application server and open the Administration Console.
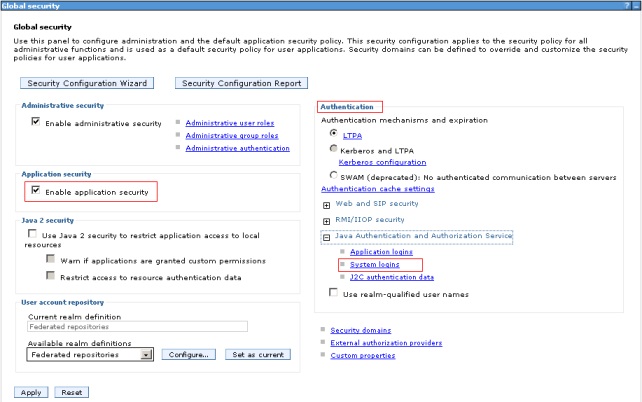
3. Go to the section Security/Global Security and make the following configuration:
- Global security: Select the option "Enable application security" and click on "Apply".
- Global security: On the "Authentication" section click "Java Authentication and Authorization Service/System Logins".
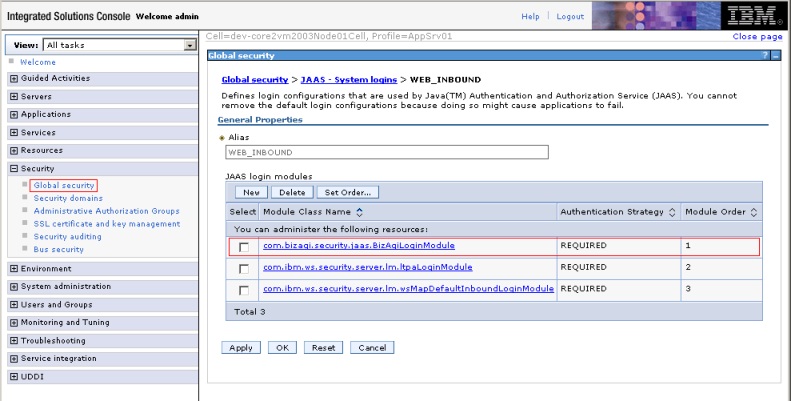
- Global security > JAAS – System logins: Click over the resource "WEB_INBOUND".
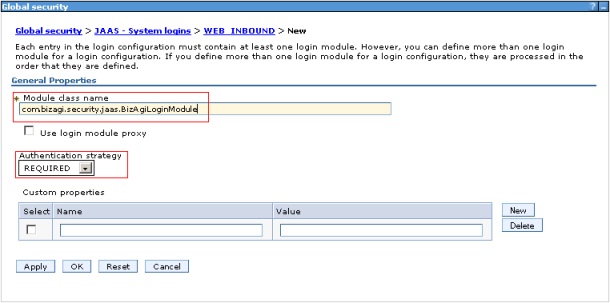
- Global security > JAAS – System logins > WEB_INBOUND: Click the "New" button to create Bizagi authentication module. In the creation form, enter the values:
- Module class name: com.bizagi.security.jaas.BizAgiLoginModule
- Authentication strategy: REQUIRED
Click on "Apply". The created component is added at the end of the list of modules that are part of the "WEB_INBOUND" resource. Is very important to set this new module at the top of the list, to do this use the "Set Order …" button.
4. Click on Ok and then click on Save to save changes.
Setting the Data Access Configuration
Bizagi supports SQL Server and Oracle database engines.
Setting the Data Access Provider
Microsoft SQL Server
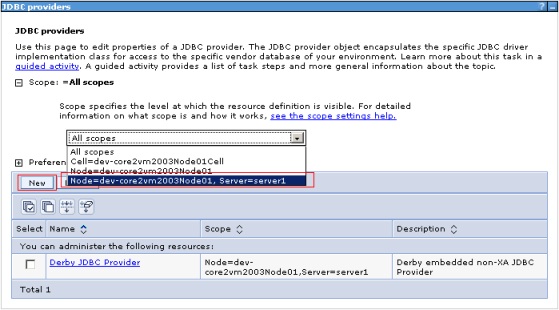
1. On the Administration Console, go to the section Resources/JDBC/JDBC Providers. Select the "Scope" in which the resource will be created (it is recommended to use the server level) and click on New.
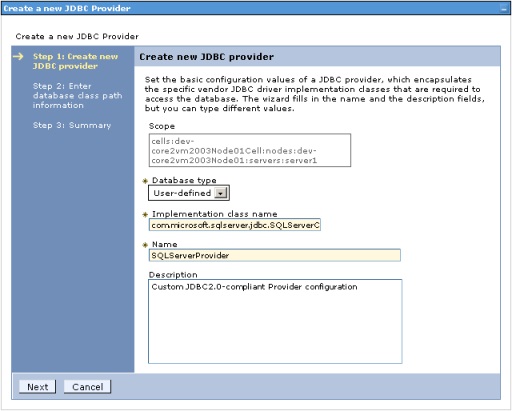
2. Create a new JDBC Provider. Enter the data access provider’s general information and click on Next.
Database type: User-defined
Implementation class name: com.microsoft.sqlserver.jdbc.SQLServerConnectionPoolDataSource
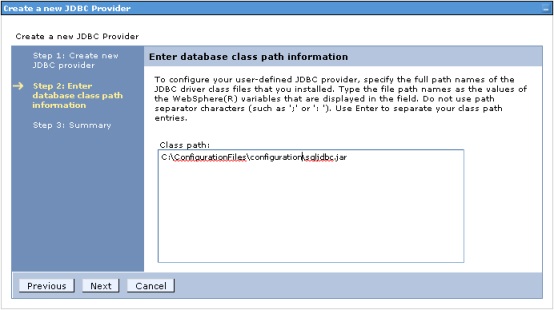
3. Enter database class path information. Enter the path where is located the JDBC driver and click on Next. The driver can be found in the Configuration Files delivered by Bizagi.
<PATH_CONFIGURATION_FILES>\configuration\sqljdbc.jar
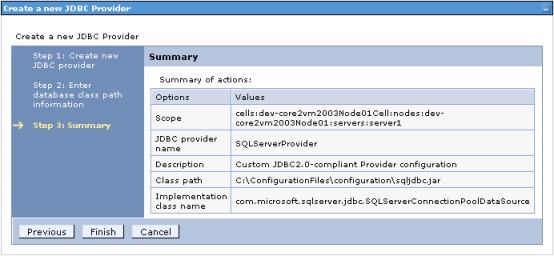
4. Summary. The summary of the data access provider’s configuration is shown. Check that the information is correct and then click on Finish.
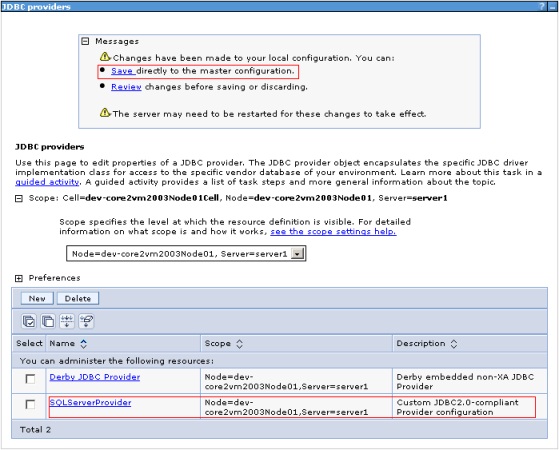
5. Click on Save in the messages box to save the changes made on the master configuration and restart the server.
Oracle
1. Edit the <PATH_CONFIGURATION_FILES>\JiNET\config\web.config file's "ProviderType" key.
By default this key has the value "MSSqlClient" (for SQL Server), but for an Oracle database, remove the comments from the line with the "Oracle" value and add those comments to the other key; like this:</span>
<add key="PROVIDERTYPE" value="Oracle" /> <!--add key="PROVIDERTYPE" value="MSSqlClient" /-->
2. Log on to the Administration Console and in the Resources/JDBC/JDBC Providers section select the Scopes in which the resource will be created (it is recommended to use the server level) and click on New.
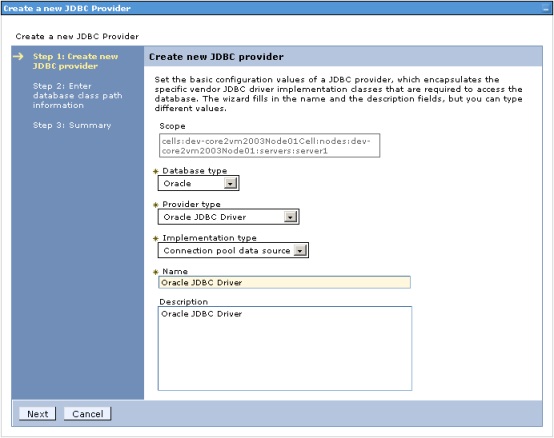
3. Create a new JDBC Provider. Enter the general information of the data access provider and click on Next.
Database Type: Oracle
Provider type: Oracle JDBC Driver
Implementation class name: Connection pool data source
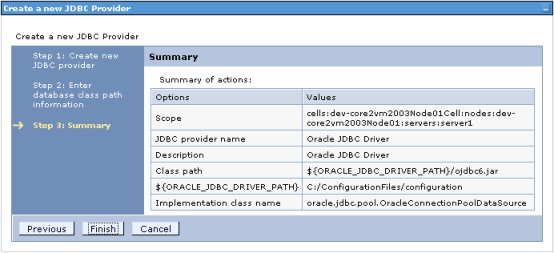
4. Enter database class path information. Enter the path of the directory where is located the JDBC driver (ojdbc6.jar)
5. Summary. The summary of the data access provider’s configuration is shown. Check that the information is correct and then click on Finish.
6. Click on Save in the messages box to save the changes made on the master configuration and restart the server.
Setting the Data Source
Microsoft SQL Server
1. On the Administration Console, go to the section Resources/JDBC/JDBC Providers, enter on the created resource and click on Data sources to load the list of data sources associated to the provider. Select the "Scope" in which the resource will be created (it is recommended to use the server level) and click on New.
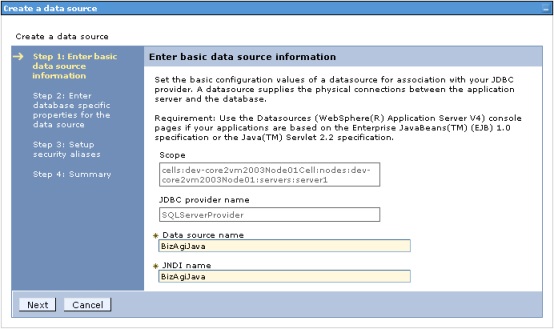
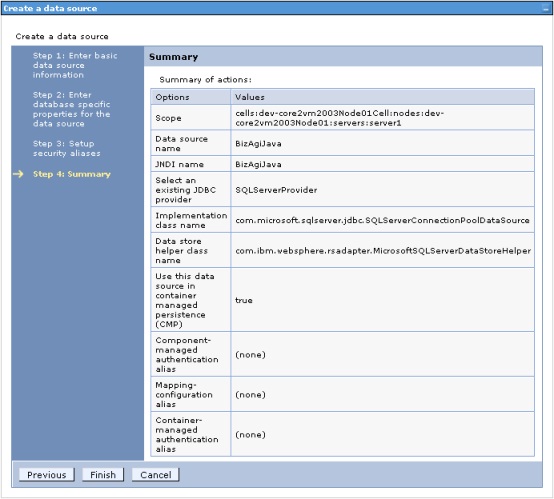
2. Enter basic data source information. Enter the data source’s basic information and click on Next.
Data source name: BizAgiJava
JNDI name: BizAgiJava
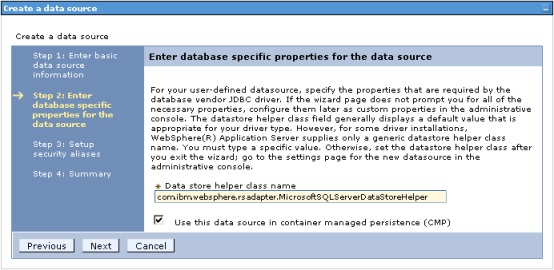
3. Enter database specific properties for the data source. Keep the default configuration and click on Next.
4. Setup security aliases. Keep the default configuration and click on Next.
5. Summary. The summary of the data source’s configuration is shown. Check that the information is correct and then click on Finish.
6. Enter on the created data source (BizAgiJava) and click on the link in the Additional Properties/Custom Properties section. In this page configure the following properties:
serverName: Database server name.
portNumber: By default 1433 (it may vary according to the configuration of the engine).
databaseName: Name of the Bizagi database.
user: database user.
password: user’s password.
webSphereDefaultIsolationLevel: 1 (READ-UNCOMMITED)
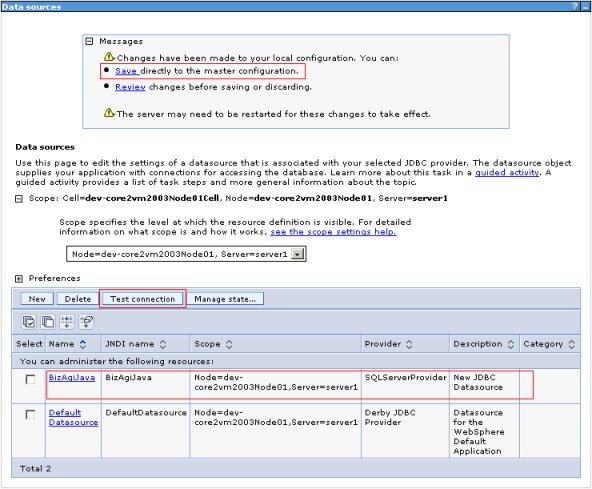
7. Return to the list of Data sources and click on Save in the message box to save changes made on the master configuration.
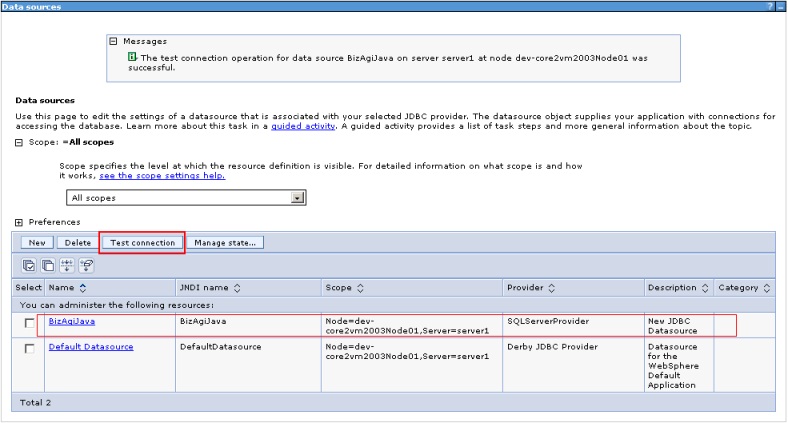
8. After saving changes, test the connection to the data base by selecting the created data source and clicking on Test Connection.
Oracle
1. Log on to the Administration Console and in the Resources/JDBC/Data sources section select the Scopes in which the resource will be created (it is recommended to use the server level) and click on New.
2. Enter basic data source information. Enter the basic information of the data source and click on Next.
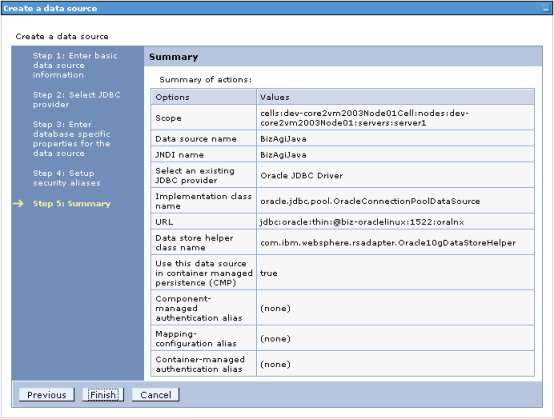
Data source name: BizAgiJava
JNDI name: BizAgiJava
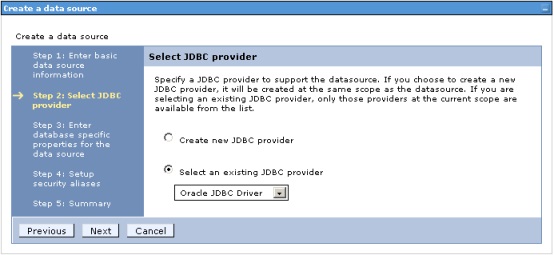
3. Select JDBC provider. Select the Oracle data access provider created on the previous procedure and click on Next.
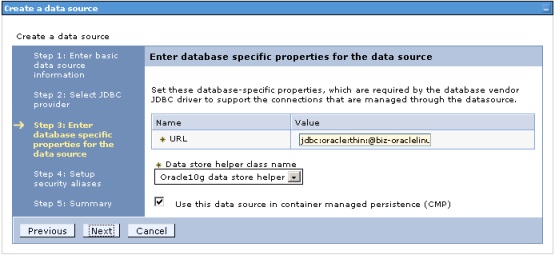
4. Enter database specific properties for the data source. Enter the connection URL, keep the rest of the default configuration and click Next.
URL: jdbc:oracle:thin:@[DB_HOSTNAME]:1521:[DATABASE_NAME]
5. Setup security aliases. Keep the default configuration and click on Next.
6. Summary. The summary of the data source’s configuration is shown. Check that the information is correct and then click on Finish.
7. Go to the created data source (BizAgiJava) and click on the link of the Additional Properties/Custom Properties section. In here create the following properties by using the New button.
user: Database user.
password: User’s password.
After creating and assigning the values to these properties, configure the following parameter:
webSphereDefaultIsolationLever: 1 (READ-UNCOMMITED)
8. Return to the list of data sources and click on Save in the messages box to save the changes made on the master configuration. Finally test the connection to the database by selection the created data source and clicking on Test Connection.
Setting the Messaging Service Configuration (JMS)
Bizagi uses the Java Messaging Service to process asynchronous tasks. To configure this service, follow these steps:
1. Create the Service Bus to activate the messaging service on the server’s instance.
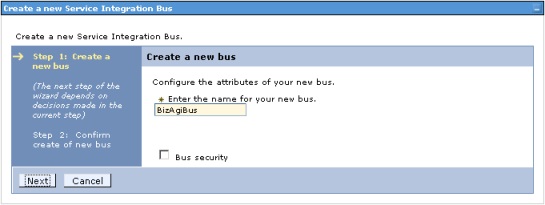
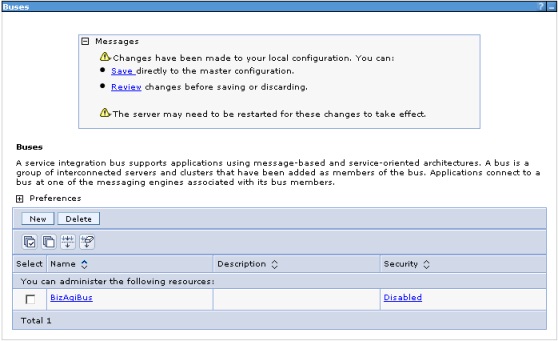
a. Log on to the Administration Console, on the navigation pane go to the Service Integration – Buses section and click on New. Enter a name for the bus, disable the Bus security option and click on Next.
b. Once the steps on the wizard are completed, click on Finish and Save changes made on the master configuration.
2. Associate the created service bus to the instance of the server.
a. Select the created resource (for example, BizAgiBus).
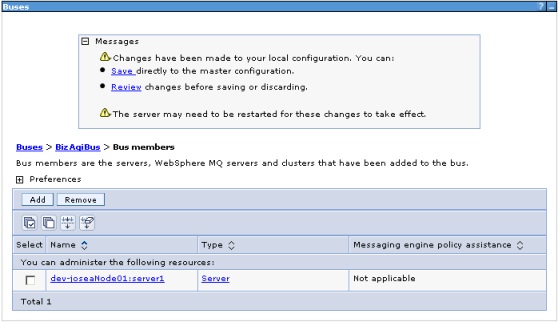
b. Select the option Bus members in the Topology section.
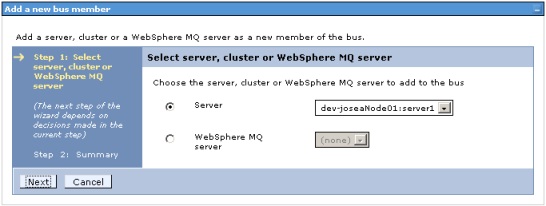
c. On the Bus members window click on Add.
d. As the type of member select Server and click on Next.
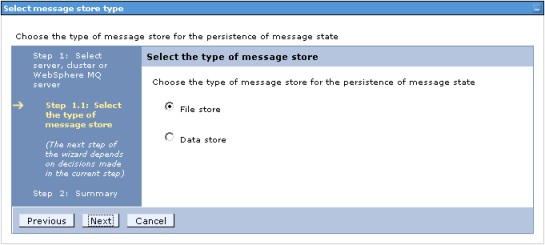
e. Select File store as the type of message store and click on Next.
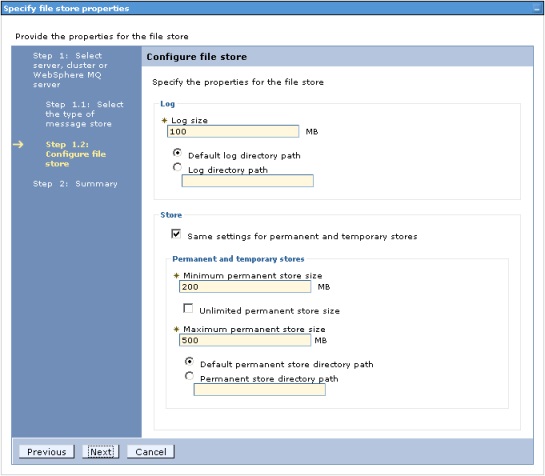
f. Configure file store. Keep the default values and click on Next. This configuration may be modified depending on the application server administrator’s judgment.
g. Tune performance parameters. Keep the default values and click on Next. This configuration may be modified depending on the application server administrator’s judgment.
h. Summary. Check the values shown on the summary of the configuration, click on Finish and save the changes.
3. Create the Queue Destination resource associated to the bus.
a. On the navigation pane go to the Service Integration – Buses section and select the bus created (e.g. BizAgiBus).
b. Select the option Destinations in the Destination resources section and click on New.
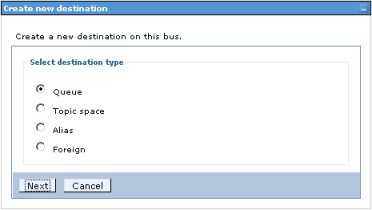
c. For destination type select Queue and click on Next.
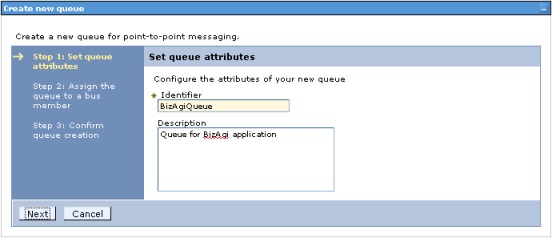
d. Enter the Identifier and description for the resource, this last one optional. Click on Next.
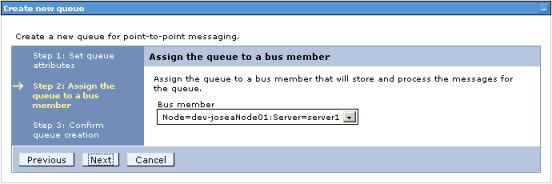
e. Select the previously created resource bus member and click on Next.
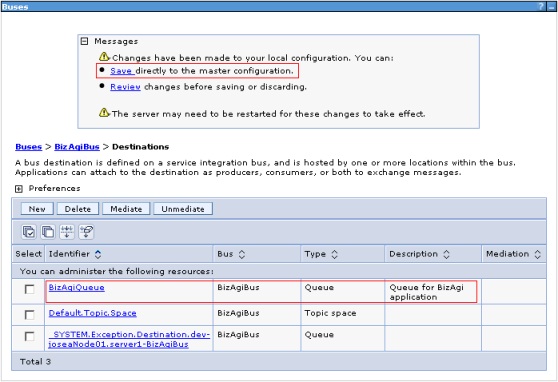
f. Confirm queue creation. Check the values on the configuration summary, click on Finish and save the changes.
4. Create the JMS Connection.
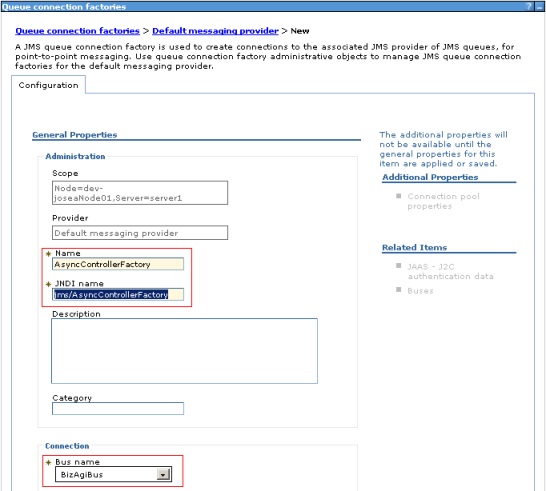
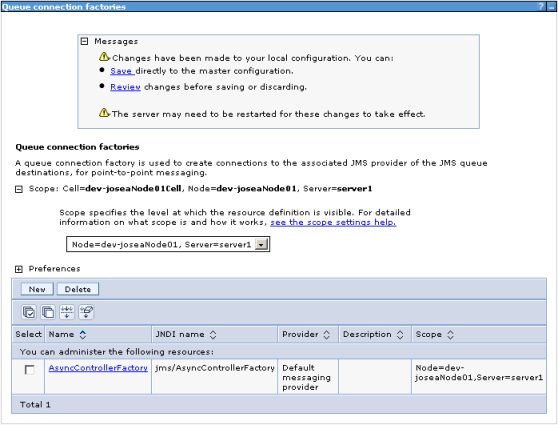
a. On the navigation pane go to the Resources – JMS – Queue connection factories section. Select the Scopes in which the resource will be created (it is recommended to use the server level) and click on New.
b. Select Default messaging provider as the provider of the resource and click on OK.
c. Configure the following general properties and click OK.
Name: AsyncControllerFactory
JNDI name: jms/AsyncControllerFactory
Bus name: BizAgiBus
d. Save the changes made on the master configuration by clicking on Save.
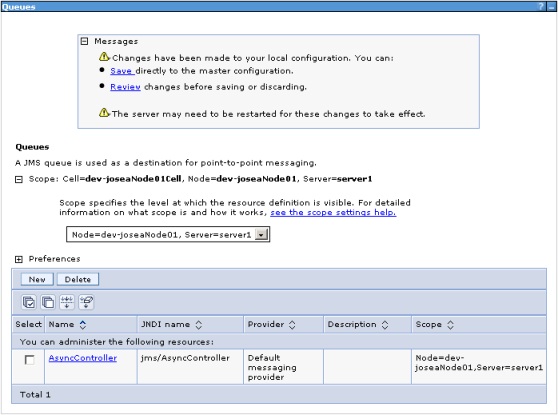
5. Create the Queue resource.
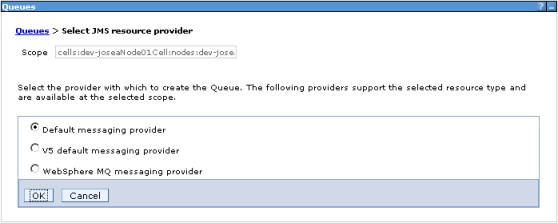
a. On the navigation pane go to the Resources – JMS – Queues section. Select the Scopes in which the resource will be created (it is recommended to use the server level) and click on New.
b. Select for the resource provider select Default messaging provider and click on OK.
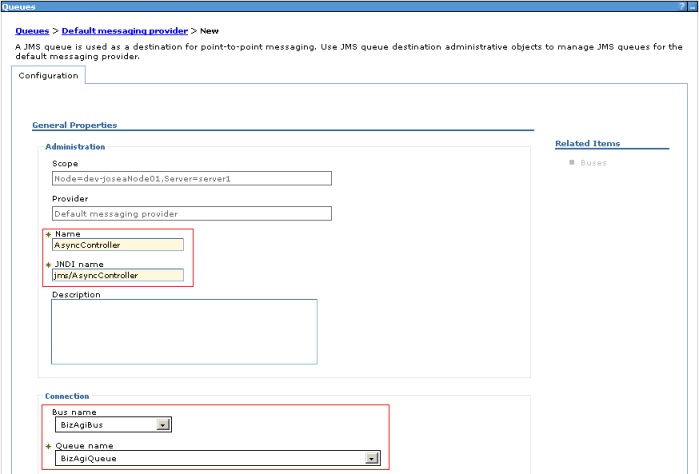
c. Configure the following general properties and click on OK.
Name: AsyncController
JNDI name: jms/AsyncController
Bus name: BizAgiBus
Queue name: BizAgiQueue
d. Save changes on the master configuration.
6. Create the Activation specification resource.
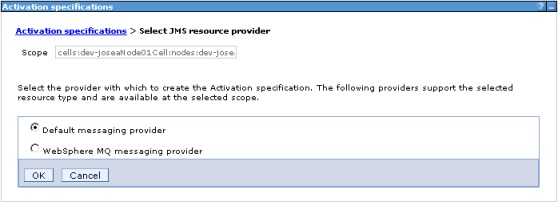
a. On the navigation pane go to the Resources – JMS – Activation specifications section. Select the Scopes in which the resource will be created (it is recommended to use the server level) and click on New.
b. Select Default messaging provider for provider of the JMS resource and click on OK.
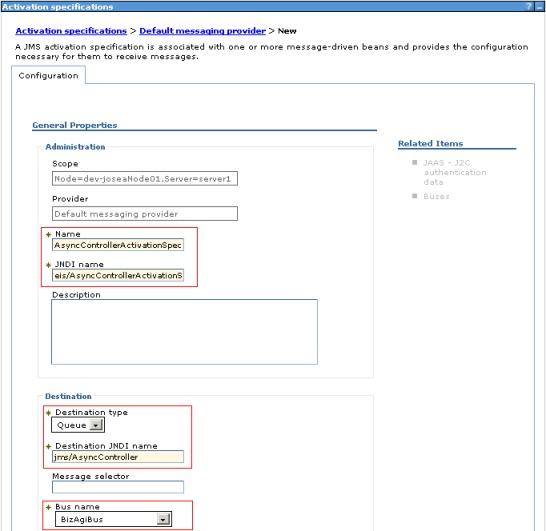
c. Configure the following general properties and click OK.
Name: AsyncControllerActiviationSpec
JNDI name: eis/AsyncControllerActivationSpec
Destination type: Queue
Destination JNDI name: jms/AsyncController
Bus name: BizAgiBus
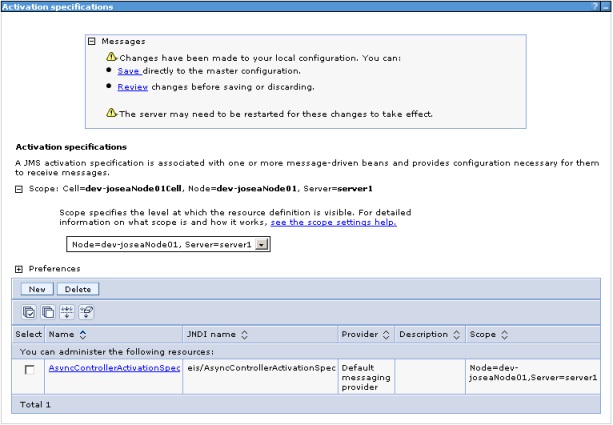
d. Click on Save to save changes made on the master configuration.
Updating the Persistence Framework (eclipselink)
1. Copy the file:
<PATH_CONFIGURATION_FILES>/configuration/eclipselink.jar
On the server’s library repository:
<WEBSPHERE_HOME>/lib
2. Restart the application server.
Configuring the Administrator User (domain\admon)
To perform some internal operations, Bizagi requires an administrator user that is part of the security context defined by the WebSphere server.
1. Log on to the Administration Console and in the navigation pane go to section Users and Groups – Manage Users. Click on create … button.
2. enter the following information in the creation form:
User ID: domain\admon
First name: BizAgi
Last name: BizAgi
Password: bizagi (It is important to use the same password because this account is referenced on the descriptor deployment)
3. Click on Create.
After this configuration, the server will be ready to deploy the application.
Related articles
- Installing Bizagi Enterprise JEE Edition
- JBoss configuration to work with Bizagi
- WebLogic configuration to work with Bizagi
<comments />

