Deployment of the Application to a JEE Server
From Business Process Management, BPM and Workflow Automation Wiki | BizAgi BPMS
<keywords content="keywords">Deployment, deployment, Bizagi, enterprise edition, Glassfish, glassfish, JEE, WebLogic, Weblogic, weblogic, WebSphere, Websphere, websphere</keywords>
|
Applies to ENTERPRISE JEE EDITION |
Contents |
Deployment of the Application to a JEE Server
After the development phase of a Bizagi Enterprise JEE project is finished, deploying those processes into a Test or Production JEE Application server is carried out by using a Bizagi Advanced deployment and Bizagi JEEConsole Manager.
Take into account that if your project uses Virtualization or Replication, then you need to ensure that your JEE Application Server has the proper data sources configured.
This article describes how to perform that additional step for the Test or Production environment, so that processes are deployed into the web application residing in the specific JEE Application Server of your choice (Weblogic, WebSphere, JBoss).
WebLogic
Review WebLogic Server configuration to work with Bizagi before the web application is deployed.
Web Application Installation
File required to install Bizagi is: <PATH_CONFIGURATION_FILES>\Bizagi\Bizagi-ear-Weblogic.ear.
The steps required to complete this task are:
1. Log on to the Administration Console and using the navigation pane go to Domain Structure – Deployments. Click on Install.
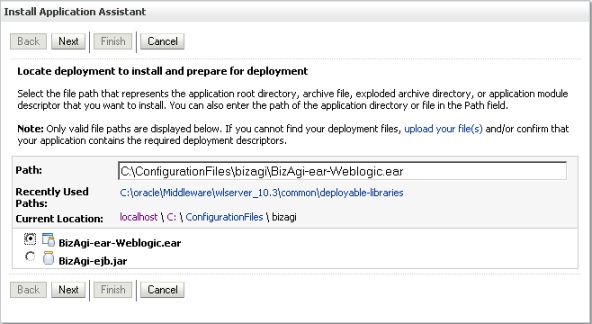
2. Locate deployment to install and prepare for deployment: Find the Bizagi distribution (Bizagi-ear-Weblogic.ear) to be installed and then click on Next.
3. Choose targeting style: Selected the option Install this deployment as an application and click on Next.
4. Optional Settings: Click on Finish.
5. To verify that the Web application was installed correctly, enter the following address into any browser:
http://localhost:7001/Bizagi-war/
|
Note: If during the installation of the web application occurs a memory error, perform the following procedure: 1. Open the file: <WEBLOGIC_HOME>\user_projects\domains\Bizagi_domain\bin\setDomainEnv.cmd 2. Locate the line: @REM IF USER_MEM_ARGS the environment variable is set, use it to override ALL MEM_ARGS values 3. Below this line copy the following statement: Windows: set USER_MEM_ARGS=-Xms256m -Xmx512m -XX:PermSize=128m -XX:MaxPermSize=256m Linux: USER_MEM_ARGS="-Xms256m -Xmx512m -XX:PermSize=128m -XX:MaxPermSize=256m" 4. Save changes and restart the application server. |
Entities Generation
The first time a new distribution of Bizagi is installed, it provides a basic configuration of the data model, therefore is required to perform the entities generation procedure to update the component associated with the data model. The steps are:
1. Log on to the Administration Console and using the navigation pane go to Domain Structure – Deployments. Click on the name of the installed web application (Bizagi-ear-Weblogic).
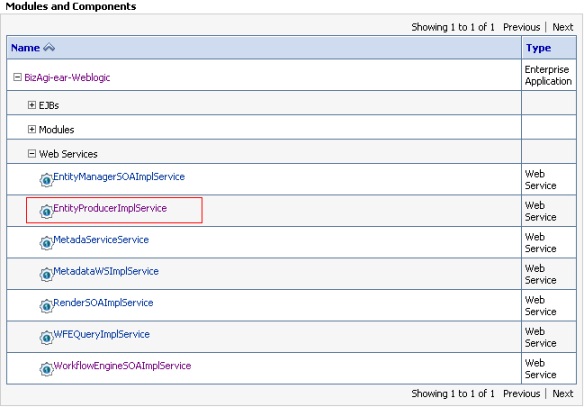
2. Locate the tab Overview, in the section Modules and Components go through the components structure and find the item Web Services. Click on the service EntityProducerImplService.
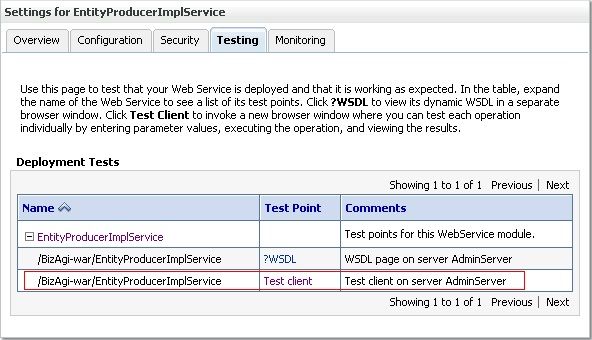
3. Locate the Testing tab, open the items related to the service (click on +) and click on the test point Test Client.
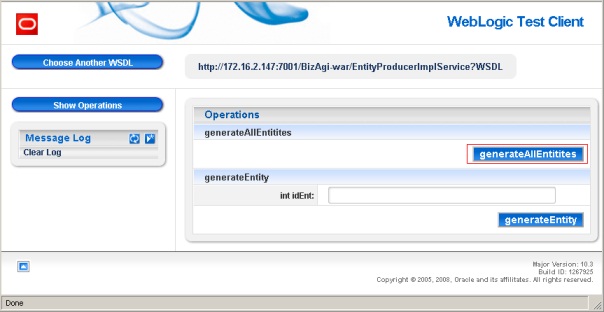
4. WebLogic Test Client: Run the operation "generateAllEntitites". This operation is responsible for generating the component that contains all the metadata of the new model (Generated.jar).
The file is created in the temporary directory of the operating system user:
Windows: %tmp%/Generated/Generated.jar
Linux: /tmp/Generated/Generated.jar
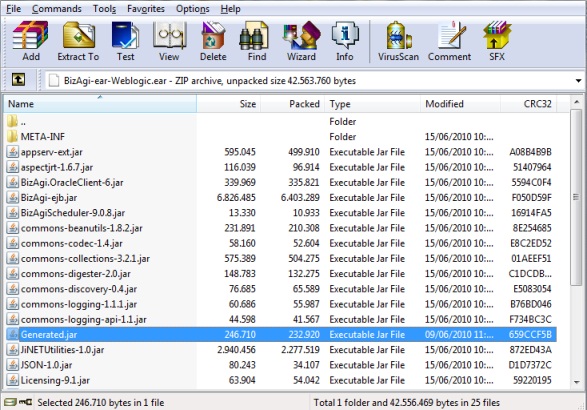
5. Use a tool to unzip files to open the Bizagi distribution (Bizagi-ear-Weblogic.ear) and copy the generated entities file: Generated.jar. For this example WinRAR was used.
To copy the file just click on the Add button and select the Generated.jar file from the temporary directory, another simple option is to drag the file into the WinRAR window; either way a confirmation window is shown, to add the file click OK. Verify that the file was properly added to the distribution and then close the tool.
6. Log on to the Administration Console and using the navigation pane go to Domain Structure – Deployments. Select the installed Bizagi distribution and click on Delete.
7. Install the Web application again, using the distribution that was updated with the Generated.jar. file
|
Note: This procedure should also be performed when the data model is modified from Bizagi Studio. |
WebSphere
Review WebSphere Server configuration to work with Bizagi before the web application is deployed.
Web Application Installation
Prerequisites
Bizagi Enterprise JEE offers a command-line administration console which allows to perform the following tasks in a quick and easy way:
- Start and stop the application server.
- Install and uninstall Bizagi BPM (Web Application).
Before the installation process of Bizagi BPM is initiated make sure that the application server is started.
Procedure
There must be a project created with the configuration information of the database and the application server.
1. To do so, use this command-line instruction:
<JEECONSOLE_HOME>/bin/ JEEConsoleManager.bat createproject <CONFIG_PATH>
<CONFIG_PATH> is the path where the configuration XML file is located.
2. Start the administration console by executing the DEPLOY command. Enter this in a command-line interface:
<JEECONSOLE_HOME>/bin/ JEEConsoleManager.bat deploy -e -p <PROJECT_NAME> <BIZAGI_PATH>
The "-e" element indicates that as part of the installation process is necessary to make the entities generation and update the related component.
WebSphere Management Console
File required to install Bizagi is: <PATH_CONFIGURATION_FILES>\Bizagi\Bizagi-ear-Websphere.ear.
The steps required to complete this task are:
1. Log on to the Administration Console and using the navigation pane go to Applications – Application Types – WebSphere enterprise applications. Click on Install.
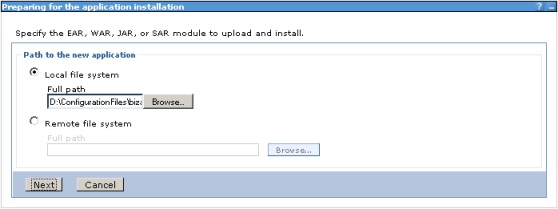
2. Preparing for the application installation: Find the Bizagi distribution (Bizagi-ear-Websphere.ear) to be installed and then click on Next.
3. Selected for installation type the option Fast Path and click on Next.
4. Install New Application / Select installation options: Keep the default values and click on Next. This configuration may be modify depending on the application server administrator’s judgment.
5. Install New Application / Map modules to servers: Click on Next.
6. Install New Application / Map virtual hosts for Web modules: Click on Next.
7. Install New Application / Summary: Review the parameters for the configuration of the installation process. Click on Finish.
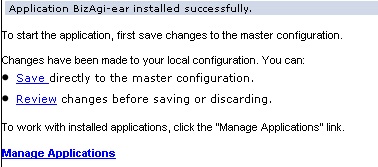
8. Once the application is finished installing, click on Save to keep the changes on the master configuration.
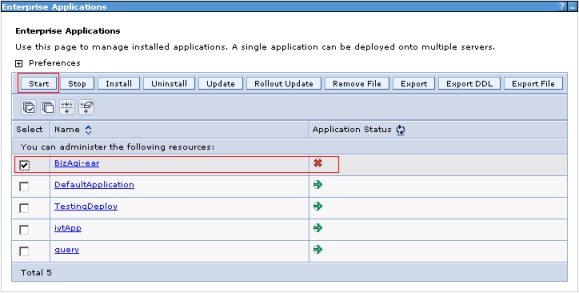
9. Finally is necessary to select the installed application and click on the Start button to load its components.
10. To verify that the Web application was installed correctly, enter the following address into any browser:
http://localhost:9080/Bizagi-war/
|
Note: When Bizagi BPM is installed using WebSphere’s administration console, it is assumed that the distribution (.EAR) already has the updated component associated to the data model (Generated.jar). |
JBoss
Before performing the deployment of Bizagi (EAR) in the application server, it is necessary to execute a pre-deployment procedure of the version beforehand. Basically, it consists in build the module with the generated entities from the data model information and integrate it to the Bizagi's version that was delivered. For JBoss, this procedure has to be performed by using the administrative console (this procedure is explained in this article). Review the JBoss configuration to work with Bizagi before the web application is deployed.
Prerequisites
Bizagi Enterprise JEE offers a command-line administration console (called "JEEConsoleManager") which allows you to generate the EAR file for the web application deployment in a JBoss Server.
Before proceeding for the installation of the processes of Bizagi BPM into the Application server, make sure the following conditions are met:
1. The Application server must be started.
2. The "JEEConsoleManager" must be installed. Installation of the JEE administration console is done by uncompressing the .rar file delivered by Bizagi into a local path.
This local path is referenced in this guide as <JEECONSOLE_HOME>.
Procedure
Ensure that your project's XML configuration file already has the proper configuration of the database connection and the application server (this file must be created from the template "ProjectTemplate.xml" located at the path <JEECONSOLE_HOME>).
To start the generation of the processes .ear, use the following command-line instructions.
1. To first create the project files:
#<JEECONSOLE_HOME>/bin/JEEConsoleManager.bat createproject <CONFIG_PATH>
<CONFIG_PATH> is the path where the configuration XML file is located.
Remember that this configuration file specifies the project name, amongst other required information.
2. Then, to create the generated version:
#<JEECONSOLE_HOME>/bin/JEEConsoleManager.bat predeploy -o <OUTPUT_PATH> -p <PROJECT_NAME> <FILE_PATH>
<OUTPUT_PATH> is an optional path to specify Bizagi's version generation.
<PROJECT_NAME> is the project's name as specified in the xml in (<CONFIG_PATH>).
<FILE_PATH> is the path where the .EAR file is located, that one which is taken to generate the web installation in JBoss.
Web application installation in JBoss
JBoss allows web applications to be installed by simply copying the distribution (.EAR) file at the deploy folder of the server. This deploy folder is: <JBOSS_HOME>/server/default/deploy/
This can be done while the server is up and running (in hot), or if the server is stopped.
Notice that when Bizagi BPM project is installed this way, it is assumed that the distribution (.EAR) already counts with the updated component (Generated.jar) corresponding to the data model.
|
Alert: It is posible to edit the file run.conf in order to modify the memory parameters for the server. This is specially useful in case the server shows a memory restriction error executing the steps previously mentioned. To do that, edit the file “<JBOSS_HOME>\bin\run.conf.bat” (for Windows operative systems); or “<JBOSS_HOME>\bin\run.conf” (for Linux) as described: Include the line: set "JAVA_OPTS=-Xms512m -Xmx1024m -XX:MaxPermSize=512m" after the line: “rem # JVM memory allocation pool parameters - modify as appropriate.” (On Windows) For Linux, edit the parameters: –Xms512m –Xmx1024m -XX:MaxPermSize=512m Under the line: “# Specify options to pass to the Java VM”. |
Finally, to access the Web application (and verify its proper installation), type the following address into your browser:
[http://localhost:8080/Bizagi-war/ http://localhost:8080/Bizagi-war/]
Related articles
- Installing Bizagi Xpress Edition
- Installing Bizagi Enterprise .NET Edition
- Installing Bizagi Enterprise JEE Edition
- WebSphere Configuration to Work With Bizagi
- WebLogic Configuration to Work With Bizagi
<comments />
