SMTP Configuration
From Business Process Management, BPM and Workflow Automation Wiki | BizAgi BPMS
<keywords content="keywords">configure, mail server, send mails, smtp server, local, local host, no server, no smtp, error with smtp</keywords>
Contents |
Installation and Configuration of the SMTP Service
Most Bizagi projects implement the use of notifications (messages sent by email) that send information about a case to people who have a relationship with the process. In order to send these notifications it is necessary to have a mail server available.
Bizagi allows to receive emails locally when specific tests are required in development environment, and there is no SMTP server configured. Bizagi also allows to configure a SMPT server for any environment (development, testing, production). For testing and production it is necessary to have the SMTP server correctly configured.
With this as a clear starting point, the following describes how to perform the configuration for Windows Servers on which the Web application resides.
SMTP service helps avoid problems that can affect the process. That is, it increases the server availability because notifications are spooled and sent once the mail server is running.
Configure local SMTP in Bizagi
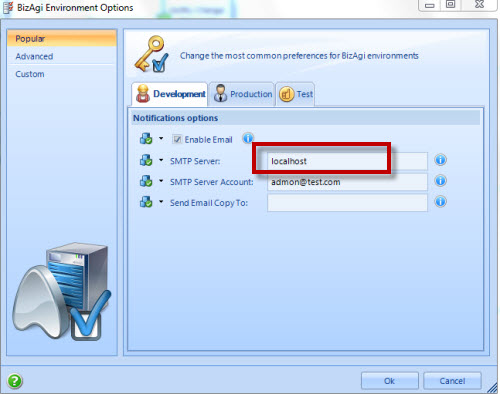
For development enviroments where specific tests are needed or where no SMTP server is available it is possible to configure sending emails to a local folder.
To send emails to a local folder select Enable Emails in the Environment Configuration checkbox. Then type localhost in the SMTP Server.
Then, make sure you have a SMTP service installed and running in the local BPM Server.
Configure SMTP server in Bizagi
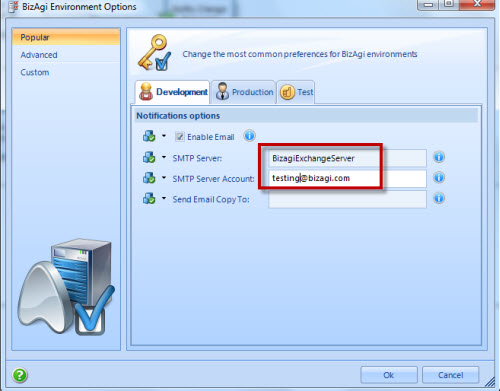
To configure SMTP server it is just necessary to type the correct server name in the SMTP server item in Bizagi Environment Configuration. The Server Account must have the correct domain belonging to the SMTP server domain.
Click here for a tip on how to find your SMTP server
Alternative configuration
It is also possible to configure the SMTP server and IIS to redirect emails to the server. The SMTP Server option of the Environment Configuration in Bizagi Studio, will be set to localhost or with a node balancing address in case it is in a load balancing cluster.
There is an article in the Microsoft Knowledge Base that explains the correct procedure to follow for the configuration:
|
Note: It has been proven that if it is configured in this way and the client’s server is not entered as the SMTP Server there can be a time saving of between 80% and 95% when sending emails with files attached. |
Install the SMTP Service
The following procedure describes the installation of the SMTP Service in Windows with IIS 5 or 6. If the SMTP Service is already installed, continue to the subject of Configuration :
|
Note: To see the installation procedure in IIS 7 (for Windows Server 2008) please view this procedure. |
1. Click on Start, Control Panel and in the pop-up window double click on the Add and Remove Programs icon.
2. In the pop-up window, click on the Windows Components button on the button bar on the left hand side of the window.
3. In the Windows Components window select Internet Information Service from the list and click on Details.
4. Click in the verification box on the left of the SMTP service in the list and click on Accept.
5. Click on Accept in the Windows Components window.
6. If the installation requests it, supply the necessary Window media.
7. When the installation has finished click on End.
8. When the installation finishes, restart the equipment, if requested.
SMTP Configuration in the server
The following procedure describes how to configure the SMTP service:
1. Open the IIS administration tool by clicking on Start – Programs – Administration Tools – Internet Administrator.
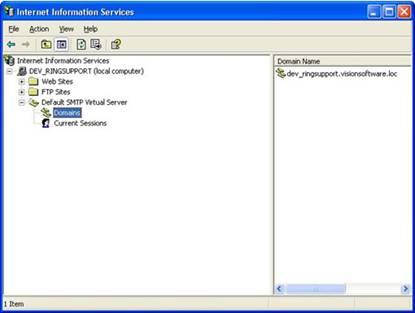
2. In the left hand panel of the IIS administration console expand the tree structure under the server name and right click over SMTP service.
3. In the pop-up menu click on New > Domain.
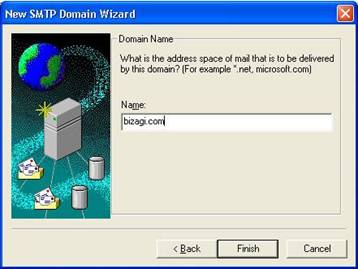
In the New SMTP Domain Wizard select the Remote option and click on Next.
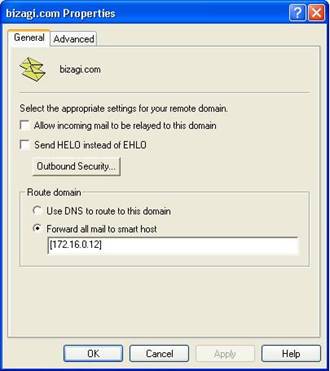
4. In the text box write the DNS name of the domain to which you wish to re-send email messages. For example, if you are going to send email addresses to the address [email protected] the name of the domain that you should specify is Bizagi.com.
5. In the Route Domain box of the properties window, select Forward all mail to Smart Host and write, within square brackets "[ ]", the IP address of the SMTP server authorized to re-send mail to the specified domain.
6. Click on OK.
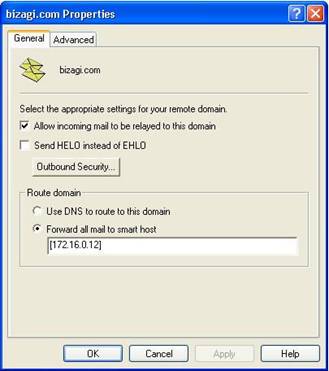
7. Check that the Relaying properties are correctly configured in the properties window of the service and click on OK.
8. Check that the SMTP service in the server is initialized in the services console by clicking on Start > Programs > Administrative Tools > Services.
9. Check that in the server configured as the Smart Host, the server that is configured for the SMTP service is authorized to re-send mail.
<comments />
