Process Data: Entities and Attributes
From Business Process Management, BPM and Workflow Automation Wiki | BizAgi BPMS
<keywords content="keywords">create, delete, create entity, delete entity, create attribute, delete attribute, remove entity, remove attribute</keywords>
Contents |
Process Data: Entities and Attributes
After defining the process, the Entity Model Definition is the second step in the Process Wizard. In this article you will find more information about how to manage Entities and Attributes in Bizagi. This is a crutial step in which the user will define where and how he/she wants to store the information related to the process in the database assigned to Bizagi.
Entities
How to Create an Entity
Create an Entity is one of the tasks that can be implemented in the Model Data option given by Bizagi (second step in the wizard). In order to create an Entity in Bizagi, follow these steps:
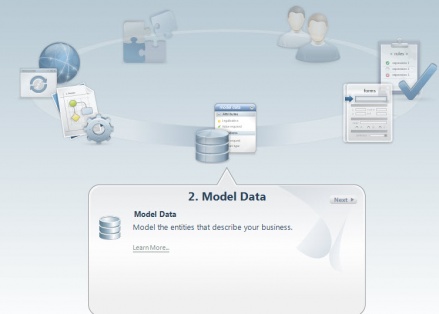
1. Select the Model Data Option in the second step of the Process Wizard.
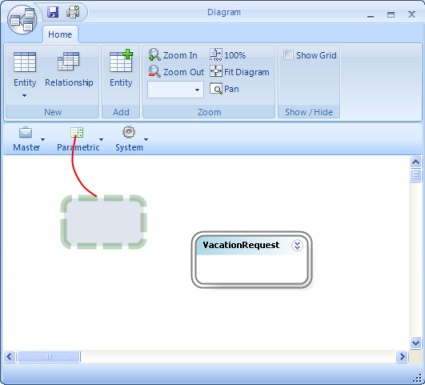
2. Once the Model Data Diagram is opened, there will be a toolbar, below the Home menu. Depending on the type of Entity to be created, click and drag a Master or a Parameter entity ![]() (System entities cannot be created) into the diagram, release to create it; after that stat typing the name of the entity.
(System entities cannot be created) into the diagram, release to create it; after that stat typing the name of the entity.
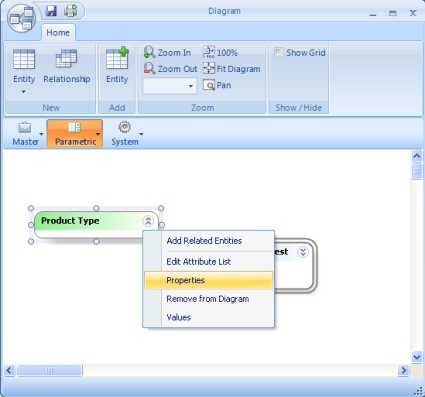
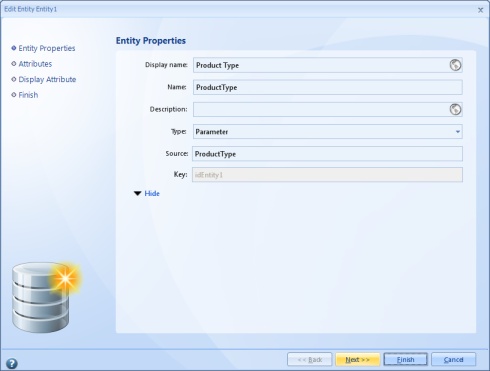
3. Right click on the new entity and select Properties. Click Next:
In the entity properties window, it is possible to change the entity's basic information (Display name, Name, Description and Type). In addition if Advanced is clicked, the Source and Key fields will appear and only the Source name can be modified; the Key is created automatically when the entity is dragged.
|
Display name: The name that appears on the entity list and the display name of dynamic combinations. Spaces and accents can be used, and the display name is limited to 40 characters. Name: Entities should be named clearly, indicating the object to which they are referring. They should start with a capital letter and cannot include spaces or special characters in the name such as accents, commas and others (#!&%$()/*+:). If the name is long, a capital letter can be used between words. Names are limited to 25 characters. A proposed name is written as the Display name is typed. Description: Description of the entity for documentation effects. Type: The types of entities that can be created are Master and Parameter entities. Advanced: Source: Is the name of the table in the Bizagi database where the values will be stored. In the case of virtualized entities, the values stored in the Bizagi table correspond to cache information from the actual information of the remote entity. Key: The exclusive identifier of the entity. Bizagi names it automatically as idName, where Name is the name corresponding to the entity. When the entity is created, this field is blank. For instance: for the City entity, the identifier would be idCity and each entry has a single number that differentiates it from the others. |
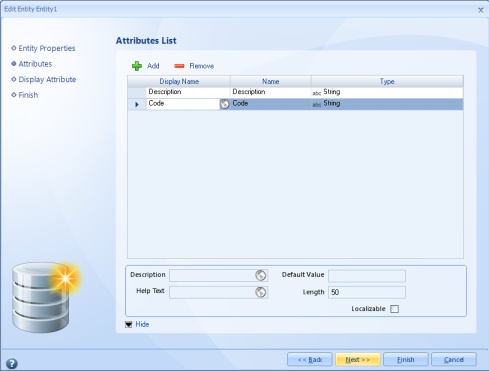
4. To include the entity's attributes, after completing the information, click on the Next button; otherwise click Cancel. On the next window fill-in the attributes and click Next.
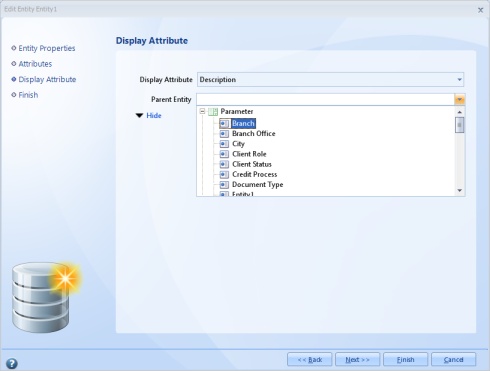
5. For Parameter Entities in the last step the user must define the Display Attribute and a Parent Entity (click on Hide to see this field) if there is any.
![]() The Display Attribute is the visible attribute created for the entity that will be shown in the web application when the entity is referred to.
The Display Attribute is the visible attribute created for the entity that will be shown in the web application when the entity is referred to.
This field is required but can be selected from the form.
Click for further information about Parent Entities
![]() The Parent Entity is needed when the field type dynamic combo is used.
The Parent Entity is needed when the field type dynamic combo is used.
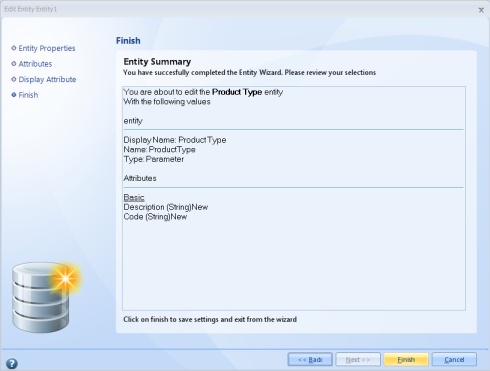
6. Finally, a window with the summary of the actions to be performed is presented. Click Finish in this window.
![]() To create an entity in an alternative manner, identify the Entities component in the Bizagi menu, right click a master or parameter entity and select the New Parameter entity or New Master entity option or access it by means of the contextual menu by selecting a master or parameter entity.
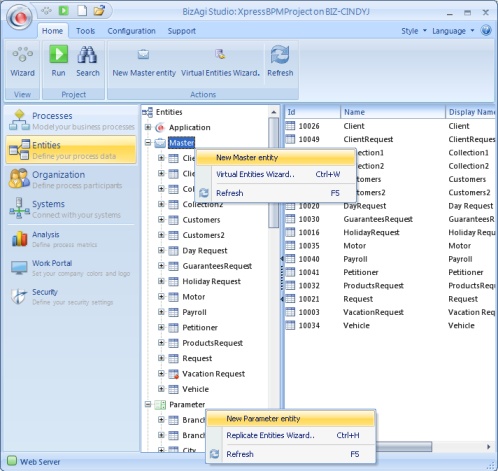
To create an entity in an alternative manner, identify the Entities component in the Bizagi menu, right click a master or parameter entity and select the New Parameter entity or New Master entity option or access it by means of the contextual menu by selecting a master or parameter entity.
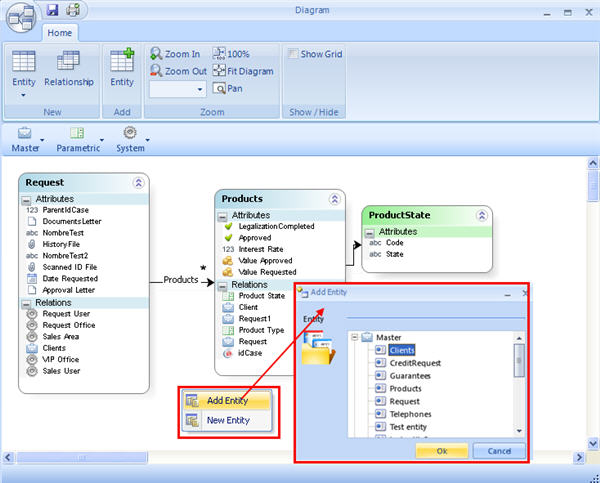
7. When the entity is already created and the user wants to associate it to the diagram, right click over the Diagram and select Add Entity. On the new window, navigate the data model until the desired entity is reached. Click OK.
How to make an entity a Process Entity
The Process Entity is the main entity that is used to access the rest of the data model entities in a single Process. There is only ONE Process Entity per process.
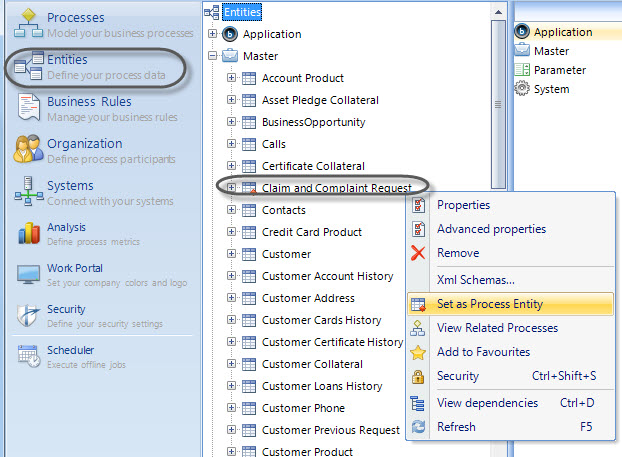
To make an entity a Process Entity, go to the Modules view and in the Entities menu right click over the desired entity. Select Set as Process Entity. Then, select the process.
If the Process already has a Process Entity, Bizagi will display a warning to make sure the change is desired.
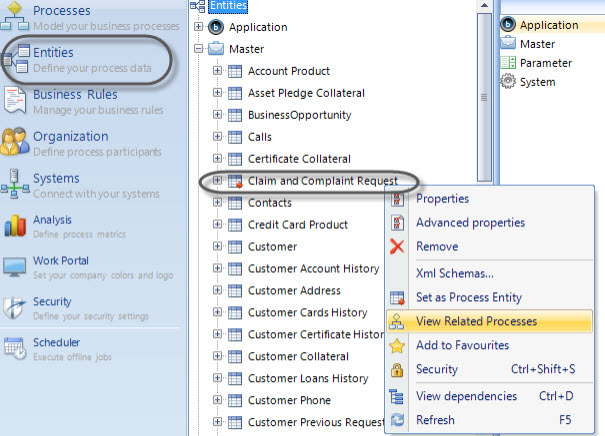
When an entity has already been assigned as a Process Entity, the option View Related Process will be available. This menu will show the processes for which the entity is the Process Entity.
Considerations
It is essential to keep the following key points in mind when working with Entities:
![]() After an entity has been created, the name and the source should not be modified.
After an entity has been created, the name and the source should not be modified.
![]() Entity and attribute names should not contain spaces, accent marks or special characters.
Entity and attribute names should not contain spaces, accent marks or special characters.
![]() Parameter entities can be managed in the administration module of the application, in the entities section.
Parameter entities can be managed in the administration module of the application, in the entities section.
![]() Entities that have parent entities and are used for dynamic combinations must ALWAYS have an attribute related to the parent entity.
Entities that have parent entities and are used for dynamic combinations must ALWAYS have an attribute related to the parent entity.
![]() An entity may not have more than 85 attributes.
An entity may not have more than 85 attributes.
How to Delete an Entity
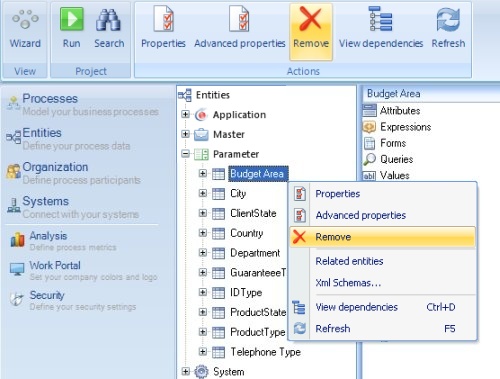
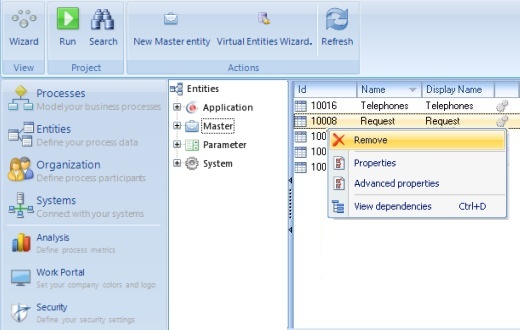
1. In the Bizagi menu, select the Entities component and right click on the parameter entity or the master entity you want to eliminate and choose the Remove option. Or click the Remove button in the contextual menu.
![]() Alternatively, select the Master or Parameter element, and in the corresponding work area, select the entity, right click and select the Remove option, or use the button in the contextual menu.
Alternatively, select the Master or Parameter element, and in the corresponding work area, select the entity, right click and select the Remove option, or use the button in the contextual menu.
|
Note: Entities cannot be removed if they have associated attributes, forms or relations. |
How to Search or Edit an Entity
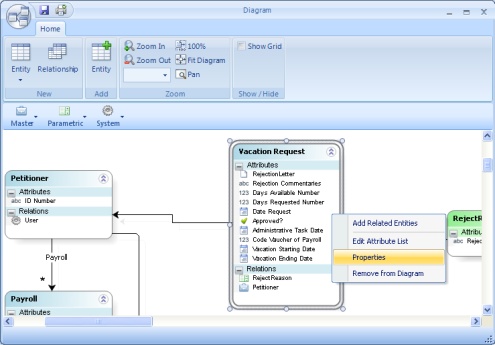
1. In the Diagram Editor, right click on the entity you would like to edit or search, click on the Properties option, which displays a window where you can search or modify the properties of the entity.
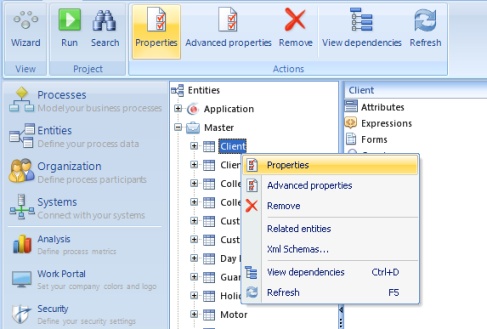
![]() Alternatively, in the Bizagi menu, click on the Entities component and select the Entity you would like to search or modify, right click on the entity and click on the Properties option.
Alternatively, in the Bizagi menu, click on the Entities component and select the Entity you would like to search or modify, right click on the entity and click on the Properties option.
Or select the entity and in the corresponding work area, right click and select the Properties option; you can also access it by means of the contextual menu by selecting a master, parametric or application entity.
How to configure Access Rights to an entity
With Bizagi BPM Suite you can have a collaborative environment where you and other co-workers can work simultaneously on your processes. If you have several processes in your project you might need to restrict accesses to some elements to prevent the users modifying one process, to affect others.
Most projects have entities that are that are crucial for the proper functioning of the process, and any uncontrolled changes can affect its development. You can give access permissions to those entities where you consider necessary to restrict changes.
Click here to learn more about Access Rights for Entities
Attributes
How to Create an Attribute
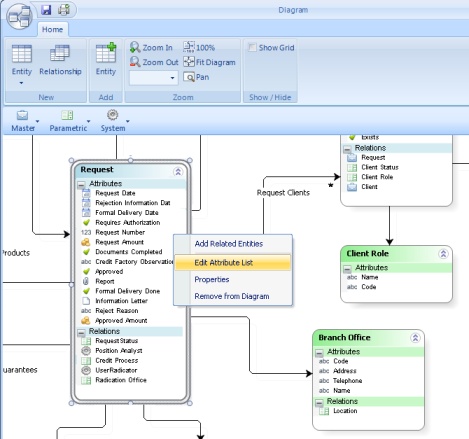
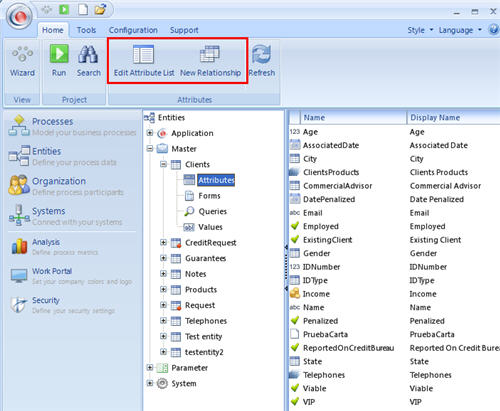
1. In the workspace of the Diagram window, right click on the entity where you would like to create or edit an Attribute. Click on the Edit Attribute List option.
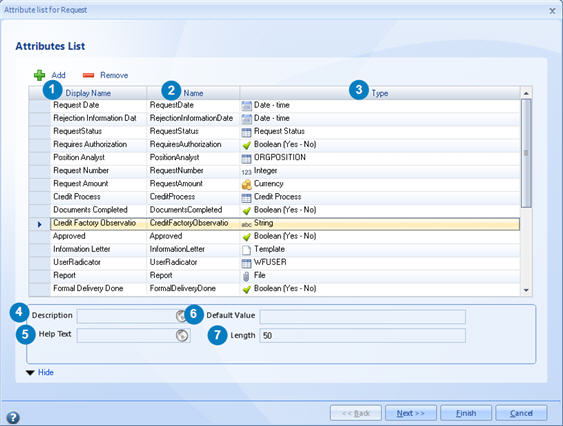
2. The Attribute List window will appear. In order to create an attribute, click on the Add button at the top of the screen. You should fill in the following information for each new attribute:
|
1. Display Name: Attributes must have clear, understandable names that indicate the object to which they refer. It is the name that appears on the forms or screens of the web application. Spaces and accents are allowed and the display name is limited to 40 characters. Example: Client’s Name, License Plate, Type of Identification. 2. Name: Attributes must have clear, understandable names that indicate the object to which they refer. They must begin with a capital letter and must not contain spaces or special characters such as accents, commas and others (#!&%$()/*+:). If the name is long, capital initials may be used. Attribute names are limited to 25 characters. Example: NameClient, TypeIdentification. As the Display Name is typed, a proposed Name is written, if desire it can be change. 3. Type: Type of data. Attribute Type will be used to define the display field types in the creation of forms. The attribute types are: Basic Types: Entity: Collection: 4. Description: Include a description of the field for documentation effects. 5. Help Text: The help text will appear when you click on the field in the forms or screens of the web application. 6. Default Value: Value of the attribute by default. The default value will be displayed provided the attribute has no value, that is to say, when you highlight the field on the screen, if it is void, the default value will be filled in. 7. Length: The length is indicated for string-type fields and should be between 1 and 4000 characters. |
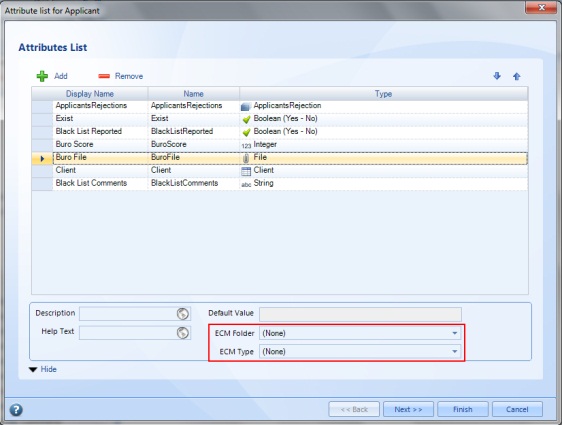
An attribute of type File has the following additional information, depending on whether ECM Integration is going to be used or not.
|
ECM Folder : From the folders configured in the ECM repository select the one that is going to be used to saved files uploaded to this attribute. ECM Type : Select the content type for this attribute from all the custom content types existing in the ECM repository of the previous selected folder. |
3. After completing the information, click on the Next button to continue. The summary window is shown, to complete the process click Finish.
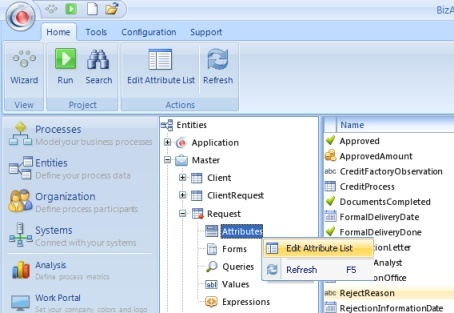
![]() To create an attribute in an alternative way, in the Bizagi menu identify the entities component and right click on the attributes icon. Select the Edit Attribute List option (or select it from the Main menu) and follow the wizards instructions.
To create an attribute in an alternative way, in the Bizagi menu identify the entities component and right click on the attributes icon. Select the Edit Attribute List option (or select it from the Main menu) and follow the wizards instructions.
Considerations
It is essential to keep the following points in mind when working with Attributes:
![]() Attributes with the same name cannot be created in the same entity.
Attributes with the same name cannot be created in the same entity.
![]() The type of data in each attribute must be selected properly.
The type of data in each attribute must be selected properly.
![]() For the default values for date and float type values, if the regional configuration of the computer where Bizagi Studio is installed in which the default value was placed on these attributes and the configuration of the application server are different,the application takes on the server configuration.
For the default values for date and float type values, if the regional configuration of the computer where Bizagi Studio is installed in which the default value was placed on these attributes and the configuration of the application server are different,the application takes on the server configuration.
![]() An entity may not have more than 85 attributes.
An entity may not have more than 85 attributes.
How to Remove an Attribute
1. In the Diagram Editor, right click on the entity where you would like to remove the Attribute from and select the Edit Attribute List option.
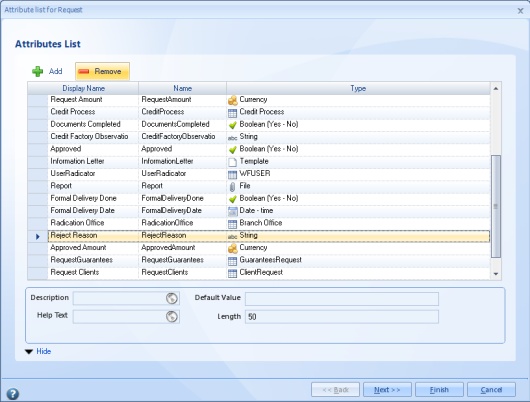
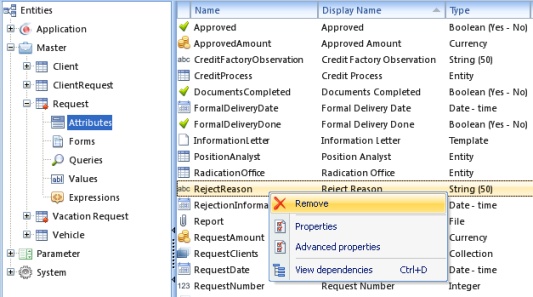
2. The window containing the attribute list of the entity will pop up. Select an attribute and click on the Remove button at the top of the screen.
3. Click Next, and in the summary window click Finish.
![]() Alternatively, in the Bizagi menu, select the Entities component and select the entity and the Attributes element, and in the corresponding work area, right click and select the Remove option.
Alternatively, in the Bizagi menu, select the Entities component and select the entity and the Attributes element, and in the corresponding work area, right click and select the Remove option.
|
Note: Attributes can only be removed if they are not associated with any forms, relations or rules. |
How to Search or Edit an Attribute
1. In the Diagram Editor, right click on the entity where you would like to search or modify an attribute. Select the Edit Attribute List option and the window containing the attribute lists will pop up, where you can make the respective changes.
![]() Alternatively, in the Bizagi menu, select the Entities component, the respective entity and select the Attributes element. Right click and select the Edit Attribute List option or access it by means of the contextual menu by selecting the attributes element of the entity.
Alternatively, in the Bizagi menu, select the Entities component, the respective entity and select the Attributes element. Right click and select the Edit Attribute List option or access it by means of the contextual menu by selecting the attributes element of the entity.
In addition, to search or modify the attribute of the entity, select the Attributes element and in the corresponding work area, right click on the attribute and select the Properties option.
Attributes in Production
When a project has been deployed, some elements like the attributes will have some restrictions to avoid possible problems with further deployments. For this reason, when an attribute is already in production, this will not be editable and cannot be deleted. The users can create new attributes and change the forms where those are displayed if necessary.
Diagram Information
In the Data Model Editor, the following tools can be found.
|
ICONS AVAILABLE |
DESCRIPTION |
|
The Save icon saves the changes made in the duagram. In order to save the changes for the first time, indicate the name of the diagram in the properties' window. | |
|
Print. This button is used to print the diagram. | |
|
New Entity. It is used to create the data model directly in the diagram i.e.new entities that had not been stored yet. Once clicked, a new entity's properties window will appear and the new entity will be displayed in the diagram in the Entity's section. | |
|
Add Entity. This button shows the entities that had been created in the diagram. When selected, an additional window will appear. In this window, the user can select the entity that will be included among a list of existing entites. | |
|
Add Relation. This button shows the relationship wizard, where the 1-1 and the n-n relationships can be configured. | |
|
Zoom In. Every click enlarges the view of the diagram. | |
|
Zoom Out. Every click diminishes the view of the diagram. | |
|
Zoom. Allows to select the size of the diagram. | |
|
100%. Sets the size of the diagram to 100%. | |
|
Fit Diagram. Adjusts the full diagram to fit the size of the window. | |
|
Pan. When clicked, a smaller window will be opened with the data model in a smaller size, without all the details of the entities, and with a preview of the diagram. By clicking in the pan's window, the selected position can be moved as well as the diagram inside the original window. | |
|
Show Grid. Check and uncheck this option to show or hide the table in the background of the diagram.
|
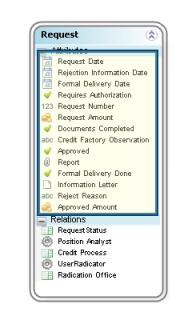
![]() See Attributes: Shows or hides the attributes of an entity.
See Attributes: Shows or hides the attributes of an entity.
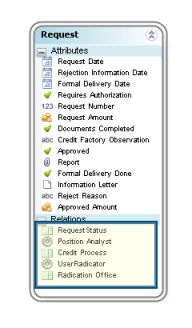
![]() See Relationships: Shows the foreign keys of an entity i.e.the related attributes of other entities.
See Relationships: Shows the foreign keys of an entity i.e.the related attributes of other entities.
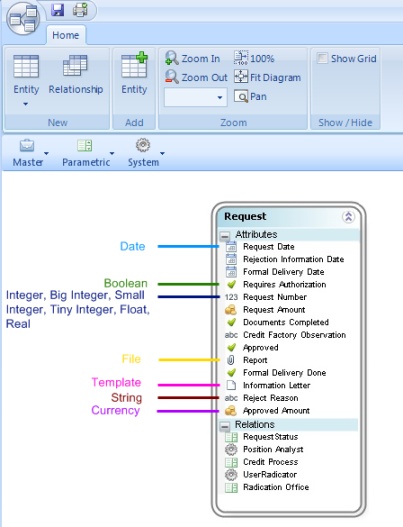
![]() Icons for the different attribute types: Depending of the type of attribute, different icons are displayed, as shown in the following picture.
Icons for the different attribute types: Depending of the type of attribute, different icons are displayed, as shown in the following picture.
<comments />
