How to Integrate Bizagi with an External Data Source
From Business Process Management, BPM and Workflow Automation Wiki | BizAgi BPMS
<keywords content="keywords"> replication, virtualization, data shadowing, data mapping, replicated entities, virtual entities, integration, systems </keywords>
Contents
|
How to Integrate Bizagi with an external data source
Bizagi supports integration at a data level (with an external data source) with two different types of integration:
![]() Replication - Replication synchronices the information from the external data source into Bizagi as a scheduled task (periodically). This type of integration is focused for parameter entities e.g. lists of cities, products.
Replication - Replication synchronices the information from the external data source into Bizagi as a scheduled task (periodically). This type of integration is focused for parameter entities e.g. lists of cities, products.
![]() Virtualization (or Data Shadowing / Data Mapping) - Virtualization synchronices information in both ways (into Bizagi from the external data source and viceversa). This is carried out in runtime, since this type of integration is focused for master entities (entities with business data, e.g. customers, providers, invoices, purchase orders).
Virtualization (or Data Shadowing / Data Mapping) - Virtualization synchronices information in both ways (into Bizagi from the external data source and viceversa). This is carried out in runtime, since this type of integration is focused for master entities (entities with business data, e.g. customers, providers, invoices, purchase orders).
Both types of integration can be set and assisted by using Bizagi's wizard, or by a manual definition with advanced options (standard method), as described below.
Considerations
Take into account that this feature requires using a database user (for the connection to the external source) having certain priviledges.
The minimum granted priviledges for this user differ for your project's Development environment (solution design) and for your project's Test or Production environment (process execution).
In order to configure virtualization or replication in your project's Development environment, your database user will require priviledges to consult the catalog.
In a Test or Production environment (process execution), the database user will only require priviledges to read and write over the virtual entities.
While using replication in the Test or Production environment, then this user will only require priviledges to read information over the replicated entities.
Using the Virtualization and Replication Wizard
By using this Wizard, replication or virtualization is assisted so that minimum configuration is required and the necessary components and management for the connection is created by default (this can only apply if the data source is running under SQL Server or Oracle database engines).
Replicate Entities Wizard
This section illustrates how to configure replication by means of the Replicate Entities Wizard.
In this example, we will replicate the "Territories" and "Region" tables of the "Northwind" database from SQL Server. These tables will be created automatically by Bizagi as parameter entities.
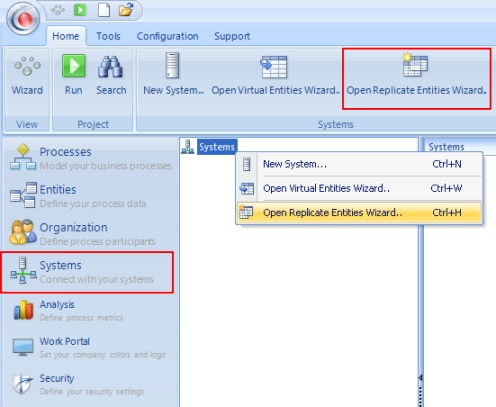
1. In Bizagi's Modules view, select the Systems menu item. Then click on the contextual menu the "Open Replicate Entities Wizard" option.
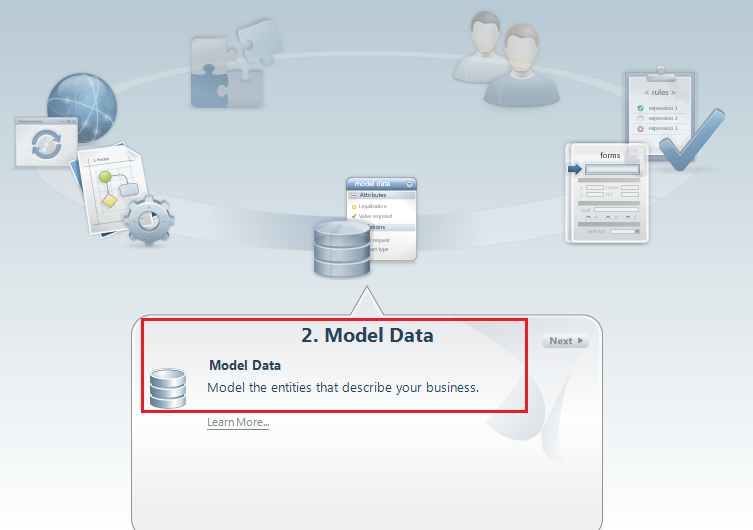
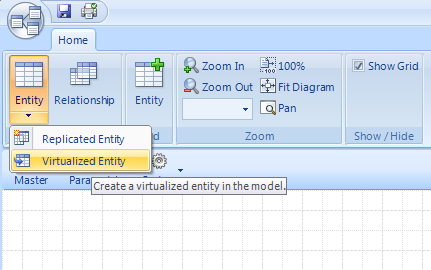
Take into account that this wizard can be also launched from the Process Wizard's step 2 (Model Data) when defining the process' data model.
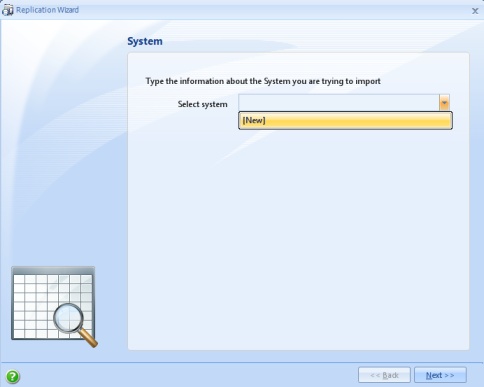
2. In the Replicate Entities Wizard window, define the information for the system where the external data source is.
This is done by selecting New from the "Select System" combobox.
Enter the detail for this new system: System Name, Display Name, and Description’’’. Click on Next.
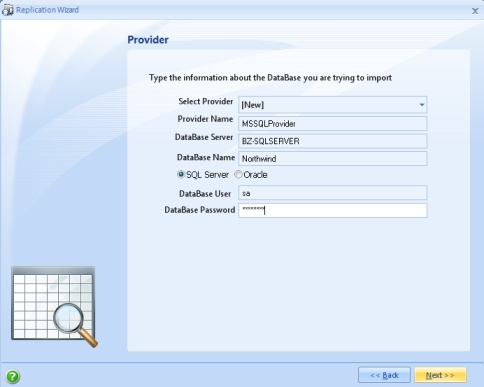
3. In the next window, enter the details for the data Provider.
If your external data source is in SQL Server, then the following information is required: Provider Name, DataBase Server, DataBase Name, DataBase User and DataBase Password.
If your external data source is in Oracle, then the following information is required: Provider Name, Net Service Name (which must be in the following format: server_name:port/instance_name), Schema and DataBase Password. The port is usually and by default '1521'.
Click on Next.
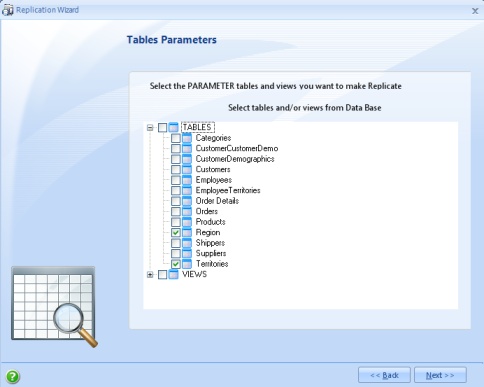
4. Replication can apply for tables or views.
Expand the TABLES node to display a list of tables on the external data source, and mark the table(s) to replicate.
Click on Next.
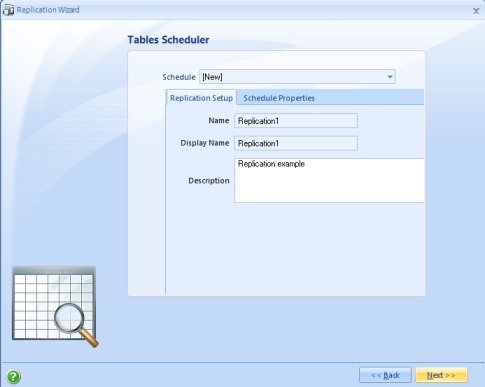
5. Next, type a Name, Display Name and Description for the replication.
Click onNext.
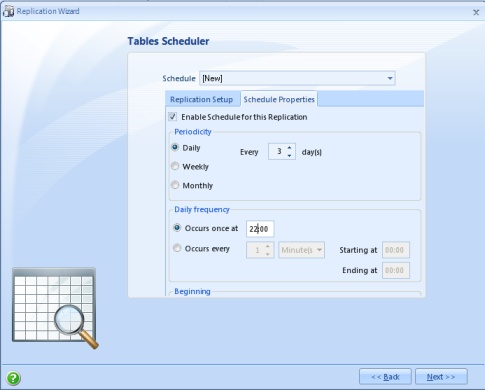
On the Schedule Properties tab, configure the frequency for which the information will be replicated from the data source (synchronized from the data source into Bizagi).
For this example, the replication will occur every three days at 10:00 pm starting on January 19, 2009.
Click on Next.
|
Alert: Take into account that the replication is not performed immediately. It will start at the day and time configured and it requires that the Scheduler service for the environment is started up and running. View information about the scheduler service and its management from Bizagi's Management Console. |
The following table describes the Scheduling options:
|
Enable Schedule for this replication: This option must be checked in order to execute the data replication from the external source to Bizagi. The frequency options also become available: Periodicity: Daily: Check this option when the replication will be executed every certain number of days. Every: When the Daily option is checked, enter the number of days between repetitions of the execution. The default value for this field is 1. Weekly: When checked, select the days of the week on which the replication schema will be executed. Monthly: Check this option to specify the monthly frequency and the day of the month for executing the schema. Daily Frequency: Occurs once at: Define the time of day for executing the replication schema. Occurs Every: Configure the repetition frequency and the lapse of time between each one expressed in minutes and hours. A start and end time can also be configured. Beginning: Start Date: Date on which the replication schema will begin. |
6. The configuration for the replication has now been completed. Click on Finish.
Verifying the Replication's Execution (Checkpoint)
You may verify that the replication configuration and schema has been set, by double-clicking again on Systems (or refreshing this view) in order to display the newly created system.
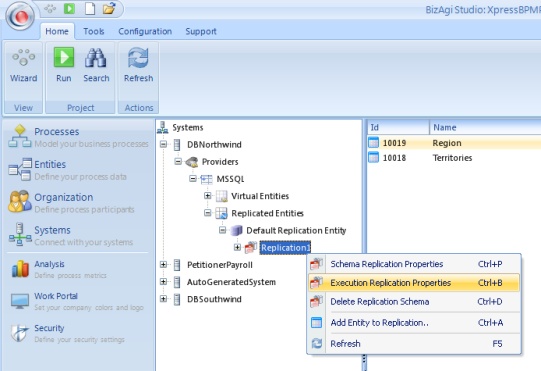
Expand the node elements under it, until the schema is presented (that one for the particular system, the "providers" node, the specific provider, the "replicated entities" node, and the "default replication class").
Select the Schema and click on Execution Replication Properties in the contextual menu.
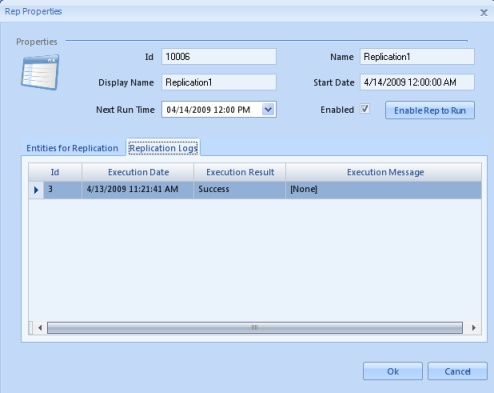
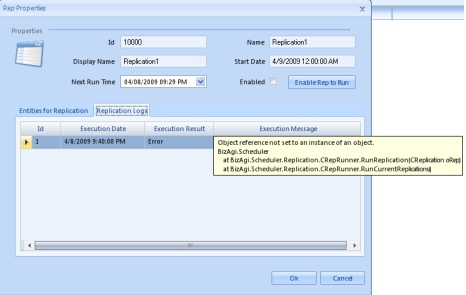
In this window select the Replication Logs tab to display the date and time of replication executions.
The result is also shown as Success or Error with the corresponding error message.
Once a successful replication is achieved, you may look for the replicated tables and their corresponding values for the parameter entities in Bizagi.
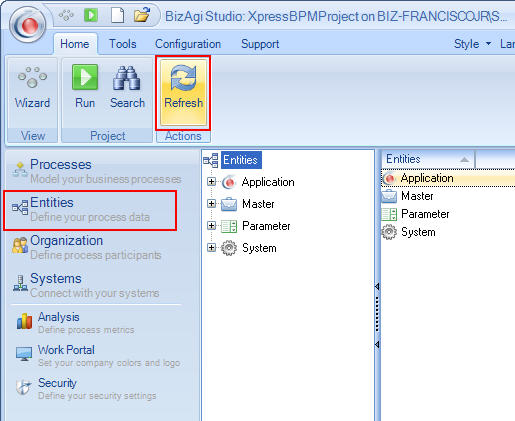
To do this, you may select the Entities menu item in the Modules View and locate the given parameter entities ("Territorries", "Region") under the "Parameter" classification.
Make sure you Refresh this view (by using the option from the contextual menu).
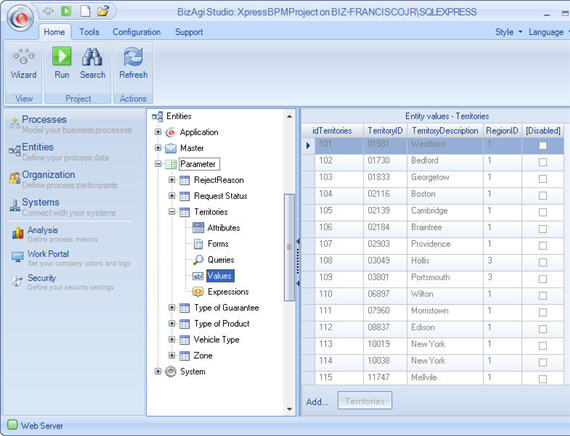
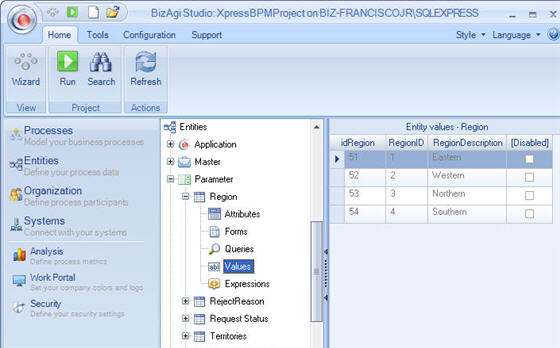
Under the parameter entities created, you may click on Values to query their records.
Bizagi’s work area will show the synchronized values.
Values for Territories from the external data source:
Values for Region from the external data source:
Virtual Entities Wizard
This section illustrates how to configure virtualization by means of the Virtual Entities Wizard.
In this example, the "Customers" and "Suppliers" tables of the Northwind database will be mapped. These tables will be represented as master entities in Bizagi.
1.
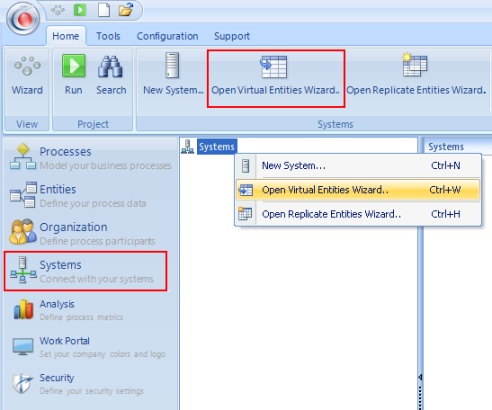
In Bizagi's Modules view, select the Systems menu item. Then click on the contextual menu the "Open Virtual Entities Wizard" option.
Take into account that this wizard can be also launched from the Process Wizard's step 2 (Model Data) when defining the process' data model.
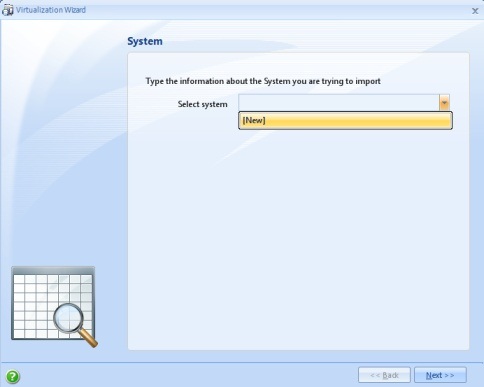
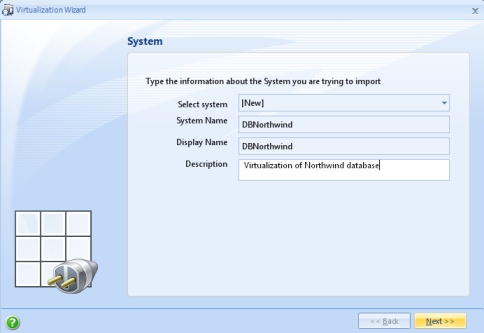
2. In the Virtual Entities Wizard window, define the information for the system where the external data source is.
This is done by selecting New from the "Select System" combobox.
Enter the detail for this new system: System Name, Display Name, and Description’’’. Click on Next.
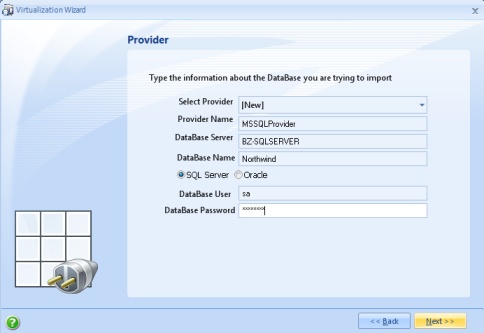
3. In the next window, enter the details for the data Provider.
If your external data source is in SQL Server, then the following information is required: Provider Name, DataBase Server, DataBase Name, DataBase User and DataBase Password.
If your external data source is in Oracle, then the following information is required: Provider Name, Net Service Name (which must be in the following format: server_name:port/instance_name), Schema and DataBase Password. The port is usually and by default '1521'.
Click on Next.
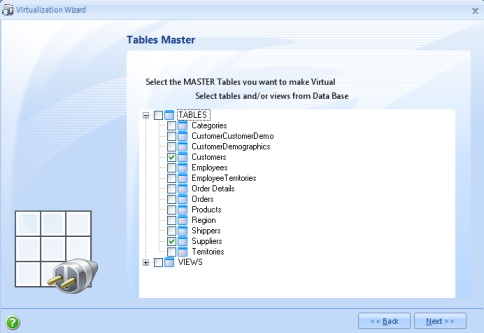
4. Virtualization can apply for tables or views.
Expand the TABLES node to display a list of tables on the external data source, and mark the table(s) to map (virtualize in Bizagi).
Click on Next.
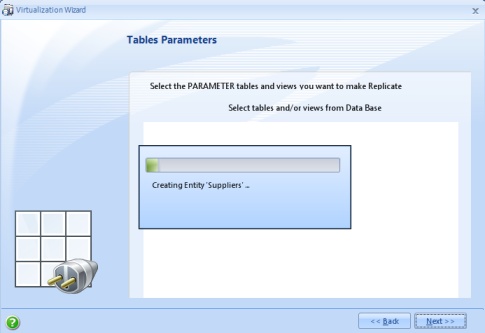
5. The configuration of the virtualization in Bizagi is executed automatically.
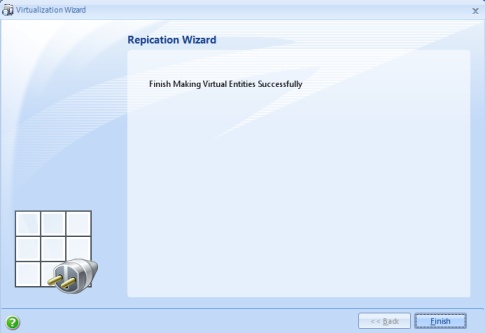
6. When the confirmation of the virtualization is shown, click Finish.
Verifying the Virtualization's Configuration (Checkpoint)
You may check that the virtualization was correctly configured and its values are updated "on demand".
This should be done only if the source table does not have a really large amount of records, otherwise this action will cause the entire table's values to be retrieved and it can take up few minutes).
To do this, you may select the Entities menu item in the Modules View and locate the given master entities ("Customers", "Suppliers") under the "Master" classification.
Make sure you Refresh this view (by using the option from the contextual menu).
For the master entities created, click on the Values option.
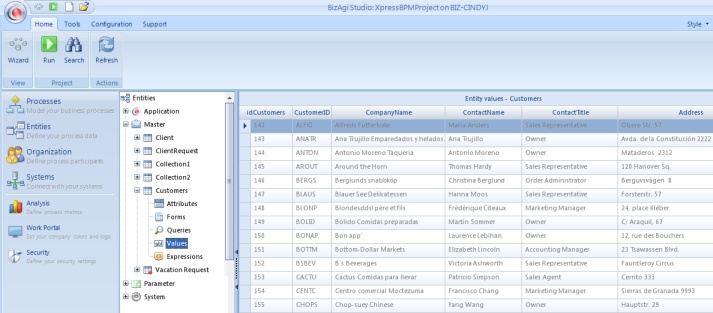
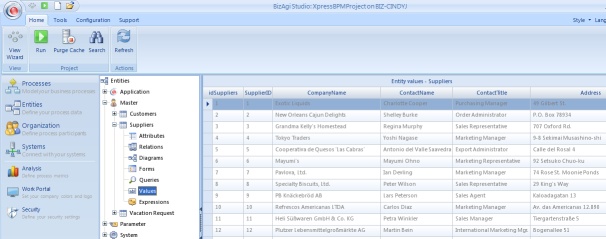
Bizagi’s work area will show the values found in the configured data source.
Values for Customers from the external data source:
Values for Suppliers from the external data source:
Using the Standard Method
Throughout the standard method for replication and virtualization, integration with external data sources running under any database engine is supported.
This means that this configuration can be done to replicate or virtualize tables in SQL Server, Oracle, or any other database engine.
Support for any other database engine, applies only for Bizagi Enterprise Editions.
Learn in these articles, how to replicate or virtualize external data sources in databases different from SQL Server or Oracle:
Standard Replication configuration
This section illustrates how to configure replication by means of the Standard Replication configuration.
In this example, we will replicate the "Territories", "Region" and "Shippers" tables of the "Southwind" database from Oracle.
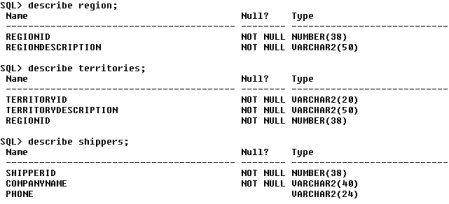
In order to configure replication with this standard method, ensure that you have already created the parameter entities and their attributes to store the incoming values from the external data source.
The entities created in Bizagi must have a similar data structure to those in the external data source (for example, the corresponding data types to store the columns' values in the external tables).
Region entity and attributes in Bizagi:
Territories entity and attributes in Bizagi:
Shippers entity and attributes in Bizagi:
Notice that throughout this approach, the parameter entities in Bizagi are not be automatically created. We will define the replication connection and details, and assign the external source information to Bizagi's data model (using already created parameter entities in Bizagi).
View how to create entities in the data model).
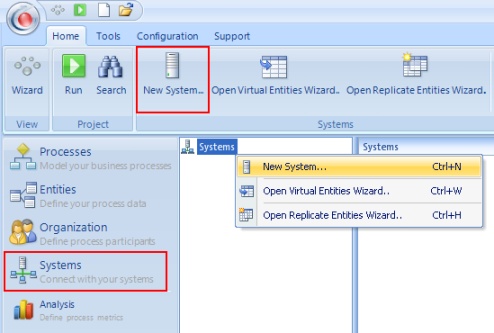
1. In Bizagi's Modules view, select the Systems menu item. Then right-click on the "Systems" node and select New System.
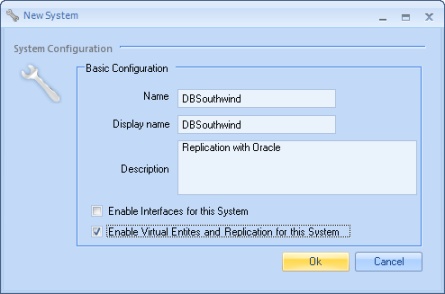
2. In the "New System" window, define the information for the system where the external data source is.
Enter the detail for this new system: Name, Display Name and Description.
Ensure you also check the Enable Virtual Entities and Replication for this System option.
Click on OK.
3. Once you have defined and created the new system in Bizagi, we will enter the details for the data Provider.
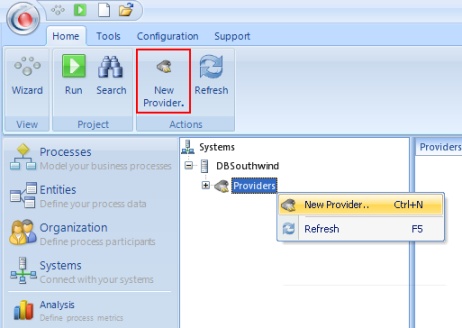
Right-click on the Providers node located under the newly created system, and select the New Provider option.
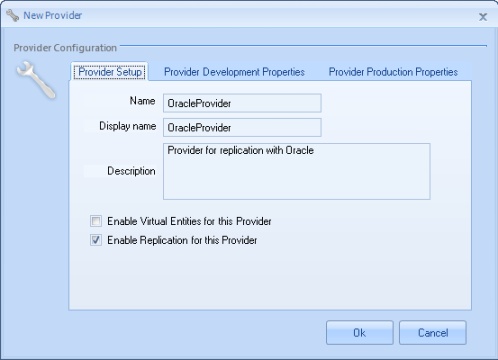
4. In the Provider Setup tab of the "New Provider" window, enter the detail for this new provider: Name, Display Name, Description.
Ensure you mark the Enable Replication for this Provider option.
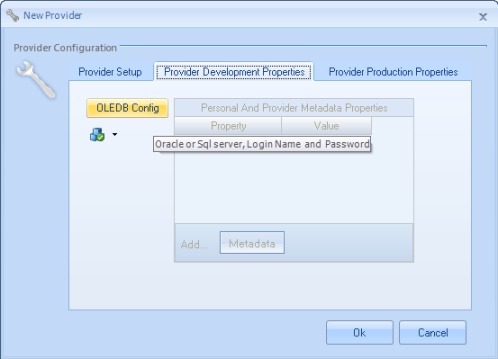
Then, in the Provider properties tab, click on the OLEDB Config button.
Notice that if your external data source is in SQL Server, then the following information is required: Provider Name, DataBase Server, DataBase Name, DataBase User and DataBase Password.
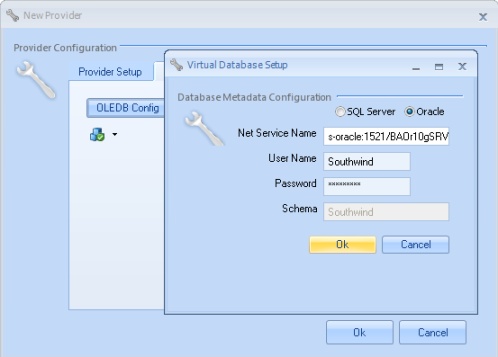
If your external data source is in Oracle, then the following information is required: Provider Name, Net Service Name (which must be in the following format: server_name:port/instance_name), Schema and DataBase Password. The port is usually and by default '1521'.
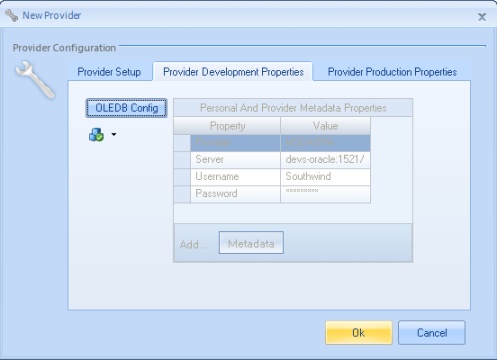
For this example, we illustrate the replication with an external data source in Oracle: in the "Database setup" window, we enter the Net Service Name, User Name and Password information.
Click on OK to save this connection configuration. Click again on OK in the New Provider window.
|
Alert: Take into account that you may define the properties and connection values for this integration for the different environments separately (Development, Test, Production). |
5. After the configuration for the provider is done, it is required to define the Replication entity class which will be used for the replication.
This step is done automatically by Bizagi in the Xpress edition, since Component library (custom assemblies registration) is not supported in this edition.
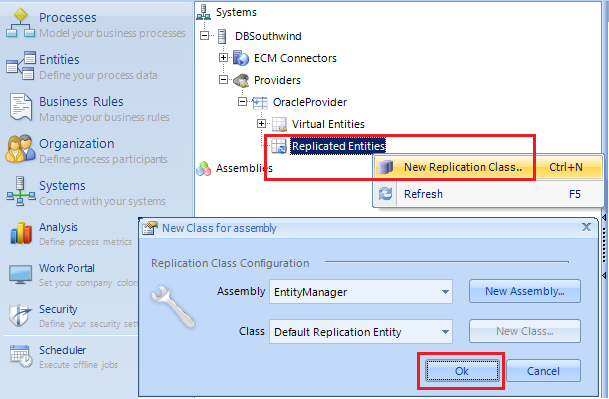
However, for the Enterprise edition and this example, we define the Replication entity class by right-clicking on the "Replicated Entities" node and selecting the "New Replication Class..." option.
Leave the defaults and click on OK.
6. A newly created Default Replication Entity node will appear under the Replicated Entities node.
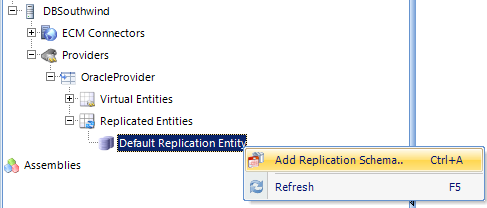
For this Default Replication Entity, right-click on it and select the Add Replication Schema option.
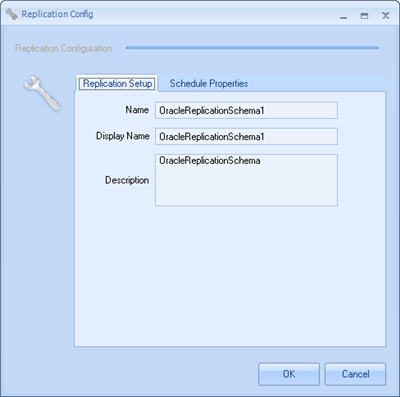
7. For the Replication Configuration window, type a Name, Display Name and Description for the replication schema.
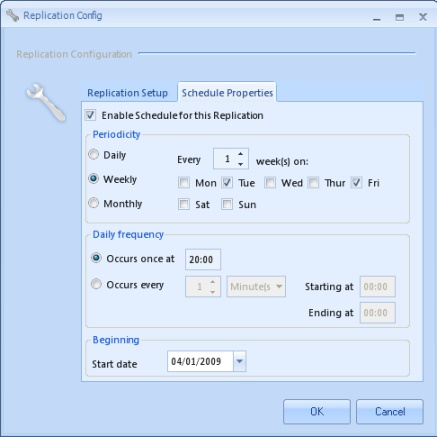
On the Schedule Properties tab, configure the frequency for which the information will be replicated from the data source (synchronized from the data source into Bizagi).
For this example, the replication will occur every week on Tuesday and Friday at 8:00 pm starting on April 1, 2009.
Click on OK.
|
Alert: Take into account that the replication is not performed immediately. It will start at the day and time configured and it requires that the Scheduler service for the environment is started up and running. View information about the scheduler service and its management from Bizagi's Management Console. |
The following table describes the Scheduling options:
|
Enable Schedule for this replication: This option must be checked in order to execute the data replication from the external source to Bizagi. The frequency options also become available: Periodicity: Daily: Check this option when the replication will be executed every certain number of days. Every: When the Daily option is checked, enter the number of days between repetitions of the execution. The default value for this field is 1. Weekly: When checked, select the days of the week on which the replication schema will be executed. Monthly: Check this option to specify the monthly frequency and the day of the month for executing the schema. Daily Frequency: Occurs once at: Define the time of day for executing the replication schema. Occurs Every: Configure the repetition frequency and the lapse of time between each one expressed in minutes and hours. A start and end time can also be configured. Beginning: Start Date: Date on which the replication schema will begin. |
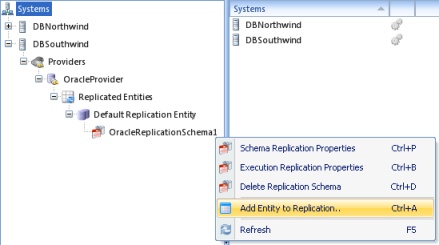
8. Right-click on the newly created schema node, and select the Add Entity to Replication option. Do this for each entity you wish to replicate.
In this example, we are replicating the parameter entities: Region, Branch and Shipper, and therefore illustrate their structure and configuration:
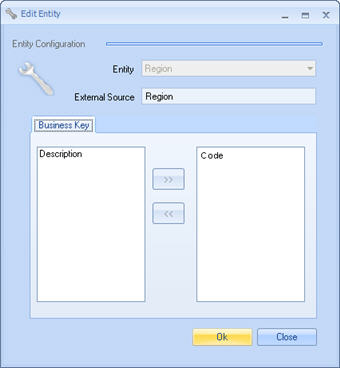
Region added to the replication configuration and schema:
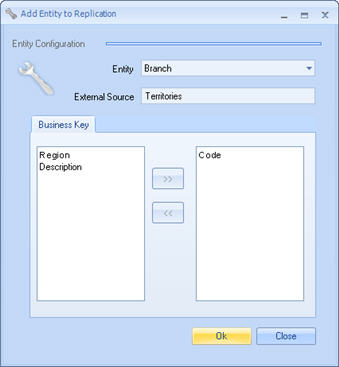
Territories added to the replication configuration and schema:
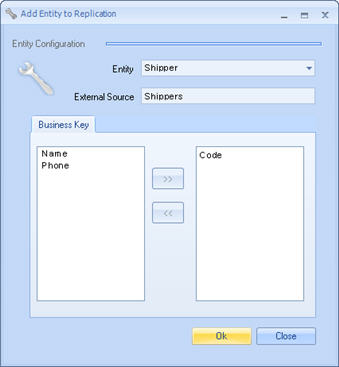
Shippers added to the replication configuration and schema:
Notice that in this step, you should type the name of the source table for the replication and define as well, which of the source's columns will be taken as business keys for the attributes in Bizagi's entity.
The business keys should correspond to the primary key of the source table.
9. Once this is done, you will be able to see the replicated entites listed under the Default Replication Entity.
By clicking on a specific entity (for our example, we need to do this for each of the 3 parameter entities), in Bizagi's work area you will be presented with this entities' current attributes and their matching "external source" column.
We configure this matching manually for each attribute by right-clicking on the attribute to be configured and choosing the Properties option.
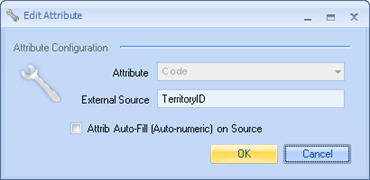
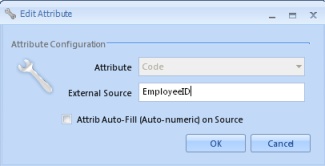
10. In the Edit Attribute window, enter the name of the column in the External Source that will corresponds to the attribute in Bizagi. This should be repeated for all attributes in each replicated entity.
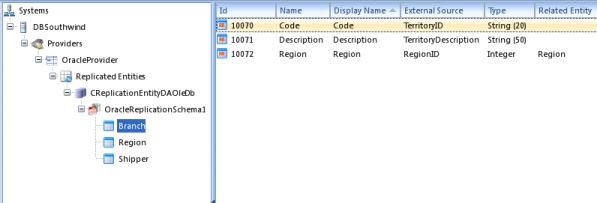
Configured attributes for Territories ("Branch" in Bizagi):
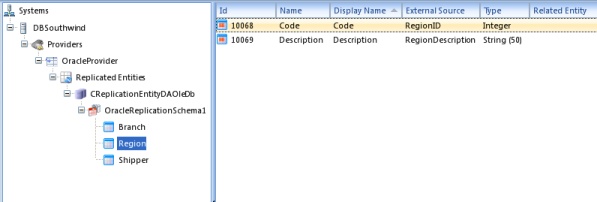
Configured attributes for Region:
Configured attributes for Shipper:
At this point, the standard replication configuration is set and we can check that the values for these parameter entities are updated after the scheduled synchronization.
Verification of the values' update can be done by selecting the Entities menu item in the Modules View and locating the given entity. Under that entity, clicking on the "Values" option will show in Bizagi's work area, the updated values in it.
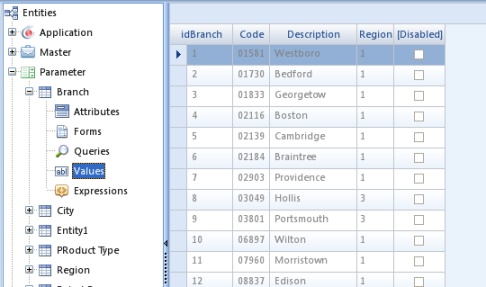
Values for Branch from the external data source:
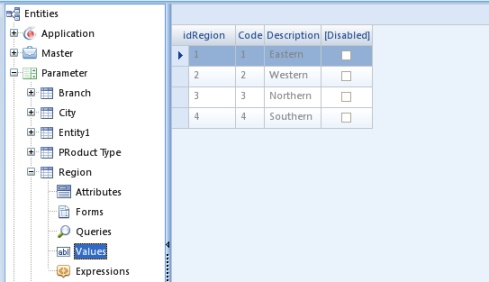
Values for Region from the external data source:
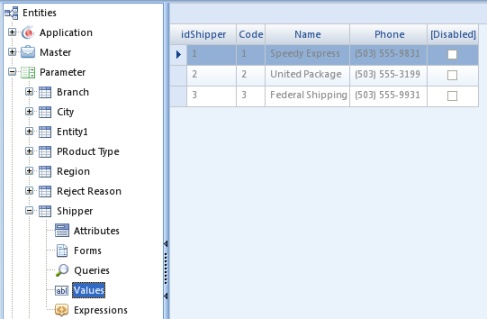
Values from Shipper from the external data source:
Standard Virtualization configuration
This section illustrates how to configure virtualization by means of the Standard Virtualization configuration.
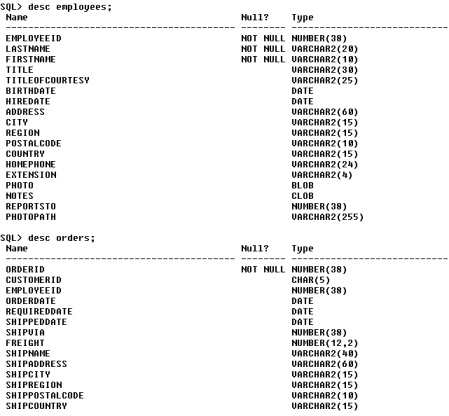
In this example, we will virtualize the "Employees" and "PurchaseOrder" tables of the "Southwind" database from Oracle.
In order to configure virtualization with this standard method, ensure that you have already created the master entities and their attributes to store the incoming values from the external data source.
The entities created in Bizagi must have a similar data structure to those in the external data source (that is, the corresponding data types to store the columns' values in the external tables).
Employees entity and attributes in Bizagi:
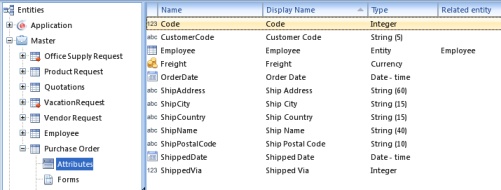
PurchaseOrder entity and attributes in Bizagi:
Notice that throughout this approach, the master entities in Bizagi are not be automatically created. We will define the virtualization connection and details, and assign the external source information to Bizagi's data model (using already created master entities in Bizagi).
View how to create entities in the data model).
1. For this example, we will part from using a system and provider which are already configured in Bizagi (set as shown in the section above for [[How_to_Integrate_Bizagi_with_an_External_Data_Source#Standard_Replication_configurationStandard replication configuration]]).
Right-click on the specific provider and select the Properties option.
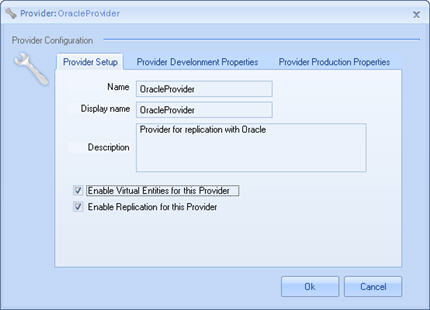
2. In the Provider configuration window, ensure that the Enable Virtual Entities for this Provider checkbox is marked.
Click on OK.
3. With the provider properly configured and enabled for virtualization, we now proceed to define the Virtualization entity class used for our virtualization.
This step is done automatically by Bizagi in the Xpress edition, since Component library (custom assemblies registration) is not supported in this edition.
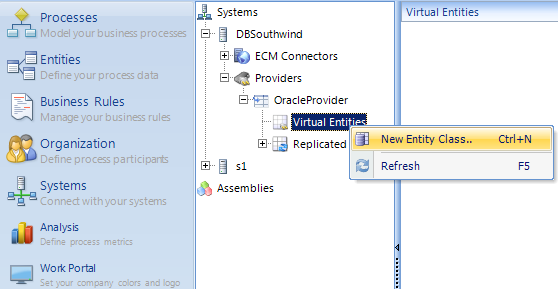
However, for the Enterprise edition and this example, we define the Virtualization entity class by right-clicking on the "Virtual Entities" node and select the "New Virtualization Class..." option.
Leave the defaults and click on OK.
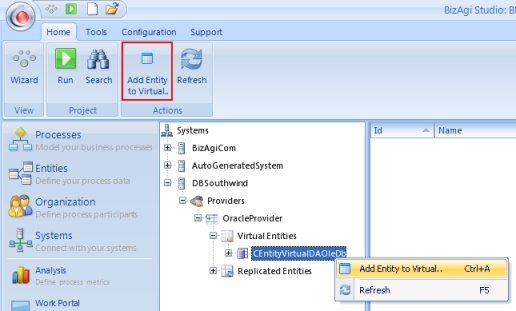
4. Right-click on the newly created Default Virtual Entity node, and select the Add Entity to Virtual option.
Do this for each virtual entity.
In this example, we are virtualizing the master entities: Employees and PurchaseOrder, and therefore illustrate their structure and configuration:
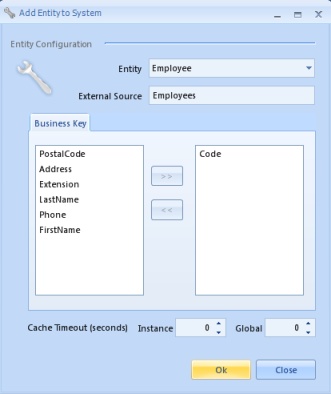
Employees mapped for virtualization:
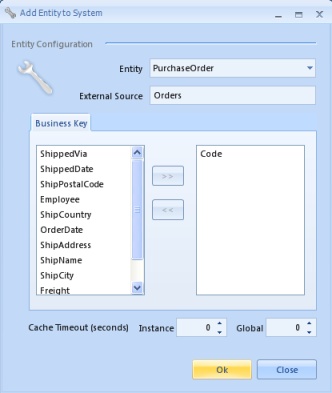
PurchaseOrder mapped for virtualization:
Notice that in this step, you should type the name of the source table for the virtualization and define as well, which of the source's columns will be taken as business keys for the attributes in Bizagi's entity.
The business keys should correspond to the primary key of the source table.
The following table describes the options presented for this mapping:
|
Entity: Entity to be virtualized. External Source: Enter the name of the object to be virtualized (table, view). Business Key: Using the >> symbol, select the attribute or attributes that make up the key for the object to be virtualized in the external data source. Cache Timeout (seconds) Instance: Quantity, set in seconds, indicating the time before values are synchronized with the data source for an entity record. Cache Timeout (seconds) Global: Quantity, set in seconds, indicating the time that Bizagi will wait to synchronize the data of the entire virtualized entity. |
5. Once this is done, you will be able to see the virtual entites listed under the Default Virtual Entity.
By clicking on a specific entity (for our example, we need to do this for each of the 2 master entities), in Bizagi's work area you will be presented with this entities' current attributes and their matching "external source" column.
We configure this mapping manually for each attribute by right-clicking on the attribute to be configured and choosing the Properties option.
6. In the Edit Attribute window, enter the name of the column in the External Source that will corresponds to the attribute in Bizagi. This should be repeated for all attributes in each replicated entity.
Configured attributes for Employees:
Configured attributes for PurchaseOrder:
At this point, the standard virtualization configuration is set and we can check that the values for these master entities are updated "on demand".
Verification of the values' update can be done by selecting the Entities menu item in the Modules View and locating the given entity. Under that entity, clicking on the "Values" option will show in Bizagi's work area, the updated values in it.
Take into account that use of this feature to retrieve the data from the external data source may take a while if your source table has a large amount of records.
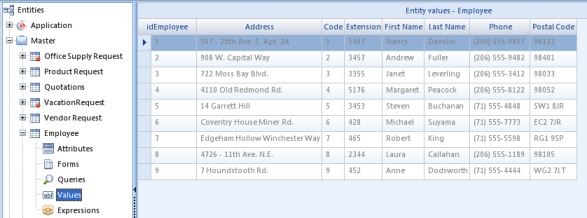
Values for Employees from the external data source:
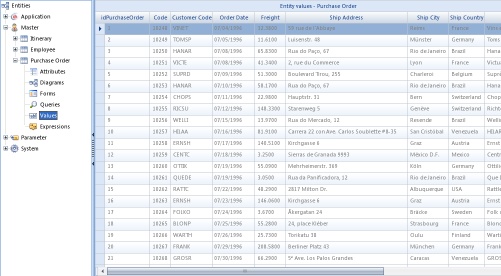
Values for PurchaseOrder from the external data source:
Advanced Options for Replication and Virtualization
Test Provider (requires IIS)
To verify that the provider was properly configured and that the connection is Ok, the provider can be tested from Bizagi Studio.
This test can be done before proceeding to configure the replicated or virtual entities, and it will diagnose if the connection to the external source cannot be stablished.
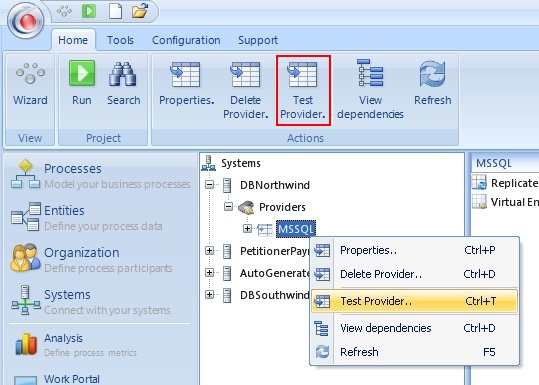
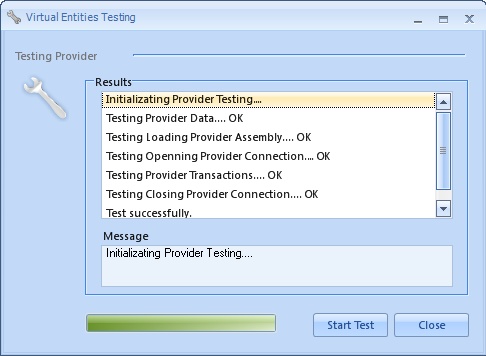
To do this, select the provider and right-click to choose the Test Provider option (or click the button in the contextual menu as shown).
In the opened window, select the Start Test button. A provider properly configured, will show all the operations with an OK result status.
|
Alert: The "Test provider" feature requires that the IIS (Internet Information Services) is used as the web server for the Bizagi project. The IIS should be up and running (IIS Installation), and the project's web application folder should have security settings that allow anonymous authentication. |
Failed provider test message triggered when the IIS the conditions alerted above are not met: "The web application is not available...".
Test Virtual Entity
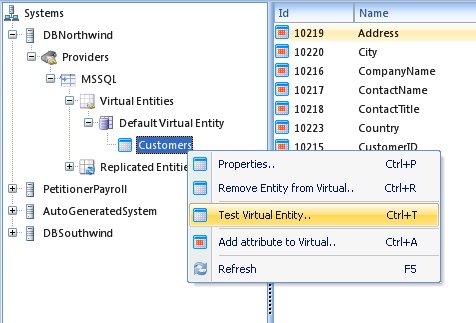
To verify that a virtual entity was properly configured and that the permissions in the external source are met (to read from and write into the source), each virtual entity can be tested from Bizagi Studio.
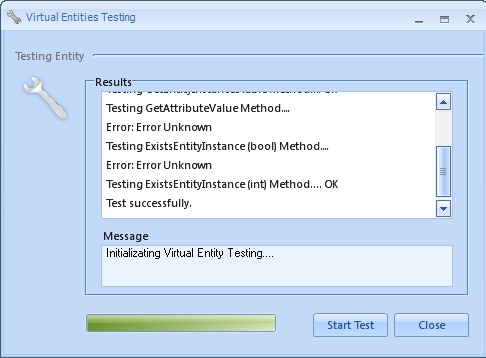
To do this, click on the given virtual entity and choose the "Test Virtual Entity" option.
In the opened window, select the Start Test button. A virtual entity properly configured, will show all the operations with an OK result status (the final result should be Test sucessfully).
Remove entities from the replication or virtualization integration
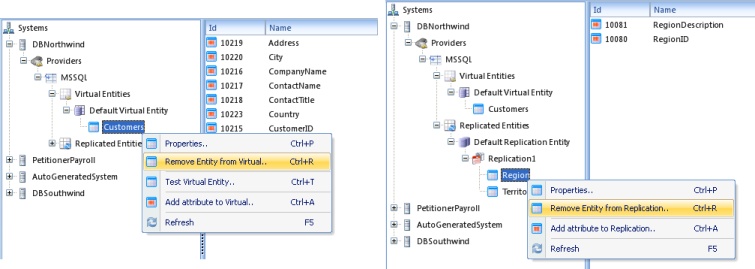
Virtual and replicated entities have an option to stop the virtualization and replication of these entities.
This remove option does not delete the entity from the data model. It only "un-selects" those entities for the virtualization and replication features and integration.
Once an entity is Remove from Virtual or Remove from Replication it still can be used, and the values of that entity used up until that moment would remain the same.
Remove attributes for replication of an entity
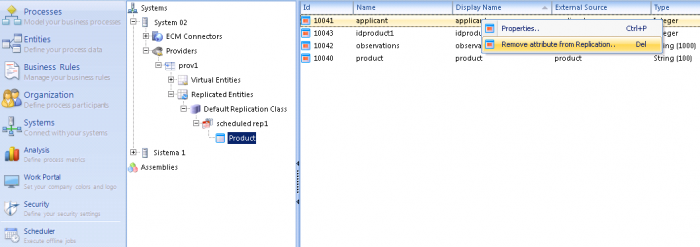
Replicated entities present an option to remove attributes from the replication schema (usually automatically included by the replication wizard method).
The removed attribute would still exist in the entity and can be used in the process, but it would no longer be synchronized with the external data source.
This option is useful to ensure that the data we are replicating and synchronizing in the replication schema, is the proper and necessary information (and unnecessary information is not updated), in order to keep up good performance in data-level integrations.
It is also useful for columns that are references to other external tables which we are not using in Bizagi.
An additional advantage, is that once a parameter entity has an attribute which is not included in the replication schema, then the entity will appear as manageable from the work portal menu (from the web application's entity administration), having off course only those removed attributes' values as editable.
Remove attributes for virtualization of an entity
Virtual entities present an option to remove attributes from the virtualization configuration (usually automatically included by the wizard method).
The un-virtual attribute would still exist in the entity and can be used in the process, but it would no longer be synchronized with the external data source.
This option is useful to ensure that the data we are mapping and synchronizing in runtime constitutes the proper and necessary information (and unnecessary information is not updated) to keep up good performance in virtualization integration.
It is also useful for columns that are references to other external tables we are not using in the integration.
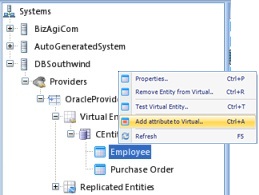
Adding attributes for virtualization of an entity
Virtual entities present an option to include additional attributes for the virtualization configuration (usually when the table's structure in the external data source has been changed after the virtualization is set or already working).
The new virtual attribute would still need to be mapped to the external source column as described in the above standard virtualization configuration section in step 5 and later.
Adding attributes to the virtualization of an already virtual entity, requires that we create first for that master entity, the attribute in Bizagi which will store the incoming value.
How do I access virtual entities information?
Once virtualization is properly configured and tested for your project, your Bizagi processes will be able to update the information to and from these entities "on-demand".
This means that whenever a new record is added, or an existing one is searched for in those virtual entities, Bizagi will query in the data source and update the information when necessary.
All this will be "transparent" to users, and whether or not entities are virtual, they would be handled in the same way by Bizagi.
In order to search for existing records, you may use the EntityManager class in your expressions or the join search dialog in your forms. For new records, you may add them in a collection in your forms (a grid), or again use the join search dialog with its "Allow New" property.
View further information and an example about the join search dialog.
View further information about the EntityManager class methods to query an entity.
|
Alert: If you have replicated or virtual entities against an instance of SQL Server which is not configured to start in its default port (1433), then you need to configure the "SQLServerDBPort" property for the data provider. |
Providers in Production
To guarantee the correct performance of all environments and once a project has been deployed, it will not be possible to delete providers used by a process version already working in the Production environment.
Management of these providers' values in the Test or Production environment will be done directly with the Management Console in each project's environment separately.
Enterprise JEE consideration
To configure virtualization or replication in a Test or Production environment using a JEE Application server (applies for Bizagi Enterprise JEE edition), an additional step is needed so that the external data source is configured at the Application server's level.
To carry out this step, ensure that your JEE Application server is already configured to work with Bizagi.
Take into account that this step is only needed in an environment different than the Development environment (in which case, Bizagi Studio automatically configures the JBoss 7.1.1 Application server's data source).
View How to configure virtualization and replication in a JEE Application server.
Related Articles
- Bizagi's Management Console information for adminstration options in a running environment.
- Virtualization of related entities example
- Replication for data sources different from MSSQL and Oracle
- Virtualization for data sources different from MSSQL and Oracle
- How virtualization works, its benefits and guidelines.
- Data Type Support for replication and virtualization.
- Virtualization restrictions.
- Guide and how-to for integration by means of web services.
<comments />
