File Type Attributes
From Business Process Management, BPM and Workflow Automation Wiki | BizAgi BPMS
<keywords content="keywords">Document, documents, file, files, format, formats, upload, uploading</keywords>
Contents |
File Type Attributes
Bizagi allows to easily upload files such as word processor files, data from spreadsheets, audio and video files to a process. These files will be associated directly to a specific business case. Users can access and edit them during the execution of the process and track the files at any time.
In addition, Bizagi has the possibility to show documents generated automatically with process data (Letters), based on predefined templates in Bizagi Studio.
Since files are part of the case, they must also belong to the business data model that supports the entire application. For this reason in order to attach files to a case, a File type attribute must be created in Bizagi's data model.
It is importat to remember that in a single attribute many files can be uploaded, and they can contain more information regarding each document, such as Date of Receipt, Date of Revision, whether it has been approved or not, whether it is required, etc.
The Files configuration applies for the entire application and is made in the Configuration Tab in Bizagi Studio´s Standard Menu -> Options -> Advanced-> Options Uploads.
By default the maximum size of an uploaded file is 1 MB. But it really depends on server capabilities (memory and disk space) of the network where the file is uploaded and business needs. It is recommended to have a maximum size of 10 MB, but this can vary depending on specific needs. To change this configuration use the Advance tab of Environment Configuration.
Bizagi also offers the possibility to display documents generated automatically with data from the process based on templates predefined in Bizagi Studio. For further information about creating documents please go to Letters
Add and Configure a File Attribute In Bizagi
In order to add a File Attribute to a Form, the first step is to create a File Attribute in the Data Model.
|
Example: For a process in which the user can report and manage errors and bugs, the users may need the file that contains the error screens displayed in the error registration activity. |
The attributes that represent attached files must be created as “File” type. This type of data allows the user to attach one or several files and associate them directly to the case, depending on the location of the attribute.
To show this attribute in the activity forms, drag and drop the “Upload” Control Type. In the User Portal, this control will be represented in with the icon![]() . Once the control is added to the form, the user can configure its properties.
. Once the control is added to the form, the user can configure its properties.
Attachment Properties
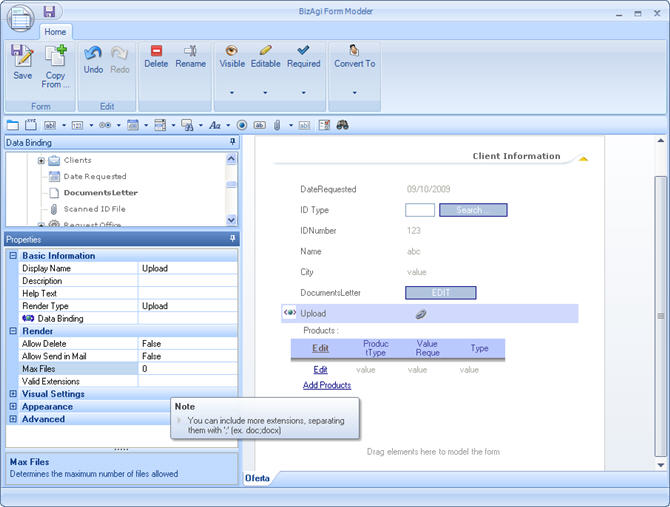
Bizagi allows the user to configure the several properties for each of the attached files within a process. The properties of the Upload control allow the adminisrator to define, among other things, whether the file uploaded can be deleted, or what should be the maximum size of each uploaded file.
![]() Delete Attachment: If this property is enabled in the form where the FILE attribute was related, the user will see a Link to delete it next to each of the attachments. To delete the file, click on the link and confirm the fact that the file is going to be deleted in the confirmation window that pops up.
Delete Attachment: If this property is enabled in the form where the FILE attribute was related, the user will see a Link to delete it next to each of the attachments. To delete the file, click on the link and confirm the fact that the file is going to be deleted in the confirmation window that pops up.
![]() Limit Number of Attachments in an Attribute or Icon: If you select this property, once the number of files allowed has been attached to the process, the icon to attach documents will disappear.
Limit Number of Attachments in an Attribute or Icon: If you select this property, once the number of files allowed has been attached to the process, the icon to attach documents will disappear.
![]() Send Files by Mail: This property will allow you to send the attachments using the mail server that has been predetermined for Bizagi. You can access this property in the web application by clicking on the icon
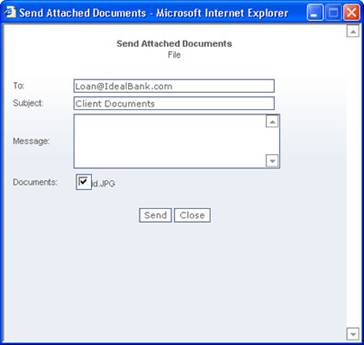
Send Files by Mail: This property will allow you to send the attachments using the mail server that has been predetermined for Bizagi. You can access this property in the web application by clicking on the icon ![]() . When you do so, the following window will pop up, where you will enter the addressees, subject and body of the message and the documents you would like to send by mail.
. When you do so, the following window will pop up, where you will enter the addressees, subject and body of the message and the documents you would like to send by mail.
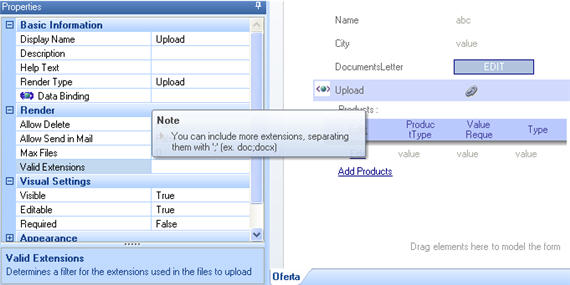
![]() Valid Extensions: It is also possible to restrict the types of files that can be attached to each one of those attributes. This is done by including the extensions of the allowed files in the field “valid extensions” found in the ‘Render’ tab. The possible extensions for the files to be attached should be indicated in this field, separated by semi-colons (;), as seen below.
Valid Extensions: It is also possible to restrict the types of files that can be attached to each one of those attributes. This is done by including the extensions of the allowed files in the field “valid extensions” found in the ‘Render’ tab. The possible extensions for the files to be attached should be indicated in this field, separated by semi-colons (;), as seen below.
|
Note:: extensions must be separated by a semi-colon with no spaces in between. |
How to Attach a Document in the User Portal
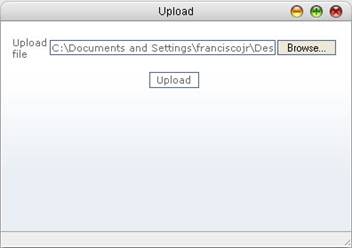
To attach a document to in the User Portal, click on the icon ![]() and, on the screen that pops up, select the file to be attached to the application and click on the Upload” button.
and, on the screen that pops up, select the file to be attached to the application and click on the Upload” button.
It is possible to configure the programs to open attached documents in the users portal:
The default programs are the following:
XLS, application/ms-excel;
DOC,application/msword;
JPG,image/jpeg;
GIF,image/gif;
PDF,application/pdf;
ZIP,application/x-zip-compressed;
RTF,application/msword;
How to modify the Default Programs for Attached Files
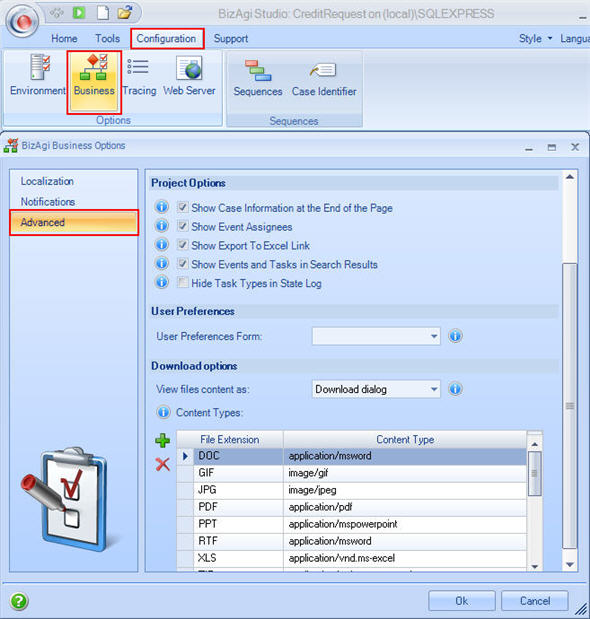
Sometimes, the user has specific programs that he wants to use in order to work with a paticular file type. To modify the default configuration in Bizagi for the Default Programs associated to the most common type files, follow these steps:
1. In Bizagi Studio, select the Configuration Tab and open the Business Option.
Select the advanced option at the left of the new displayed window.
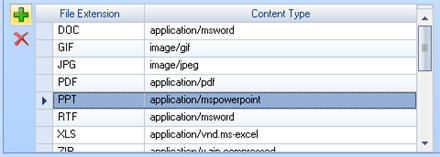
2. On the Configuration screen, on the bottom, the content types for each one of the extensions will be displayed with the respective program for executing it. To edit one, just click on its file extension or Content Type and retype. To delete one, select the content type and click on the X on the left to erase it.
To add a new one, click on the PLUS sign on the left. On the new line, enter the extension and the program.
Where Attachments are Saved
When a document is attached to a case, it is saved in one of the folders created by Bizagi to organize the documents that belong to each case. These folders are created by default in the docs directory that can be found in the folder of the web application server, whose path by default would be:
C:\Bizagi\Xpress\Projects\ApplicationName\WebApplication\Docs
AplicationName: Name of the Web application
How to change the path for saving documents
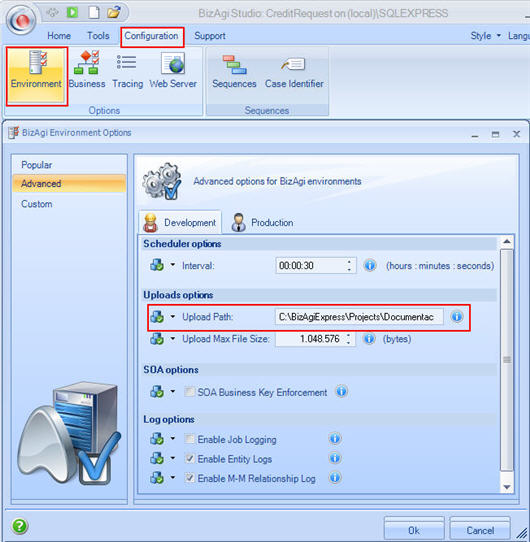
1. On the Bizagi Main Menu, select the Configuration Tab and open the Environment Option.
Select the advanced option at the left of the new displayed window.
2. Go to the ‘Uploads Options’ menu. Type the route for the physical directory where you wish to save the documents. Keep in mind that the route shown is the route defined at the time of installation, which by default is: C:\Bizagi\Xpress\Projects\ApplicationName\WebApplication\Docs
|
Note: Before the first deployment the configuration for ALL environments is performed in development in Bizagi Studio. The first deployment will take the configuration to each environment. Henceforth changes to Environment Configuration are local to the production environment from the Management Console. If you want those changes to be permanent, and become part of the process design, please make them on the development environment as well. |
Recommended data handling
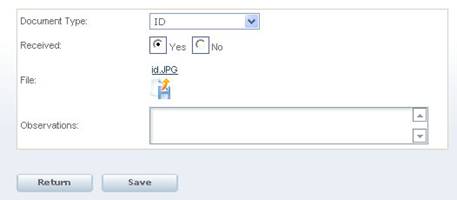
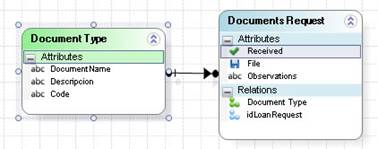
When there are different types of documents that need to be associated to a process, a recommended way to save additional information regarding the document is to create a Master Entity with the documents and attributes related to the documents, such as Date of Delivery, Approved, observations, etc. (see images below)
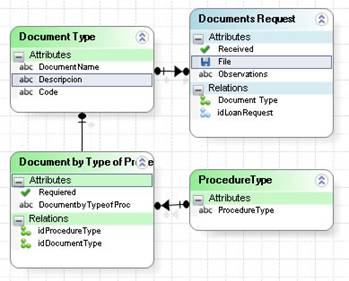
If the documents must be parameterized according to a type of process, create a parametric entity to relate the Document Type entity with Process Type entity as illustrated below.
How to relate files that were previously stored in a server?
In some cases, the user may want to reference from Bizagi existing files in a different server. i.e. the user does not want to use the File Type Attributes, and duplicate the files that he/she has already stored and organized in an external server in the same network, and that is accessible from the Bizagi User Portal.. In this case, it is recommended to follow these steps:
1. Create a String type Attribute and associate it to the form where the files of the external server are going to be referenced.
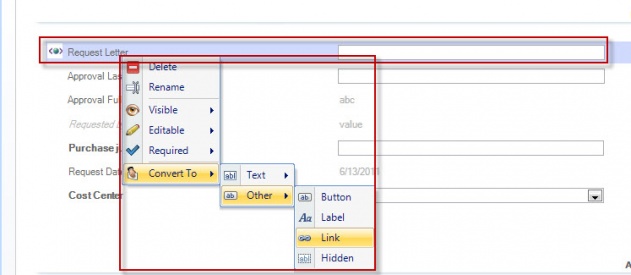
2. In the form desgin view, trasform the String type Attribute to a Link by doing right click as shown in the following image.
After the transformation, the text type render is now a link:
3. In an expression that is associated to an activity (as an event On Enter, On Save or On Exit) assign the file path to the attribute that was transformed into a link in the previous step. The sentence to assign the path is:
Me.setXPath("XpathAtribute","file://ServerName/FolderNames/FileName.Extension");
For example, if the file is located in the path //Server1/Docs/Test.txt, the assignation would be done this way:
Me.setXPath("PurchaseRequest.RequestFile","file://Server1/Docs/Test.txt");
In the User Portal, the file would be associated through a link as shown in the next image.
Related Articles
<comments />
